Technique PDF7:Performing OCR on a scanned PDF document to provide actual text
About this Technique
This technique relates to:
- 1.4.5 Images of Text (Sufficient)
- 1.4.9 Images of Text (No Exception) (Sufficient)
This technique applies to scanned PDF documents.
Techniques are examples of ways to meet Web Content Accessibility Guidelines (WCAG). They are not required to meet WCAG. Content can satisfy the normative requirements of WCAG even if it does not use any of the documented techniques. See About WCAG Techniques.
Description
The intent of this technique is to ensure that visually rendered text is presented in such a manner that it can be perceived without its visual presentation interfering with its readability.
A document that consists of scanned images of text is inherently inaccessible because the content of the document is images, not searchable text. Assistive technologies cannot read or extract the words; users cannot select, edit, resize, or reflow text nor can they change text and background colors; and authors cannot manipulate the PDF for accessibility.
For these reasons, authors should use actual text rather than images of text, using an authoring tool such as Microsoft Word or Oracle Open Office to author and convert content to PDF.
If authors do not have access to the source file and authoring tool, scanned images of text can be converted to PDF using optical character recognition (OCR). Adobe Acrobat Pro can then be used to create accessible text.
Examples
Example 1: Generating actual text rather than images of text using Adobe Acrobat Pro
This example is shown with Adobe Acrobat Pro. There are other software tools that perform similar functions.
This example uses a simple one-page scanned image of text. To ensure that actual text is stored in the document, perform the following steps:
- Select Tools → Scan & OCR.
- In the Scan & OCR toolbar, select Insert and then either From File or From Scanner.
- Depending on the resolution and how clear the text was, OCR converts images of words and characters to actual text. Text that Acrobat Pro does not recognize is listed as an "OCR suspect", or text element that Acrobat suspects was not recognized correctly.
- To fix the suspects, in the Scan & OCR toolbar, choose Recognize Text → Correct Recognized Text. Acrobat Pro presents each suspect one at a time, which can then be corrected.
- Using the Accessibility Tags panel, add tags to the document.
- Test for accessibility: Accessibility Tool → Accessibility Check.
The following image shows a scanned one-page document in Adobe Acrobat Pro.
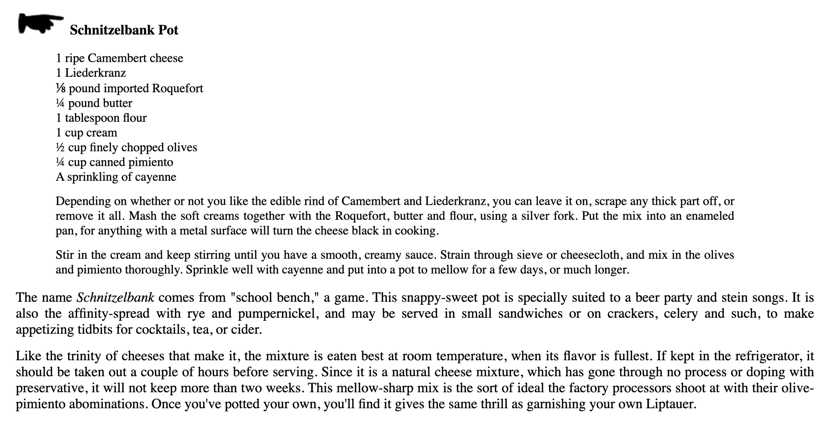
The next image shows the converted content after adding tags to the document. It will be necessary to use the Reading Order tool and the Tags panel to tag the content properly. The Reading Order tool was used in this example to hide the image of the hand as decorative image / artifact (see PDF4). The recipe title was tagged as a first level header.

Note: Acrobat Pro may automatically add tags when the file is run through OCR.
This example is shown in operation in the working example of generating actual text and the result of tagging text created with OCR.
Related Resources
No endorsement implied.
Tests
Procedure
-
For each page converted to text using OCR, ensure that the resulting PDF has been converted correctly, using one of the following ways:
- Read the PDF document with a screen reader or a tool that reads aloud, listening to hear that all text is read correctly and in the correct reading order.
- Save the document as text and check that the converted text is complete and in the correct reading order.
- Use a tool that is capable of showing the converted content to open the PDF document and verify that all text was converted and is in the correct reading order.
- Use a tool that exposes the document through the accessibility API and verify that all text was converted and is in the correct reading order.
Expected Results
- #1 is true.