This Web page lists Flash Techniques from Techniques for WCAG 2.0: Techniques and Failures for Web Content Accessibility Guidelines 2.0. Technology-specific techniques do not replace the general techniques: content developers should consider both general techniques and technology-specific techniques as they work toward conformance.
Publication of techniques for a specific technology does not imply that the technology can be used in all situations to create content that meets WCAG 2.0 success criteria and conformance requirements. Developers need to be aware of the limitations of specific technologies and provide content in a way that is accessible to people with disabilities.
For information about the techniques, see Introduction to Techniques for WCAG 2.0. For a list of techniques for other technologies, see the Table of Contents.
Adobe Flash Player is a cross-platform browser plug-in. Authors creating content for display by the Flash Player may choose to do so for a variety of factors, including video support, authoring preference, vector-based graphics capabilities, or to take advantage of available components. The motivation of the author notwithstanding, it is equally important to ensure that content playing in the Flash Player meets the accessibility criteria in WCAG 2.0 as it is for other web content.
The Flash Player provides a combination of built-in support for accessibility and capabilities that authors and authoring tools can take advantage of in order to enable support for accessible content. Flash authors may use any of a few tools for authoring accessible Flash content, including but not limited to:
Flash MX, MX2004, 8, CS3, CS4, CS5
Flex 1.5 and newer
Flex Builder 2, Flex Builder 3, Flash Builder 4
Flash Catalyst 4
Other tools, including Adobe Presenter and Adobe Captivate
For blind, low-vision, and other assistive technology users the Flash Player introduced support for an accessibility API in 2001 with Flash Player 6. Flash accessibility support for assistive technology relies on the Microsoft Active Accessibility (MSAA) interface and a Flash Player-specific interface to properly convey information about Flash content for assistive technologies. Support for assistive technologies is provided for users viewing content using combinations of:
Microsoft Internet Explorer 6 or later, in combination with Flash Player 6 or newer on Windows.
Mozilla Firefox 3 or later, in combination with Flash Player 9 or later on Windows.
Assistive technology support for MSAA is provided in several assistive technologies, including but not limited to:
JAWS (4.5 and newer)
Window-Eyes (4.2 and newer)
NVDA
ZoomText (8 and newer)
Flash Player also supports keyboard access for users who are unable to use a mouse. Keyboard support is best within the ActiveX version of the player used in Internet Explorer, but techniques to provide support within Mozilla Firefox are also available. Flash authors can control the tab order of content within published Flash content, as is demonstrated in the WCAG 2.0 techniques for Flash.
Flash Player is often used to display video, and it provides support for text tracks which can be used to provide closed captions or subtitles in any language, and it also supports multiple tracks of audio, thereby enabling support for video description, and it supports multiple video tracks, enabling the delivery of sign language interpretation for audio-visual content.
The Flash Player does not currently support high-contrast mode or text resizing via the Windows operating system. However, Flash authors may take advantage of Flash's support for Cascading Stylesheets (CSS), other built-in style support, or Flash's display filter features to offer alternative views of a Flash-based interface with larger text, alternative fonts, or alternative or high-contrast color schemes.
Flash accessibility support for assistive technology relies on use in Windows operating systems, using Internet Explorer 6 or later (with Flash Player 6 or later) or Mozilla Firefox 3 or later (with Flash Player 9 or later).
For additional general information about the Flash Player, visit the Flash Player FAQ.
2.4.2 Page Titled - In order to meet 2.4.2, Flash content must be embedded within an HTML page that has a page title in the HTML title element. See H25: Providing a title using the title element (HTML) .
3.1.1 Language of Page - The language of Flash content is established by the lang attribute of the containing object element in HTML, not within the Flash SWF file itself. Authors may include more than one Flash SWF in a single web page, each with a different language indicated in the object element's lang attribute. See FLASH13: Using HTML language attributes to specify language in Flash content.
3.1.2 Language of Parts - Since the language of Flash content is not established within the Flash SWF file, it is not currently possible to indicate changes of language within a single SWF file.
Adobe Flash Professional version MX and higher
Adobe Flex
This technique relates to:
See User Agent Support Notes for FLASH1. Also see Flash Technology Notes.
The objective of this technique is to show how non-text objects in Flash can be marked so that they can be read by assistive technology.
The Flash Player supports text alternatives to non-text objects using the name property in the accessibility object, which can be defined in ActionScript or within Flash authoring tools.
When an object contains words that are important to understanding the content, the name property should include those words. This will allow the name property to play the same function on the page as the object. Note that it does not necessarily describe the visual characteristics of the object itself but must convey the same meaning as the object.
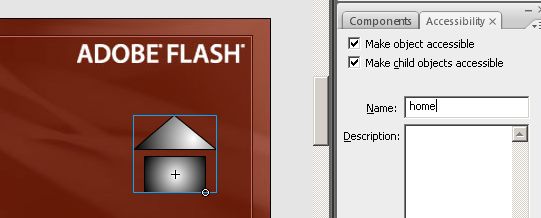
The Flash Professional authoring tool's Accessibility panel lets authors provide accessibility information to assistive technology and set accessibility options for individual Flash objects or entire Flash applications.
For a text alternative to be applied to a non-text object, it must be saved as a symbol in the movie's library. Note: Flash does not support text alternatives for graphic symbols. Instead, the graphic must be converted to or stored in a movie clip or button symbol.
Bring up the Accessibility panel by selecting "Window > Other Panels > Accessibility" in the application menu, or through the shortcut ALT + F11. Ensure that the 'Make object accessible' checkbox is checked.
Select the non-text instance on the movie stage, the fields in the Accessibility panel become editable.
Enter a meaningful text alternative in the 'name' field, properly describing the purpose of the symbol.
To manage an object's text equivalent programmatically using ActionScript 2, the _accProps object must be used. This references an object containing accessibility related properties set for the object. The code example below shows a simple example of how the _accProps object is used to set an objects name in ActionScript.
Example Code:
// 'print_btn' is an instance placed on the movie's main timeline
_root.print_btn._accProps = new Object();
_root.print_btn._accProps.name = "Print";To manage an object's text equivalents programmatically using ActionScript 3, the AccessibilityProperties object and name property must be used. The code example below shows a simple example of how the name property is used to set an objects name in ActionScript.
Example Code:
// 'print_btn' is an instance placed on the movie's main timeline
print_btn.accessibilityProperties = new AccessibilityProperties();
print_btn.accessibilityProperties.name = "Print";Publish the SWF file
Open the SWF file in Internet Explorer 6 or higher (using Flash Player 6 or higher), or Firefox 3 or higher (using Flash Player 9 or higher)
Use a tool which is capable of showing an object's name text alternative, such as ACTF aDesigner 1.0 to open the Flash movie.
In the GUI summary panel, loop over each object which is contained by the Flash movie and ensure the object that was provided a name has a proper name attribute appearing in the tool's display.
Authors may also test with a screen reader, by reading the Flash content and listening to hear that the equivalent text is read when tabbing to the non-text object (if it is tabbable) or hearing the alternative text read when reading the content line-by-line.
All non-text objects have text equivalents that can serve the same purpose and convey the same information as the non-text object
Check #6 is true.
If this is a sufficient technique for a success criterion, failing this test procedure does not necessarily mean that the success criterion has not been satisfied in some other way, only that this technique has not been successfully implemented and can not be used to claim conformance.
Adobe Flash Professional version MX and higher
Adobe Flex
This technique relates to:
See User Agent Support Notes for FLASH2. Also see Flash Technology Notes.
The objective of this technique is to provide a long text alternative that serves the same purpose and presents the same information as the original non-text content when a short text alternative is not sufficient.
The Flash Player supports long text alternatives to non-text objects, which can be defined in ActionScript or within Flash authoring tools using the description property, as indicated in the examples below.
The Flash Professional authoring tool's Accessibility panel lets authors provide accessibility information to assistive technology and set accessibility options for individual Flash objects or entire Flash applications.
For a text alternative to be applied to a non-text object, it must be saved as a symbol in the movie's library. Note: Flash does not support text alternatives for graphic symbols. Instead, the graphic must be converted to or stored in a movie clip or button symbol.
Bring up the Accessibility panel by selecting "Window > Other Panels > Accessibility" in the application menu, or through the shortcut ALT + F11. Ensure that the 'Make object accessible' checkbox is checked.
Select the non-text instance on the movie stage, the fields in the Accessibility panel become editable.
Enter a description describing the non-text object's contents concisely. For example, a diagram could have a 'name' identifying what information the diagram conveys, while the 'Description' field lists this information in full detail. Alternatively, for an animation which is part of an instructional movie about car repairs the name could be: 'how to replace a flat tire', while the long description describes each step of the process in greater detail.
Important: Only use the 'Description' field if a short text alternative is not sufficient to describe the objects purpose. Otherwise, leave the 'Description' field empty.

To manage an object's text equivalents programmatically using ActionScript, the _accProps object must be used. This references an object containing accessibility related properties set for the object. The code example below shows a simple example of how the _accProps object is used to set an objects name and description in ActionScript.
A chart showing sales for October has a short text alternative of "October sales chart". The long description would provide more information, as shown in the code below.
Example Code:
// 'chart_mc' is an instance placed on the movie's main timeline
_root.chart_mc._accProps = new Object();
_root.chart_mc._accProps.name = "October Sales Chart";
_root.chart_mc._accProps.description = "Bar Chart showing sales for October.\
  There are 6 salespersons.Maria is highest with 349 units.Frances is next\
  with 301.Then comes Juan with 256, Sue with 250, Li with 200 and Max\
  with 195.The primary use of the chart is to show leaders, so the description\
is in sales order.";To manage an object's text equivalents programmatically using ActionScript, the AccessibilityProperties object must be used. The code example below shows a simple example of how the AccessibilityProperties object used to set an objects name and description in ActionScript.
A chart showing sales for October has a short text alternative of "October sales chart". The long description would provide more information, as shown in the code below.
Example Code:
// 'chart_mc' is an instance placed on the movie's main timeline
chart_mc.accessibilityProperties = new AccessibilityProperties();
chart_mc.accessibilityProperties.name = "October Sales Chart";
chart_mc.accessibilityProperties.description = "Bar Chart showing sales for October.\
  There are 6 salespersons.Maria is highest with 349 units.Frances is next\
  with 301.Then comes Juan with 256, Sue with 250, Li with 200 and Max\
  with 195.The primary use of the chart is to show leaders, so the description\
  is in sales order.";
Resources are for information purposes only, no endorsement implied.
Publish the SWF file
Open the SWF file in Internet Explorer 6 or higher (using Flash Player 6 or higher), or Firefox 3 or higher (using Flash Player 9 or higher)
Use a tool which is capable of showing an object's long description, such as ACTF aDesigner 1.0 to open the Flash movie.
In the GUI summary panel, loop over each object which is contained by the Flash movie and ensure the object that was provided a description has a proper description value appearing in the tool's display.
Authors may also test with a screen reader, by reading the Flash content and listening to hear that the description is read when tabbing to the non-text object (if it is tabbable) or hearing the alternative text read when reading the content line-by-line.
All non-text objects have text equivalents that can serve the same purpose and convey the same information as the non-text object.
#6 is true.
If this is a sufficient technique for a success criterion, failing this test procedure does not necessarily mean that the success criterion has not been satisfied in some other way, only that this technique has not been successfully implemented and can not be used to claim conformance.
Adobe Flash Professional version MX and higher
Adobe Flex
This technique relates to:
See User Agent Support Notes for FLASH3. Also see Flash Technology Notes.
The purpose of this technique is to show how images can be marked so that they can be ignored by Assistive Technology.
The Flash Player supports the ability for authors to control which graphics appear to assistive technologies using the silent property of the accessibility object, as indicated in the examples below.
The Flash Professional authoring tool's Accessibility panel lets authors provide accessibility information to assistive technology and set accessibility options for individual Flash objects or entire Flash applications.
To apply changes to accessibility properties for a graphic, it must be saved as a symbol in the movie's library. Note: Flash does not support text alternatives for graphic symbols. Instead, the graphic must be converted to or stored in a movie clip or button symbol.
Bring up the Accessibility panel by selecting "Window > Other Panels > Accessibility" in the application menu, or through the shortcut ALT + F11.
Select the graphic object
If the 'Make object accessible' checkbox in the Accessibility control panel is checked, uncheck this option to remove the graphic from the accessiblity information conveyed to assistive technologies.
To manage an object's text equivalents programmatically using ActionScript, the _accProps property must be used. This references an object containing accessibility related properties set for the object. The code example below shows a simple example of how the _accProps property is used to remove an object from the accessibility information for the movie using ActionScript.
Example Code:
// 'decorative_mc' is an instance placed on the movie's main timeline
_root.decorative_mc._accProps = new Object();
_root.decorative_mc._accProps.silent = true;
Resources are for information purposes only, no endorsement implied.
Publish the SWF file
Open the SWF file in Internet Explorer 6 or higher (using Flash Player 6 or higher), or Firefox 3 or higher (using Flash Player 9 or higher)
Use a tool which is capable of showing an object's accessibility information, such as ACTF aDesigner 1.0 to open the Flash movie.
In the GUI summary panel, loop over each object which is contained by the Flash movie and ensure the object that was designed to be hidden does not appear in the tool's display.
Authors may also test with a screen reader, by reading the Flash content and listening to hear that object is not mentioned when the page is read.
Non-text objects that are coded to be hidden from assistive technologies are not available to assistive technology.
Check #6 is true.
If this is a sufficient technique for a success criterion, failing this test procedure does not necessarily mean that the success criterion has not been satisfied in some other way, only that this technique has not been successfully implemented and can not be used to claim conformance.
Adobe Flash Professional version MX and higher
Adobe Flex
This technique relates to:
See User Agent Support Notes for FLASH4. Also see Flash Technology Notes.
The objective of this technique is to use submit buttons to allow users to take actions that cause changes of context rather than allowing changes in context to occur when the value or state of a non-submit button control is modified. The intended use of a submit button in this technique is to generate an HTTP request that submits data entered in a form or to perform an action that triggers a change in context, so it is an appropriate control to use to initiate this change.
This is a basic ActionScript 3 example of a combobox component with a submit button to redirect the user to a different resource.
Example Code:
import fl.accessibility.ComboBoxAccImpl;
import flash.net.navigateToURL;
import flash.net.URLRequest;
ComboBoxAccImpl.enableAccessibility();
state_submit.addEventListener(MouseEvent.CLICK, submitHandler);
function submitHandler(e) {
  var url: URLRequest = new URLRequest("http://www.wikipedia.org/wiki/" +
    state_combo.selectedLabel);
  navigateToURL(url, "_self");
}This is a basic ActionScript 2 example of a combobox component with a submit button to redirect the user to a different resource - the same example as in example 1 except in ActionScript 2:
Example Code:
import fl.accessibility.ComboBoxAccImpl;
ComboBoxAccImpl.enableAccessibility();
state_submit.addEventListener("click", submitHandler);
function submitHandler(e) {
  getURL("http://www.wikipedia.org/wiki/" + state_combo.selectedLabel, "_self");
}Find all interactive control instances (that are not submit buttons) in the flash movie that can initiate a change of context, e.g. a combobox, radio button or checkbox.
For each instance, confirm that the event handler(s) responsible for the change of context are not associated with the controls themselves, but with a separate button instead.
#2 is true
If this is a sufficient technique for a success criterion, failing this test procedure does not necessarily mean that the success criterion has not been satisfied in some other way, only that this technique has not been successfully implemented and can not be used to claim conformance.
Adobe Flash Professional version MX and higher
Adobe Flex
This technique relates to:
See User Agent Support Notes for FLASH5. Also see Flash Technology Notes.
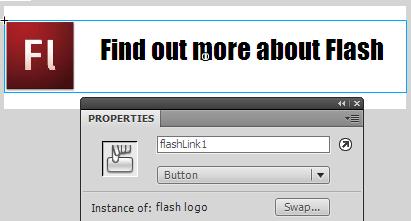
The objective of this technique is to avoid unnecessary duplication that occurs when adjacent text and iconic versions of a button are contained in a Flash movie.
Many kinds of buttons have both a text and iconic button adjacent to each other. Often the text and the icon button are rendered in separate buttons, in part to create a slight visual separation from each other. Although the sighted user can see this slight visual separation, a blind or low vision user may not be able to recognize the separation, and be confused by the redundant buttons. To avoid this, some authors omit specifying the accessible name for the image, but this would fail Success Criterion 1.1.1 because the text alternative would not serve the same purpose as the graphical button. The preferred method to address this is to put the text and image together in one button symbol instance, and provide a single accessible name for the button to eliminate duplication of text.
The following examples are for a situation where a button instance comprised of both an image and text is on the stage. The combined button in this example uses the instance name 'flashLink1'.
To create the combined button in Flash Professional:
Add a graphic object and text to the stage
Select both objects
Select 'New Symbol' from the Insert menu or hit Ctrl+F8 to create a new button object
Click on the button object on the stage and enter an instance name in the Properties panel.
Continue under example 1, 2, or 3 below.
The Accessibility panel is used to specify the accessible name (which in this case is the same as the visual text).
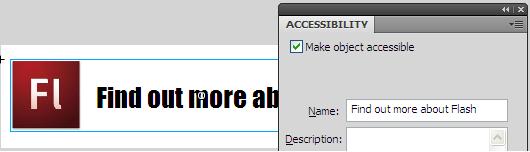
ActionScript 3 can be used instead of the Accessibility control panel to define the accessibility name for the combined button, as follows:
Example Code:
// 'flashLink1' is an instance placed on the movie's main timeline
flashLink1.accessibilityProperties = new AccessibilityProperties();
flashLink1.accessibilityProperties.name = "Learn more about Flash";
ActionScript 2 can be used instead of the Accessibility control panel to define the accessibility name for the combined button, as follows
Example Code:
// 'flashLink1' is an instance placed on the movie's main timeline
flashLink1._accProps = new Object();
flashLink1._accProps.name = "Learn more about Flash";Publish the SWF file
Open the SWF file in Internet Explorer 6 or higher (using Flash Player 6 or higher), or Firefox 3 or higher (using Flash Player 9 or higher)
Use a tool which is capable of showing an object's name text alternative, such as ACTF aDesigner 1.0 to open the Flash movie.
If you are using ACTF aDesigner 1.0, use the GUI Summary panel to check each image button in the Flash movie and ensure that there is no separate, redundant text control adjacent to the image that performs the same action.
#4 is true.
If this is a sufficient technique for a success criterion, failing this test procedure does not necessarily mean that the success criterion has not been satisfied in some other way, only that this technique has not been successfully implemented and can not be used to claim conformance.
Adobe Flash Professional version MX and higher
Adobe Flex
This technique relates to:
See User Agent Support Notes for FLASH6. Also see Flash Technology Notes.
The objective of this technique is to provide text alternatives that serve the same purpose as the clickable hotspots of an image. Each hotspot serves as a clickable region for a part of the image which can trigger an action (such as opening a web page corresponding to the hotspot). The hotspots are implemented as invisible Flash buttons, which are each given an accessible name that describes the hotspot's target.
Add the original graphic that needs to have clickable hotspots to the stage.
For each hotspot, do the following:
Create a new button symbol by choosing "New Symbol" from the Flash Professional 'Insert' menu or by using the Ctrl + F8 shortcut.
Inside the button symbol, create a shape that matches the clickable surface.
Place the newly created button on top of the original graphic.
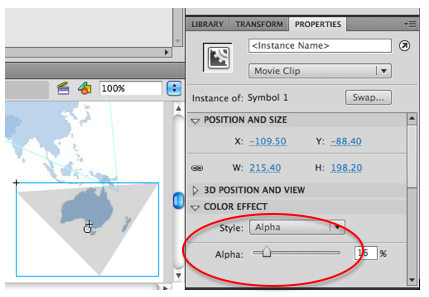
Open the button's properties panel, and choose "Alpha" from the "Style" dropdown list under "Color Effect". Change the value of the "Alpha" slider that appears to zero so that the button becomes invisible.
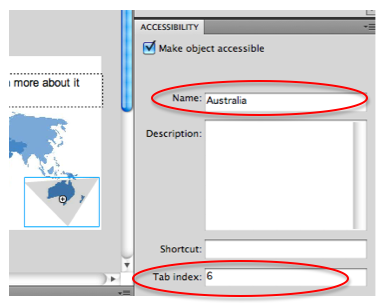
Using the Accessibility panel, specify a value for the "tabindex" field to give the button a logical position in the tab order.
Using the Accessibility panel, specify an accessible name that describes the purpose of the hotspot.
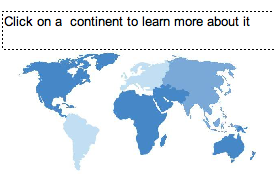
The result can be seen in the working example of creating accessible hotspots using invisible buttons. The source of creating accessible hotspots using invisible buttons is available.
Find all images with hotspots. For each hotspot, confirm that:
The hotspot is implemented as an invisible button
The hotspot is provided with an accessible name, either through the Accessibility panel or through ActionScript
#1 and #2 are true
If this is a sufficient technique for a success criterion, failing this test procedure does not necessarily mean that the success criterion has not been satisfied in some other way, only that this technique has not been successfully implemented and can not be used to claim conformance.
Adobe Flash Professional version MX and higher
Adobe Flex
This technique relates to:
See User Agent Support Notes for FLASH7. Also see Flash Technology Notes.
The purpose of this technique is to allow users to choose to have additional information added to the label of a button or other control so that it can be understood out of context.
Some users prefer to have control labels that are self-contained, where there is no need to explore the context of the control. Other users find including the context information in each button to be repetitive and to reduce their ability to use a site. Among users of assistive technology, the feedback to the working group on which is preferable has been divided. This technique allows users to pick the approach that works best for them.
A control is provided near the beginning of the page that will expand the labels for controls on the page so that no additional context is needed to understand the purpose of those controls. It must always be possible to understand purpose of the control directly from its label.
This technique expands the control labels only for the current page view. It is also possible, and in some cases would be advisable, to save this preference in a cookie or server-side user profile, so that users would only have to make the selection once per site.
This example uses ActionScript to add contextual information directly to the label of a button. When the "Expand Button Labels" button is toggled, each button on the page has its label property modified.
Example Code:
import fl.accessibility.ButtonAccImpl;
ButtonAccImpl.enableAccessibility();
btn1.addEventListener(MouseEvent.CLICK, clickHandler);

function clickHandler(e) {
  btn2.label = btn1.selected? "PDF version of 2010 brochure": "PDF";
  btn2.width = btn1.selected? 200: 100;
  btn3.label = btn1.selected? "Text version of 2010 brochure": "Text";
  btn3.width = btn1.selected? 200: 100;
  btn4.label = btn1.selected? "Word version of 2010 brochure": "Word";
  btn4.width = btn1.selected? 200: 100;
}
The result can be seen in the working example of adding contextual information to a button label. The source of adding contextual information to a button label is available.
When a Flash Movie contains content with context dependent labels, confirm that a separate toggle control is provided that allows the user to expand the labels so that they are no longer context dependent.
The above is true.
If this is a sufficient technique for a success criterion, failing this test procedure does not necessarily mean that the success criterion has not been satisfied in some other way, only that this technique has not been successfully implemented and can not be used to claim conformance.
Adobe Flash Professional version MX and higher
Adobe Flex
This technique relates to:
See User Agent Support Notes for FLASH8. Also see Flash Technology Notes.
The objective of this technique is to provide a semantic grouping for related form controls. This allows users to understand the relationship of the controls and interact with the form more quickly and effectively.
In Flash, when related form controls are grouped, this grouping can be indicated by adding the group's name to each form control's accessible name.
Grouping controls is most important for related radio buttons and checkboxes. A set of radio buttons or checkboxes is related when they all submit values for a single named field. They work in the same way as selection lists, allowing the user to choose from a set of options, except selection lists are single controls while radio buttons and checkboxes are multiple controls. Because they are multiple controls, it is particularly important that they be grouped semantically so they can be more easily treated as a single control. Often, user agents will present the value of the legend before the label of each control, to remind users that they are part of the same group.
It can also be useful to group other sets of controls that are not as tightly related as sets of radio buttons and checkboxes. For instance, several fields that collect a user's address might be grouped together with a legend of "Address".
This example shows how the group name for radio buttons in a group can be made accessible by adding it to each button's accessible name:
Add radio button components to the stage:
Enter each button's label using its label property
Add the visual group label to the left or above the buttons added in step 1
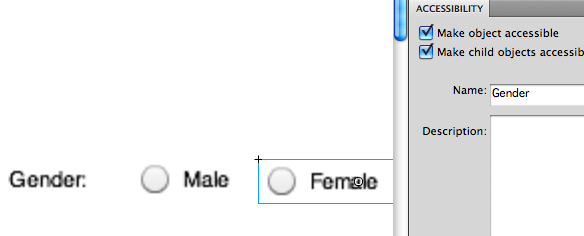
Select each radio button. In the Accessibility panel, add the group name to the "Name" field;
Flash will concatenate the group name with each button's individual name, such as "gender male".
This approach is illustrated in the screenshot below:
Note: To make the radio buttons in this example accessible, the following two lines need to be added to the movie's script: import fl.accessibility.RadioButtonAccImpl;
RadioButtonAccImpl.enableAccessibility();
For an illustration of this approach, see the working version of Adding a group name to the accessible name of radio buttons. The source of Adding a group name to the accessible name of radio buttons is available.
The code example below shows a basic proof of concept of a class that automatically places a set of form controls inside a fieldset like rectangle, including a legend. For each added control an AccessibilityProperties object is created, and its name property is set to a combination of the legend text and the actual form control label.
Example Code:
package wcagSamples {
import flash.display. *;
import flash.text. *;
import fl.controls. *
import flash.accessibility. *;
import fl.accessibility. *;
/**
* Basic example that demonstrates how to simulate a fieldset, as provided
* in HTML. The FieldSet class takes a group of controls and places them
* inside a fieldset rectangle with the legend text at the top. For each form
* control, the legend text is prepended to the control's accessible name
*
* Note: This is only a proof of concept, not a fully functional class
*
* @langversion 3.0
* @playerversion Flash 10
*
*/
public class FieldSet extends Sprite {
private var legend: String;
private var bBox: Shape;
private var currentY: int = 20;
public static var LABEL_OFFSET_X: int = 20;
public static var CONTROL_OFFSET_X: int = 110;
/**
* CONSTRUCTOR
* Legend specifies the FieldSet's legend text, items is an array
* describing the controls to be added to the FieldSet
*/
public function FieldSet(legend: String, items: Array) {
// enable accessibility for components used in this example
RadioButtonAccImpl.enableAccessibility();
CheckBoxAccImpl.enableAccessibility();
//create FieldSet rectangle and legend
legend = legend;
bBox = new Shape();
bBox.graphics.lineStyle(1);
bBox.graphics.drawRect(10, 10, 300, 250);
bBox.graphics.beginFill(0x0000FF, 1);
addChild(bBox);
var fieldSetLegend: TextField = new TextField();
fieldSetLegend.text = legend;
fieldSetLegend.x = 20;
fieldSetLegend.y = 3;
fieldSetLegend.background = true;
fieldSetLegend.backgroundColor = 0xFFFFFF;
fieldSetLegend.border = true;
fieldSetLegend.borderColor = 0x000000;
fieldSetLegend.autoSize = TextFieldAutoSize.LEFT;
addChild(fieldSetLegend);
// add controls
for (var i = 0; i < items.length; i++) {
processItem(items[i]);
}
}
/**
* Adds the control to the Fieldset and sets its accessible name. A
* control is represented as an array, containing the following values:
* [0] : A string describing the component type
* (can be "TextInput", TextArea", Checkbox" or "RadioGroup").
* [1] : The label used to identify the control
* [2] : If [0] is "RadioGroup", then [2] needs to contain an array of the
* labels for each individual radio button. if [0] is "CheckBox", then
* [1] can either be empty or a question (e.g. "Do you smoke?"), and
* [2] the CheckBox label (e.g. "Yes").
*
*/
function processItem(item: Array) {
if (item.length < 2)
return;
currentY += 30;
var newControl;
//create visual label
var lbl: Label;
lbl = new Label();
lbl.text = item[1] + ": ";
lbl.x = FieldSet.LABEL_OFFSET_X;
lbl.y = currentY;
lbl.width = FieldSet.CONTROL_OFFSET_X;
lbl.autoSize = TextFieldAutoSize.RIGHT;
lbl.wordWrap = true;
addChild(lbl);
switch (item[0]) {
case "TextInput":
case "TextArea":
newControl = item[0] == "TextInput"? new TextInput(): new TextArea();
newControl.x = FieldSet.CONTROL_OFFSET_X;
//concatenate accessible name, combining legend and label
setAccName(newControl, legend + " " + item[1]);
break;
case "CheckBox":
newControl = new CheckBox();
newControl.label = item[2];
newControl.x = FieldSet.CONTROL_OFFSET_X;
setAccName(newControl, legend + " " + item[1] + " " + item[2]);
break;
case "RadioGroup":
if (item[2] && item[2].length > 0) {
var radioGroup: RadioButtonGroup = new RadioButtonGroup(item[0]);
var newBtn: RadioButton;;
for (var i = 0; i < item[2].length; i++) {
newBtn = new RadioButton();
// concatenate the legend, the group label, and the button label
setAccName(newBtn, legend + " " + item[1] + " " + item[2][i]);
newBtn.label = item[2][i];
newBtn.group = radioGroup;
newBtn.x = FieldSet.CONTROL_OFFSET_X;
newBtn.y = currentY;
addChild(newBtn);
if (i < item[2].length - 1)
currentY += 30;
}
}
break;
}
if (newControl) {
newControl.y = currentY;
addChild(newControl);
}
}
/**
* Creates an AccessibilityProperties object for an object and sets its name property
*/
public function setAccName(obj, accName) {
var accProps: AccessibilityProperties = new AccessibilityProperties();
accProps.name = accName;
obj.accessibilityProperties = accProps;
}
}
}This example class can be initialized as follows:
Example Code:
var myFieldSet = new FieldSet("Personal Details", // the legend
[["TextInput", "Name"], // text field
["RadioGroup", "Gender", ["Male", "Female"]], // radio button group
["CheckBox", "Do you smoke", "yes"], // checkbox
["TextArea", "Comments"], // text area
]);
addChild(myFieldSet);
For an illustration of this approach, see the working version of Programmatically adding a group name with the accessible name of radio buttons. The source of Programmatically adding a group name with the accessible name of radio buttons is available.
Note: Adobe Flex allows you to perform this type of behavior by using the <form>, <formitem> and <formheading> elements
When a Flash Movie contains grouped form controls, confirm that either :
The group's name is included in the Accessibility panel's "name" field for each control.
Each control has an AccessibilityProperties.name property, which contains both the group's name and the control's label text
One of the above is true
If this is a sufficient technique for a success criterion, failing this test procedure does not necessarily mean that the success criterion has not been satisfied in some other way, only that this technique has not been successfully implemented and can not be used to claim conformance.
Adobe Flash-based Content
Adobe Flash CS3 and later
This technique relates to:
See User Agent Support Notes for FLASH9. Also see Flash Technology Notes.
The objective of this technique is to provide an option for people who have hearing impairments or otherwise have trouble hearing the sound and dialogue in synchronized media to be able to choose to view captions as an alternative to audio information. With this technique all of the dialogue and important sounds are provided as text in a fashion that allows the text to be hidden unless the user requests it. As a result they are visible only when needed. This can be achieved using the FLVPlayback and FLVPlaybackCaptioning components. Note: when using FLVPlayback skins the closed caption button is accessible by default, but if implementing custom skins authors need to test to verify that the button is accessible.
Use an external tool (such as Magpie or a simple text editor) to create a timed Text captions xml file. Stop and play the video content, and for each relevant part of audio information (including speech, important background noises and event sounds) include the start and end time code as well as the textual alternative. Tools like Magpie have advanced features to make this process easier, whereas a text editor requires you to read the timecodes from your media player and include them in the XML as illustrated in the sample captions document below
In Flash, create a new instance of the FLVPlayback component on your stage, and set its contentPath value to your flv video file using the 'Component inspector' or 'Parameters' panel.
Set the 'Skin' parameter to use a skin which includes the CC (closed captions) button.
From the components list also create an instance of the FLVPlayback captioning component. In the 'Component inspector' panel set its 'Source' parameter to the name of your timed text xml file. The captions will automatically placed at the bottom of the player's frame.
Example Code:
<?xml version="1.0" encoding="UTF-8"?>
<tt xml:lang="en" xmlns="http://www.w3.org/2006/04/ttaf1"
xmlns:tts="http://www.w3.org/2006/04/ttaf1#styling">
<head>
<styling>
<style id="defaultSpeaker" tts:backgroundColor="black"
tts:color="white" tts:fontFamily="SansSerif" tts:fontSize="12"
tts:fontStyle="normal" tts:fontWeight="normal"
tts:textAlign="left" tts:textDecoration="none"/>
<style id="defaultCaption" tts:backgroundColor="black"
tts:color="white" tts:fontFamily="Arial" tts:fontSize="12"
tts:fontStyle="normal" tts:fontWeight="normal"
tts:textAlign="center" tts:textDecoration="none"/>
</styling>
</head>
<body id="thebody" style="defaultCaption">
<div xml:lang="en">
<p begin="0:00:00.20" end="0:00:02.20">If there were nothing in
our universe</p>
<p begin="0:00:02.20" end="0:00:05.65">the fabric of space-time
would be flat.</p>
<p begin="0:00:05.65" end="0:00:08.88">But add a mass, and
dimples form within it.</p>
<p begin="0:00:16.61" end="0:00:19.84">Smaller objects that
approach that large mass</p>
<p begin="0:00:19.84" end="0:00:23.41">will follow the curve in
space-time around it.</p>
<p begin="0:00:32.64" end="0:00:36.84">Our nearest star, the
sun, has formed such a dimple</p>
<p begin="0:00:36.84" end="0:00:38.00">and our tiny planet
Earth</p>
<p begin="0:00:38.00" end="0:00:41.50">goes along for the ride
in the curve of its dimple</p>
<p begin="0:00:41.50" end="0:00:43.80">staying in orbit around
the sun.</p>
<p begin="0:00:45.67" end="0:01:55.00"/>
</div>
</body>
</tt>
This is demonstrated in working example of Adding a timed text caption file to Flash. The working example of Adding a timed text caption file to Flash is available.
Resources are for information purposes only, no endorsement implied.
http://ncam.wgbh.org/invent_build/web_multimedia/tools-guidelines
Watch all video content displayed by your Flash movie. Ensure that:
Captions are available for all audio content, either turned on by default or as a user preference.
The captions properly describe all audio information contained in the video.
#1 and #2 are true
If this is a sufficient technique for a success criterion, failing this test procedure does not necessarily mean that the success criterion has not been satisfied in some other way, only that this technique has not been successfully implemented and can not be used to claim conformance.
Adobe Flash Professional version MX and higher
Adobe Flex
This technique relates to:
Note: This technique must be combined with other techniques to meet SC 3.3.2. See Understanding SC 3.3.2 for details.
See User Agent Support Notes for FLASH10. Also see Flash Technology Notes.
The objective of this technique is to provide a clear indication that a specific form control in a Web application or form is required for successful data submission. The word "required" is added to the form control's accessible name, and a visual indicator is placed next to the label.
This example shows how to use the Accessibility panel to indicate a field as being 'required' to users:
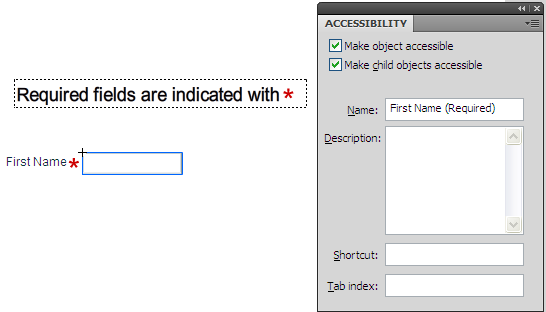
Visually, place asterisk character or some other indication adjacent to the form control's label.
Use the Accessibility panel to combine the word "required" with the control's label in the "Name" field.
This approach is illustrated in the screenshot below:
This is demonstrated in the working example of Adding the word "required" to the control's accessible name. The source of Adding the word "required" to the control's accessible name is available.
For each required form control within a Flash movie, confirm that:
The required state is indicated visually
The required state is indicated textually using the 'Name' field in the Accessibility panel
Each of the above is true
If this is a sufficient technique for a success criterion, failing this test procedure does not necessarily mean that the success criterion has not been satisfied in some other way, only that this technique has not been successfully implemented and can not be used to claim conformance.
Adobe Flash Professional version MX and higher
Adobe Flex
This technique relates to:
See User Agent Support Notes for FLASH11. Also see Flash Technology Notes.
The objective of this technique is to a provide longer, more detailed textual information for an image than would be suitable for the image's accessible name. An accessible button is provided adjacent to the image that displays a new panel containing the image's long description text.
In this example, an image containing statistical data is shown. The image is provided a short textual alternative ("Graph of percentage of total U.S. noninsitutionalized population age 16-64 declaring one or more disabilities"). Below the image, the user can click a button that will overlay a long textual description of the statistical information itself. When the button is clicked, the following actions are taken:
The MovieClip containing the long text description is made visible, and its AccessibilityProperties.silent property is set to false to make it visible to assistive technology. Its contents are placed in the tab order.
The original image and button are temporarily hidden from assistive technology and the tab order.
The image and descriptive text were taken from a previously published HTML example for long image descriptions on WebAIM.org
The results for this technique are shown in the working version of Making a hidden description visible on request. The source of Making a hidden description visible on request is available.
Example Code:
import flash.accessibility. *;
import fl.accessibility.ButtonAccImpl;
import flash.system.Capabilities;
ButtonAccImpl.enableAccessibility();
//set accessibility properties
graph_mc.accessibilityProperties = new AccessibilityProperties();
graph_mc.accessibilityProperties.name = "Graph of percentage of total U.S. \
noninsitutionalized population age 16-64 declaring one or more disabilities";
longDescBtn.accessibilityProperties = new AccessibilityProperties();
longDesc_mc.accessibilityProperties = new AccessibilityProperties();
longDesc_mc.accessibilityProperties.forceSimple = false;
hideLongDesc();
//set click handlers for button
longDescBtn.addEventListener("click", function () {
showLongDesc()
});
longDesc_mc.longDescCloseBtn.addEventListener("click", function () {
hideLongDesc()
});
function showLongDesc() {
// hide the original content from screen readers
graph_mc.accessibilityProperties.silent = true;
graph_mc.tabEnabled = false;
graph_mc.alpha = 0.2;
longDescBtn.enabled = false;
longDescBtn.accessibilityProperties.silent = true;
longDesc_mc.accessibilityProperties.silent = false;
// make the long description panel visible, both visually and to screen readers
longDesc_mc.visible = true;
longDesc_mc.tabEnabled = true;
longDesc_mc.longDescTitle.stage.focus = longDesc_mc.longDescTitle;
if (Capabilities.hasAccessibility)
Accessibility.updateProperties();
}
function hideLongDesc() {
//do the opposite to what showLongDesc does
graph_mc.accessibilityProperties.silent = false;
graph_mc.tabEnabled = true;
graph_mc.alpha = 1;
longDescBtn.enabled = true;
longDescBtn.accessibilityProperties.silent = false;
longDesc_mc.visible = false;
longDesc_mc.accessibilityProperties.silent = true;
longDesc_mc.tabEnabled = false;
longDescBtn.stage.focus = longDescBtn;
if (Capabilities.hasAccessibility)
Accessibility.updateProperties();
}
When a Flash movie contains images that require long descriptions, confirm that a longer description is made available through a separate button.
The above is true
If this is a sufficient technique for a success criterion, failing this test procedure does not necessarily mean that the success criterion has not been satisfied in some other way, only that this technique has not been successfully implemented and can not be used to claim conformance.
Adobe Flash Professional version MX and higher
Adobe Flex
This technique relates to:
See User Agent Support Notes for FLASH12. Also see Flash Technology Notes.
The objective of this technique is to validate user input as values are entered for each field, by means of client-side scripting. If errors are found, a description is added to the controls that have invalid data. Visually, the description will be placed adjacent to the control. Additionally, the error message text is added to the control's accessible description so that it is readable by assistive technology when the control receives focus.
In this example, a sample form is shown with two text fields ('name' and 'zip code'). Both fields are required. When the form's submit button is pressed, the values of the text fields will be validated. If a textfield contains an invalid value, an _accProps object is created for the textfield, and its description property is set the error message.
Note: Instead of using the accessible description, the error text can also be added to the accessible name (_accProps.name), which is supported by a wider range of assistive technology than the _accProps.description property.
ActionScript 2.0 Code
Example Code:
import flash.accessibility. *;
import mx.accessibilty.ButtonAccImpl;
import mx.controls.Alert;
import mx.accessibility.AlertAccImpl;
AlertAccImpl.enableAccessibility();
ButtonAccImpl.enableAccessibility;
resetTextFieldAccNames();
Accessibility.updateProperties();
submit_btn.addEventListener("click", handleClick);
function handleClick(e) {
//reset values
resetTextFieldAccNames();
resetTextFieldAccDescriptions();
resetErrorLabels();
//perform validation
var errors =[];
if (name_txt.text == '')
errors.push([name_txt, "You must enter your name", name_error_lbl]);
if (zipcode_txt.text == '')
errors.push([zipcode_txt, "You must enter your zip code", zipcode_error_lbl]);
else if (zipcode_txt.text.length != 5 || isNaN(zipcode_txt.text))
errors.push([zipcode_txt, "Zip code must be 5 digits", zipcode_error_lbl]);
//add validation error messages, if any
var field, errorMsg, errorLabel;
if (errors.length > 0) {
//loop over encountered errors
for (var i = 0; i < errors.length; i++) {
field = errors[i][0];
errorMsg = errors[i][1];
errorLabel = errors[i][2];
updateAccDescription(field, "Warning: " + errorMsg);
errorLabel.text = errorMsg;
}
} else {
Alert.show("Form field values were entered correctly");
}
Accessibility.updateProperties();
}
function updateAccName(obj, newName: String) {
if (! obj._accProps)
obj._accProps = new Object();
obj._accProps.name = newName;
}
function updateAccDescription(obj, newDescription: String) {
if (! obj._accProps)
obj._accProps = new Object();
obj._accProps.description = newDescription;
}
function getAccName(obj) {
return obj._accProps? obj._accProps.name: "";
}
function resetTextFieldAccNames() {
updateAccName(name_txt, "name, required");
updateAccName(zipcode_txt, "zip code, required");
}
function resetTextFieldAccDescriptions() {
updateAccDescription(name_txt, "");
updateAccDesciption(zipcode_txt, "");
}
function resetErrorLabels() {
name_error_lbl.text = "";
zipcode_error_lbl.text = "";
}This approach is demonstrated in working version of Validating a text field. The source of Validating a text field is available.
When a Flash movie provides interactive forms that can be submitted, confirm that:
The validation warnings are placed next to the control visually.
The validation warnings are added to the accessible name or description of each control.
#1 and #2 are true
If this is a sufficient technique for a success criterion, failing this test procedure does not necessarily mean that the success criterion has not been satisfied in some other way, only that this technique has not been successfully implemented and can not be used to claim conformance.
Adobe Flash Professional version MX and higher
Adobe Flex
This technique relates to:
See User Agent Support Notes for FLASH13. Also see Flash Technology Notes.
The objective of this technique is to identify the default language of the Flash content by providing the lang and/or xml:lang attribute on the HTML or object elements for the page containing the Flash. The embedded Flash content will inherit the language specified. If the entire web page uses the same language, the lang and/or xml:lang attribute can be placed on the page's HTML element, as described in H57: Using language attributes on the html element.
Since Flash inherits the language from the HTML or object element, all text within the Flash content is expected to be in that inherited language. This means that it is possible to have a Flash object in the French language on a page that is primarily in another language, or to have a page with multiple Flash objects, each in a different language. It is not possible, however, to indicate changes in the human language of content within a single Flash object using this technique.
This example defined the content of the entire web page to be in the French language. The Flash content will inherit the specified language from the HTML container.
Example Code:
<?xml version="1.0" encoding="UTF-8"?>
<html lang="fr" xml:lang="fr" xmlns="http://www.w3.org/1999/xhtml">
<head>
<meta content="text/html; charset=iso-8859-1"
http-equiv="Content-Type"/>
<title>Flash Languages Examples - French</title>
<script src="swfobject.js" type="text/javascript"/>
<script type="text/javascript">
swfobject.registerObject("myMovie", "9.0.115", "expressInstall.swf");
</script>
</head>
<body>
<object classid="clsid:D27CDB6E-AE6D-11cf-96B8-444553540000"
height="420" id="myMovie" width="780">
<param name="movie" value="myMovie.swf"/>
<!--[if !IE]>-->
<object data="languages.swf" height="420"
type="application/x-shockwave-flash" width="780">
<!--<![endif]-->
<!--[if !IE]>-->
</object>
<!--<![endif]-->
</object>
</body>
</html>
This is demonstrated in the working example of Using the language of the page as whole in the embedded Flash. The source of Using the language of the page as whole in the embedded Flash is available.
This example defines the content of a Flash movie to be in the French language. The Flash movie is embedded using SWFObject's static publishing method. This means that there are two nested object elements, the outer to target Internet Explorer, the Inner to target other browsers. For this reason the lang and xml:lang attributes must be added twice.
Example Code:
<object classid="clsid:D27CDB6E-AE6D-11cf-96B8-444553540000"
height="420" id="myMovie" lang="fr" width="780" xml:lang="fr">
<param name="movie" value="myMovie.swf"/>
<!--[if !IE]>-->
<object data="languages.swf" height="420" lang="fr"
type="application/x-shockwave-flash" width="780" xml:lang="fr">
<!--<![endif]-->
<!--[if !IE]>-->
</object>
<!--<![endif]-->
</object>
Resources are for information purposes only, no endorsement implied.
Examine the html element and the object element of the HTML document containing the reference to the SWF.
Check that the human language of the Flash content is the same as the inherited language for the object element as specified in HTML 4.01, Inheritance of language codes
Check that the value of the lang attribute conforms to BCP 47: Tags for the Identification of Languages or its successor and reflects the primary language used by the Flash content.
Check that no changes in human language occur within the Flash content
For Success Criterion 3.1.1: Checks 1-3 are all true.
For Success Criterion 3.1.2: Checks 1-4 are all true.
If this is a sufficient technique for a success criterion, failing this test procedure does not necessarily mean that the success criterion has not been satisfied in some other way, only that this technique has not been successfully implemented and can not be used to claim conformance.
Adobe Flash Professional version MX and higher
Adobe Flex
This technique relates to:
Note: This technique must be combined with other techniques to meet SC 2.1.1. See Understanding SC 2.1.1 for details.
Note: This technique must be combined with other techniques to meet SC 2.1.3. See Understanding SC 2.1.3 for details.
See User Agent Support Notes for FLASH14. Also see Flash Technology Notes.
The objective of this technique is to demonstrate how to provide device independence by providing equivalent event handlers in response to a mouse or focus event. Supporting both mouse and keyboard events ensures that users will be able to perceive the same information, regardless of the input device they used. If the event changes the state of the control, it may be important to change the descriptive name of the control in the event handlers.
In this example, a group of buttons is assigned the same event handlers for the flash.events.FocusEvent.FOCUS_IN and flash.events.MouseEvent.MOUSE_OVER events. When a button receives focus or is hovered over using a mouse, text describing the button will be updated.
Example Code:
import fl.accessibility.ButtonAccImpl;
import fl.controls.Button;
import flash.accessibility. *
import flash.events.FocusEvent;
import flash.events.MouseEvent;
import flash.net.navigateToURL;
import flash.net.URLRequest;
ButtonAccImpl.enableAccessibility();
var states: Object = {
"Alabama": "Alabama is a state located in the southeastern region of the \
United States of America.",
"California": "California is the most populous state in the United States",
"New York": "New York is a state in the Mid-Atlantic and Northeastern \
regions of the United States"
};
var buttons: Array =[];
var button: Button;
var accProps: AccessibilityProperties;
var count = 0;
for (var i in states) {
button = new Button();
button.label = i;
button.addEventListener(MouseEvent.CLICK, clickHandler);
button.addEventListener(MouseEvent.MOUSE_OVER, highlightHandler);
button.addEventListener(MouseEvent.MOUSE_OUT, unHighlightHandler);
button.addEventListener(FocusEvent.FOCUS_IN, highlightHandler);
button.addEventListener(FocusEvent.FOCUS_OUT, unHighlightHandler);
accProps = new AccessibilityProperties();
accProps.description = states[i];
button.accessibilityProperties = accProps;
addChild(button);
button.x = 30
button.y = 30 + count * 30;
buttons[i] = button;
count++;
}
function highlightHandler(e) {
descText.text = states[e.target.label];
}
function unHighlightHandler(e) {
descText.text = "";
}
function clickHandler(e) {
var url: URLRequest = new URLRequest("http://www.wikipedia.org/wiki/" + e.target.label);
navigateToURL(url, "_self");
}Note: To improve accessibility for screen reader users, the descriptive text is also attached to the buttons themselves as an accessible description. Also note that for button components, the MouseEvent.CLICK event will fire on mouse clicks as well as when the Enter key is pressed.
This technique is illustrated in the working version of Updating button text with multiple event handlers. The source of Updating button text with multiple event handlers is available.
For all scripted event handlers in a Flash Movie,
Confirm that event handlers are assigned for both mouse and keyboard events
The above is true
If this is a sufficient technique for a success criterion, failing this test procedure does not necessarily mean that the success criterion has not been satisfied in some other way, only that this technique has not been successfully implemented and can not be used to claim conformance.
Adobe Flash Professional version MX and higher
Adobe Flex
This technique relates to:
See User Agent Support Notes for FLASH15. Also see Flash Technology Notes.
The objective of this technique is to control the Flash Movie's reading order and tab order by assigning tabIndex values to its elements.
The tab order is the order in which objects receive input focus when users press the Tab key. The tab order does not necessarily contain the same elements as the reading order does, as the reading order can also contain elements that are not focusable. However, both the reading order and tab order can be controlled using tab index values.
Flash Player uses a default tab index order from left to right and top to bottom.
To create a custom reading order, assign a tab index value to every instance on the stage, either through ActionScript or through the Accessibility panel. Create a tabIndex value for every accessible object, not just the focusable objects. For example, dynamic text must have tab indexes, even though a user cannot tab to dynamic text.
You can create a custom tab-order index in the Accessibility panel for keyboard navigation for the following objects:
Dynamic text
Input text
Buttons
Movie clips, including compiled movie clips
Components
Screens
Tab focus occurs in numerical order, starting from the lowest index number. After tab focus reaches the highest tab index, focus returns to the lowest index number. When you move tab-indexed objects that are user-defined in your document, or to another document, Flash retains the index attributes. Check for and resolve index conflicts (for example, two different objects on the Stage with the same tab-index number). If two or more objects have the same tab index in any given frame, Flash follows the order in which the objects were placed on the Stage.
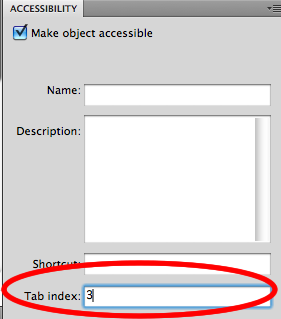
To add a tabIndex value using the Accessibility panel, perform the following steps for every accessible object on the stage:
Select the element by clicking on it.
In the Accessibility panel, enter a numeric value in the "Tab index" field. The value must be a positive integer (up to 65535) that reflects the order in which the selected object should be read. Elements with higher tab index values will be read after elements with lower values. If two or more objects have the same tab index in any given frame, Flash follows the order in which the objects were placed on the Stage.
To visualize the currently defined tab order, select View > Show Tab Order. Tab index numbers for individual objects appear in the upper-left corner of the object.
Note: You can also use ActionScript code to create a tab-order index for keyboard navigation.
These steps are illustrated in the screenshots below
Note: Flash Player no longer requires that you add all of the objects in a FLA file to a list of tab index values. Even if you do not specify a tab index for all objects, a screen reader reads each object correctly.
This example contains dynamic TextField instances that are grouped into columns. To ensure the reading order follows the column structure. The TextField instances are given a tab index value that corresponds to their textual content (for example, the TextField containing the text "Sample Text 3" has a tabindex value of 3. Additionally, a single TextField is added that has no tabindex value set. This field contains the text "Not in tab order". Even though this field is visually placed between sample text 2 and 3, it is placed at the end of the custom tab order because it is not assigned a tabindex value.
The results can be found in the working version of Using tabindex to navigate a column structure. The source of Using tabindex to navigate a column structure is available.
This example contains a Flash based form that is laid out over two columns. To make the tab order follow the column structure, each form control is assigned a tab index value in the Accessibility panel.
The results are shown in the working version of Controlling tab order in a two-column layout. The source of Controlling tab order in a two-column layout is available.
Resources are for information purposes only, no endorsement implied.
Use a screen reader to navigate through the Flash movie, one element at a time.
Check that the order in which the screen reader announces the content, matches the logical visual order.
When focus has been placed inside the Flash movie, press the Tab key repeatedly to traverse its contents by keyboard.
Verify that all interactive and focusable elements are reachable by keyboard, in a logical order.
Checks #2 and #4 are true.
If this is a sufficient technique for a success criterion, failing this test procedure does not necessarily mean that the success criterion has not been satisfied in some other way, only that this technique has not been successfully implemented and can not be used to claim conformance.
Adobe Flash Professional version MX and higher
Adobe Flex
This technique relates to:
Note: This technique must be combined with other techniques to meet SC 2.1.1. See Understanding SC 2.1.1 for details.
Note: This technique must be combined with other techniques to meet SC 2.1.3. See Understanding SC 2.1.3 for details.
See User Agent Support Notes for FLASH16. Also see Flash Technology Notes.
The objective of this technique is to demonstrate how to invoke a scripting function in a way that is keyboard accessible by attaching it to keyboard-accessible, standard Flash components provided by the Adobe Flash Professional authoring tool. In order to ensure that scripted actions can be invoked from the keyboard, they are associated with standard Flash components such as the Button component. The click event of these components is device independent. While the "CLICK" event is a mouse event, it is actually mapped to the default action of a button. The default action occurs when the user clicks the element with a mouse, but it also occurs when the user focuses the element and hits the space key, and when the element is triggered via the accessibility API.
This example shows a button that uses the MouseEvent.CLICK event to change its label. This event will fire both on mouse click and when the space key is pressed
Example Code:
import fl.controls.Button;
import fl.accessibility.ButtonAccImpl;
ButtonAccImpl.enableAccessibility();
var testBtn = new Button();
testBtn.label = "click me";
testBtn.addEventListener(MouseEvent.CLICK, clickHandler, false);
addChild(testBtn);
testBtn.x = testBtn.y = 10;
function clickHandler(e) {
e.target.label = "Thanks";
}This approach is demonstrated in the working version of click event on a button. The source of click event on a button is available.
When a Flash Movie contains interactive controls, confirm that:
Standard Flash components are used for the controls
The controls use the "click" event
#1 and #2 are true
If this is a sufficient technique for a success criterion, failing this test procedure does not necessarily mean that the success criterion has not been satisfied in some other way, only that this technique has not been successfully implemented and can not be used to claim conformance.
Adobe Flash Professional version MX and higher
Adobe Flex
This technique relates to:
Note: This technique must be combined with other techniques to meet SC 2.1.1. See Understanding SC 2.1.1 for details.
Note: This technique must be combined with other techniques to meet SC 2.1.3. See Understanding SC 2.1.3 for details.
See User Agent Support Notes for FLASH17. Also see Flash Technology Notes.
The objective of this technique is to allow keyboard focus to move to and from Flash content embedded in a web page. In browsers other than Internet Explorer, there is a problem related to keyboard accessibility of embedded Flash content. The problem is that, while both the Flash content and the HTML content around it may be keyboard accessible, many browsers do not support moving keyboard focus between the Flash content and HTML content without using a mouse. Once focus is placed inside the Flash content, a keyboard user will be trapped there. Similarly, when focus is placed somewhere else on the HTML content (outside the Flash content), it will be impossible to move focus into the content. This technique is designed to let the Flash author address this issue and provide support for moving focus between the Flash content and the HTML content via the keyboard.
This issue has been around for a long time, and is related to the way browsers implement embedded plug-ins. Until this problem is fixed, it is up to the Flash developer to come up with a work around. This technique is one of those workarounds. The approach behind this technique is the following:
Two 'neighbor' focusable HTML objects are identified for each Flash content in the document (one before and one after the content). These elements can be any HTML elements that are part of the web page's tab order (such as links and form controls).
The Flash content object itself is added to the document tab order as well, making it possible to tab into the content.
Inside the Flash content, the Flash Player maintains its own tab order. Normally, when the start or end of the Flash tab order is reached (when tabbing through the content), focus will wrap to the beginning or end of the content's tab order, and it will not be possible to (shift) tab out of it. With this technique however, when a 'focus wrap' is detected focus will instead be moved to the neighboring element in the HTML tab order (allowing a keyboard user to 'break out' of the Flash tab order).
When the SWFFocus class is imported into a Flash project, the following will happen:
A JavaScript <script> tag will be generated and added to the HTML document containing the Flash content. This JavaScript code will:
Set a tabIndex value of "0" on the <object> element of each Flash content found in the page. This causes the Flash objects to become part of the tab order.
Optionally, create a hidden anchor element before and after the Flash content, which is used by the SWFFocus class to move focus out of the Flash content back into the HTML page. Alternatively, the developer can specify existing focusable HTML elements as adjacent tab stops for the Flash content.
Set event handlers for the Flash content object, so that when it receives focus, the SWFFocus class is notified to manage the content's internal tab order.
The SWFFocus class monitors changes in focus within the Flash content. When a focus wrap is detected in the content, a JavaScript function will be called to instead move focus back to the neighboring HTML content.
As indicated above, there are two ways in which this technique can be used:
Letting the SWFFocus class generate neighboring focusable elements in the HTML tab order for each Flash content (demonstrated in example 1 below)
By default, the SWFFocus class will create a hidden link element before and after an embedded Flash content. These elements are needed as 'anchor' to move focus to when (shift) tabbing out of the Flash content. This approach is the easiest to implement, as it does not require any additional work by the developer. The downside is that the hidden links will clutter the HTML tab order with meaningless elements (although these elements are only used as tab stops when tabbing _out of_ the Flash content, not when tabbing _into_ it). Because of this, it is recommended to use the following approach instead:
Explicitly identifying focusable HTML elements that come before and after the a Flash content in the HTML tab order (demonstrated in example 2 below)
With this approach, the developer can use ID values to identify the elements that come before and after the Flash content in the HTML tab order. This is done by setting special class names on the Flash content's <object> element. This is the preferred approach, as it does not cause an unnecessary cluttering of the tab order. However, it does require more work and awareness by the developer (who has to manually set ID values). Also, in some scenarios there simply may not be a next or previous focusable element for a Flash content.
The two examples below are shown in the working example of Preventing a keyboard trap in Flash content. The example html file has two Flash contents embedded in it. The first Flash content is embedded with the approach described in example 1. The second example is embedded with the approach described in example 2. The source of Preventing a keyboard trap in Flash content is available. The source zip file contains the SWFFocus class.
Note: To run the example from a local drive (as opposed to running it from a web server), the local directory needs to be added to Flash Player's security settings.
In this example, the SWFFocus class is used without explicitly identifying focusable HTML elements. This will cause SWFFocus to dynamically insert hidden links before and after the Flash content.
The Flash object in this example is added using SWFObject's dynamic publishing method, which means that the object tag is created dynamically by JavaScript in a way that the browser supports. While this is the recommended approach, it is not a requirement for using this technique. The SWFFocus class will also work when the object tag is hardcoded into the HTML document.
The sample code below shows how to load the content dynamically with SWFObject.
Example Code:
<?xml version="1.0" encoding="UTF-8"?>
<!DOCTYPE html PUBLIC "-//W3C//DTD XHTML 1.0 Strict//EN"
"http://www.w3.org/TR/xhtml1/DTD/xhtml1-strict.dtd">
<html lang="en" xml:lang="en" xmlns="http://www.w3.org/1999/xhtml">
<head>
<title>Keyboard Trap Fix Example</title>
<meta content="text/html; charset=utf-8" http-equiv="Content-Type"/>
<script src="swfobject_2_1.js" type="text/javascript"/>
<script type="text/javascript">
var flashvars = {};
var params = {};
params.scale = "noscale";
var attributes = {};
attributes.id = "FlashSample1SWF";
attributes.name = "FlashSample1SWF";
swfobject.embedSWF("keyboard_trap_fix_custom_as3.swf", "flashSample1", \
"150", "200", "9.0.0", "expressInstall.swf", flashvars, params, attributes);
</script>
</head>
<body>
<p>The following Flash content automatically generates invisible
links before and after the flash content, allowing keyboard focus
to move out of the Flash content.</p>
<div id="flashSample1">
<a href="http://www.adobe.com/go/getflashplayer">
<img alt="Get Adobe Flash player"
src="http://www.adobe.com/images/shared/download_buttons/get_flash_player.gif"
/>
</a>
</div>
</body>
</html>The SWFFocus class needs to be added to a Flash or Flex project's source path. The easiest way to achieve this is to import the SWFFocus.swc into Library path for your project or to copy the com/swffocus/SWFFocus.as file (including the nested directory structure) to the project's root directory.
When the SWFFocus class is added to the content's source path, it needs to be initialized with the following code:
Example Code:
import com.adobe.swffocus.SWFFocus;
SWFFocus.init(stage);The code for the class itself can be found in the source files.
For a large part, this technique is the same as example 1 :
The dynamic loading approach by SWFObject is used to load the Flash content
The SWFFocus class needs to be added to the content's sourcepath and initialized in the Flash content
For more details about these steps, see example 1.
In this case however, special class names are added to the Flash content object. These class names indicate the ID values of the elements previous and next of the content in the HTML tab order. The class names are:
'swfPref-<previous ID>', where '<previous element>' should be the ID value of the previous element in the tab order.
'swfNext-<next ID>', where '<next element>' should be the ID value of the next element in the tab order.
For example, the HTML code could look like this (notice the added class names on the object tag):
Example Code:
<a href="http://www.lipsum.com/" id="focus1">test 1</a>
<object class="swfPrev-focus1 swfNext-focus2"
data="keyboard_trap_fix_as3.swf" tabindex="0"
type="application/x-shockwave-flash"/>
<a href="http://www.lipsum.com/" id="focus2">test 2</a>Since this example uses SWFObject's dynamic loading, the class names will have to be specified as attribute when SWFObject is initialized. This is demonstrated in the code example below.
Example Code:
<?xml version="1.0" encoding="UTF-8"?>
<!DOCTYPE html PUBLIC "-//W3C//DTD XHTML 1.0 Strict//EN"
"http://www.w3.org/TR/xhtml1/DTD/xhtml1-strict.dtd">
<html lang="en" xml:lang="en" xmlns="http://www.w3.org/1999/xhtml">
<head>
<title>Keyboard Trap Fix Example </title>
<meta content="text/html; charset=utf-8" http-equiv="Content-Type"/>
<script src="swfobject_2_1.js" type="text/javascript"/>
<script type="text/javascript">
var flashvars = {};
var params = {};
params.scale = "noscale";
var attributes = {};
attributes.id = "FlashSample2SWF";
attributes.name = "FlashSample2SWF";
attributes["class"] = "swfPrev-focus1 swfNext-focus2";
swfobject.embedSWF("keyboard_trap_fix_as3.swf", "flashSample1", "150",
"200", "9.0.0", "expressInstall.swf", flashvars, params, attributes);
</script>
</head>
<body>
<a href="http://www.lipsum.com/" id="focus1">lorem</a>
<p>The following Flash content uses existing links in the document
to move focus to when (shift) tabbing out of the Flash content.
The existing links are defined by placing special classnames on
the Flash object.</p>
<div id="flashSample2">
<a href="http://www.adobe.com/go/getflashplayer">
<img alt="Get Adobe Flash player"
src="http://www.adobe.com/images/shared/download_buttons/get_flash_player.gif"
/>
</a>
</div>
<a href="http://www.lipsum.com/">lorem</a>
</body>
</html>Note: this example assumes that the focusable HTML elements exist and have an ID value at the time SWFObject is called to insert the Flash content. However, in some situations it is also possible that these elements do not yet exist when the Flash content is created, or that the elements will be deleted dynamically at a later point. If this happens, it is possible to reassign ID values for previous and next focusable elements. To do this, call the SWFsetFocusIds() method on the Flash content object, like so:
Example Code:
var o = document.getElementById("FlashSample1SWF");
o.SWFsetFocusIds('prevId', 'nextId');From that point on the updated IDs will be used to move focus to when tabbing out of the Flash content.
Resources are for information purposes only, no endorsement implied.
For a Flash content on a web page:
If possible, confirm that the source of the Flash content imports and initializes the SWFFocus class
Press the tab key to move through tabbable items on the page
Confirm that it is possible to tab into the Flash content
Continue tabbing and confirm that it is possible to tab out of the flash content
Checks 3 and 4 are true
If this is a sufficient technique for a success criterion, failing this test procedure does not necessarily mean that the success criterion has not been satisfied in some other way, only that this technique has not been successfully implemented and can not be used to claim conformance.
Adobe Flash Professional version MX and higher
Adobe Flex
This technique relates to:
See User Agent Support Notes for FLASH18. Also see Flash Technology Notes.
The intent of this technique is to allow a user to turn off sounds that start automatically when a Flash movie loads. The control to turn off the sounds should be located near the beginning of the page to allow the control to be easily and quickly discovered by users . This is useful for those who utilize assistive technologies (such as screen readers, screen magnifiers, switch mechanisms, etc.) and those who may not (such as those with cognitive, learning and language disabilities).
In this technique, an author includes a control that makes it possible for users to turn off any sounds that are played automatically. For maximum accessibility, the control can be added to the HTML document rather than to the Flash movie. The HTML control will communicate with the Flash movie through the ExternalInterface class. This means that the user can control the sound playback without having to interact with Flash content. If this is not practical, the control can be provided within the Flash content, provided that the control is keyboard operable, located early in the tab and reading order, and clearly labeled to indicate that it will turn off the sounds that are playing.
This example demonstrates the addition of a button within the Flash movie to allow the user to stop sounds from playing. A class called SoundHandler is created which automatically starts playing an mp3 file when the movie loads.
Example Code:
package wcagSamples {
import flash.display.Sprite;
import flash.net.URLRequest;
import flash.media.Sound;
import flash.media.SoundChannel;
import fl.controls.Button;
import fl.accessibility.ButtonAccImpl;
import flash.events.MouseEvent;
public class SoundHandler extends Sprite {
private var snd: Sound = new Sound();
private var button: Button = new Button();
private var req: URLRequest = new URLRequest("http://av.adobe.com/podcast\
/csbu_dev_podcast_epi_2.mp3");
private var channel: SoundChannel = new SoundChannel();
public function SoundHandler() {
ButtonAccImpl.enableAccessibility();
button.label = "Stop Sound";
button.x = 10;
button.y = 10;
button.addEventListener(MouseEvent.CLICK, clickHandler);
this.addChild(button);
snd.load(req);
channel = snd.play();
}
private function clickHandler(e: MouseEvent): void {
if (button.label == "Stop Sound") {
button.label = "Start Sound";
channel.stop();
} else {
channel = snd.play();
button.label = "Stop Sound";
}
}
}
}This is demonstrated in the working example of Providing a button in the Flash to stop sound. The source of Providing a button in the Flash to stop sound is available.
A class called SoundHandler is created which automatically starts playing an mp3 file when the movie loads. An HTML button is placed in the HTML document containing the Flash movie. When the button is clicked the action is communicated between the HTML page and the Flash movie via the Flash Player JavaScript API, resulting in the toggleSound method being called on the SoundHandler class.
Example Code:
package wcagSamples {
import flash.display.Sprite;
import flash.external.ExternalInterface;
import flash.net.URLRequest;
import flash.media.Sound;
import flash.media.SoundChannel;
import flash.events.MouseEvent;
public class SoundHandler extends Sprite {
private var snd: Sound = new Sound();
private var soundOn: Boolean = true;
private var req: URLRequest = new URLRequest("http://av.adobe.com/podcast/\
csbu_dev_podcast_epi_2.mp3");
private var channel: SoundChannel = new SoundChannel();
public function SoundHandler() {
if (ExternalInterface.available)
ExternalInterface.addCallback("toggleSound", this.toggleSound);
snd.load(req);
channel = snd.play();
}
private function toggleSound(enable: Boolean): void {
if (! enable) {
channel.stop();
soundOn = true;
} else {
channel = snd.play();
soundOn = true
}
}
}
}Example Code:
<?xml version="1.0" encoding="UTF-8"?>
<!DOCTYPE html PUBLIC "-//W3C//DTD XHTML 1.0 Transitional//EN"
"http://www.w3.org/TR/xhtml1/DTD/xhtml1-transitional.dtd">
<html xmlns="http://www.w3.org/1999/xhtml">
<head>
<meta content="text/html; charset=UTF-8" http-equiv="Content-Type"/>
<title>Flash Sound Toggle example</title>
<script src="swfobject.js" type="text/javascript"/>
<script type="text/javascript">
function $(id) {
return document.getElementById(id);
}
swfobject.embedSWF("html_control_to_toggle_audio_as3.swf",
"flashPlaceHolder", "0", "0", "8");
function init() {
var soundOn = true;
$("soundToggle").onclick = function(event){
soundOn = !soundOn;
$("flashPlaceHolder").toggleSound(soundOn);
event.target.value = soundOn ? "Stop Sound" : "Start Sound";
};
}
window.onload = init;
</script>
</head>
<body id="header">
<h1>Flash Automatic Sound Demo</h1>
<p>This page contains a Flash movie that automatically starts
playing sound. Use the button below to stop or start the
sound</p>
<input id="soundToggle" type="button" value="Stop Sound"/>
<p id="flashPlaceHolder">Flash needs to be installed for this
example to work</p>
</body>
</html>
This is demonstrated in the working example of Providing a button in the HTML before the Flash object to stop sound. The source of source of Providing a button in the HTML before the Flash object to stop sound is available.
For Flash movies that automatically start playing sound after loading:
Confirm that an HTML control that conforms to WCAG 2.0 is placed at the beginning of the document's tab order
If there is no HTML-based control, confirm that an accessible control is placed at the beginning of the Flash movie's tab order.
Activate the HTML or Flash-based control
Verify that audio playback stops
Check #1 or #2 is true, and #4 is true.
If this is a sufficient technique for a success criterion, failing this test procedure does not necessarily mean that the success criterion has not been satisfied in some other way, only that this technique has not been successfully implemented and can not be used to claim conformance.
Adobe Flash Professional version MX and higher
Adobe Flex
This technique relates to:
See User Agent Support Notes for FLASH19. Also see Flash Technology Notes.
The objective of this technique is to notify users that they are almost out of time to complete an interaction. When scripts provide functionality that has time limits, the script can include functionality to warn the user of imminent time limits and provide a mechanism to request more time. 20 seconds or more before the time limit occurs, the script provides a confirm dialog that states that a time limit is imminent and asks if the user needs more time. If the user answers "yes" then the time limit is reset. If the user answers "no" or does not respond, the time limit is allowed to expire.
This technique involves time limits set with the setTimeout() method. If, for example, the time limit should be 60 seconds, you can set the time limit for 40 seconds (20 seconds less than the desired timeout) and show a confirm dialog. The confirm dialog sets a new timeout for the remaining 20 seconds. If the user requests more time, a new timeout is set. However, if the 20-second "grace period time limit" expires (meaning 60 seconds have now elapsed), the action appropriate for the expiry of the 60 second time limit in the original design is taken.
This is a basic AS2 example of a time limit that can be extended by the user. An alert is shown after 40 seconds of inactivity, warning that the session is about to expire. The user is given 20 seconds to press the space bar or click on the "Yes" button. Note that the 40 second duration would be insufficient for most tasks and is artificially short for ease of demonstration.
Example Code:
import mx.controls.Alert;
import flash.accessibility.Accessibility;
mx.accessibility.AlertAccImpl.enableAccessibility();
var sessionTimeout;
var sessionNotificationTimeout;
var timeLimit: Number = 60000;
var sessionAlert: Alert;
resetTimeout();
testField.addEventListener("change", resetTimeout);
function resetTimeout() {
clearTimeout(sessionTimeout);
clearTimeout(sessionNotificationTimeout);
sessionTimeout = setTimeout(endSession, timeLimit);
sessionNotificationTimeout = setTimeout(showTimeoutAlert, timeLimit - 20000);
}
function showTimeoutAlert() {
sessionAlert = Alert.show("Click the YES button to extend your session",
"Your login session is about to expire, do you need more time?",
Alert.YES | Alert.NO, null, handleAlertClick);
}
function endSession() {
sessionAlert.deletePopUp();
Alert.show("please log in again",
"Your session has expired");
}
function handleAlertClick(e) {
if (e && e.detail && e.detail == Alert.YES)
resetTimeout();
}For a demonstration, see a working example of Using ActionScript to offer a time limit extension before the timeout expires. The source of Using ActionScript to offer a time limit extension before the timeout expires is available.
load the page and start a timer that is 20 seconds less than the time limit.
when the timer expires, check that a confirmation dialog is displayed warning of the impending time limit and allows the user to extend the limit within 20 seconds.
Check #2 is true
If this is a sufficient technique for a success criterion, failing this test procedure does not necessarily mean that the success criterion has not been satisfied in some other way, only that this technique has not been successfully implemented and can not be used to claim conformance.
Adobe Flash Professional version MX and higher
Adobe Flex
This technique relates to:
See User Agent Support Notes for FLASH20. Also see Flash Technology Notes.
The purpose of this technique is to allow the author to use ActionScript and component skins to apply a strong visual indication when a component receives focus. In this particular technique, both the component's background color and border will change. When the component loses focus, it returns to its normal styling.
The visual highlights will be applied by switching some of the component's skin parts. The Standard Flash components each have their own set of skins that make up the component's visual appearance. Each part is represented by a MovieClip which can be edited or replaced in order to customize how the component looks. The most relevant skin for this technique is the focusRectSkin skin, which is shared by all components. By default this skin applies a subtle visual highlight when the component receives focus.
This technique can be applied through the following steps:
Create a customized version of focusRectSkin.
Use scripting to associate the component with the customized skin.
There are two ways to customize a skin:
Duplicating Existing Skin
With this approach you create a copy of the existing focusRect skin for modification. You will manually have to apply the skin for each individual component instance (as indicated in step 5 below).
Drag the components you want to style to the stage. This will ensure the appropriate component related skins are added to the movie's library.
Open the Library panel, and navigate to the "Component Assets > Shared" folder.
Right-click (or Ctrl-click on a Mac) on the focusRectSkin MovieClip, and choose "Duplicate" from the context menu.
Edit the visual border in the skin's MovieClip. For example, the focus rectangle can be made thicker to stand out more (This step is illustrated in the screenshot below this list).
Using ActionScript, associate form component instances with your customized version of focusRectSkin. This can be achieved using the setStyle method.
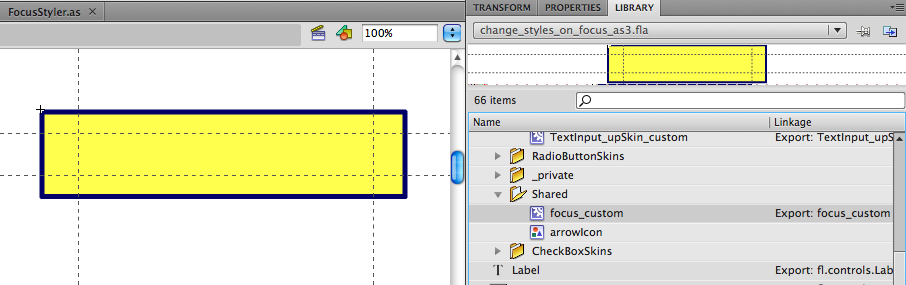
Modifying Existing Skin
With this approach, the original focusRect skin is modified. This means that the changes you make will be applied to the visual focus indication of _every_ focusable component.
Drag the components you want to style to the stage. This will ensure the appropriate component related skins are added to the movie's library.
Open the Library panel, and navigate to the "Component Assets > Shared" folder.
Open the focusRectSkin MovieClip for editing by double clicking on it.
Edit the visual border in the skin's MovieClip. For example, the focus rectangle can be made thicker to stand out more.
Note: With this approach you will override the existing skin. If you don't want this, follow the "Duplicate Existing Skin" approach instead.
The focusRect skin applies to all focusable Flash components. If you want to modify other highlights (for example highlights that occur when hovering over a component with the mouse), you will have to edit component specific skins individually. For example, to edit the mouseover highlights for the checkbox component, you will have to modify or duplicate both Checkbox_overIcon and Checkbox_selectedOverIcon. Similarly, for the Button component you will have to modify the Button_over skin.
Also, keep in mind that the existing skins are automatically applied on certain events (focus, mouseover, etc.). It is however also possible to manually switch a skin at a moment of your own choosing (e.g. to indicate invalid content for a text field). this can also be achieved this by calling the setStyle method.
The code below shows an example where form component instances are associated with a modified version of the focusRectSkin MovieClip. The result is that the components receive a thick blue border rather than the default thin border Flash provides. The code makes a reference to a modified skin called Focus_custom, which has been added to the movie's library in advance.
Note that the custom version of focusRectSkin also sets a transparent yellow background to increase the visual highlight further. Components such as Buttons and checkboxes will show this background, but TextInput components will not. To ensure the yellow background will still be applied to the TextInput instance, the following workaround is applied:
A duplicate version of the TextInput "normal" skin (which can be found in the library at "Component Asssets > TextInputSkins > TextInput_upSkin") is created and edited to show a yellow background.
FocusIn, FocusOut, MouseOver and MouseOut handlers are assigned to the TextInput instance, which temporarily swap the default "normal" skin with the custom "normal" skin while the component is focused or hovered over.
Additionally, the button_over skin is duplicated and modified to change the default mouseover highlights for the button component instance. The checkbox_overIcon and checkbox_selectedOverIcon skins are directly modified, which means those changes will be applied to all checkbox instances.
The result of this technique can be found in the working version of A thick blue border to indicate focus.
Example Code:
package wcagSamples {
import fl.accessibility.ButtonAccImpl;
import fl.accessibility.CheckBoxAccImpl;
import fl.controls.CheckBox;
import fl.controls.Button;
import fl.controls.Label;
import fl.controls.TextInput;
import flash.display.Sprite;
import flash.events.FocusEvent;
import flash.events.MouseEvent;
public class FocusStyler extends Sprite {
public function FocusStyler() {
ButtonAccImpl.enableAccessibility()
CheckBoxAccImpl.enableAccessibility()
var lbl1: Label = new Label();
lbl1.text = "name";
lbl1.x = lbl1.y = 20;
addChild(lbl1);
var txt1: TextInput = new TextInput();
txt1.x = 60;
txt1.y = 20;
txt1.width = 200;
txt1.addEventListener(FocusEvent.FOCUS_IN, handleFocusIn);
txt1.addEventListener(FocusEvent.FOCUS_OUT, handleFocusOut);
txt1.addEventListener(MouseEvent.MOUSE_OVER, handleFocusIn);
txt1.addEventListener(MouseEvent.MOUSE_OUT, handleFocusOut);
txt1.setStyle("focusRectSkin", "focus_custom");
addChild(txt1);
var chk1: CheckBox = new CheckBox();
chk1.label = "Check Me";
chk1.x = 60;
chk1.y = 70;
chk1.setStyle("focusRectSkin", "focus_custom");
addChild(chk1);
var btn1: Button = new Button();
btn1.label = "Click Me";
btn1.x = 60;
btn1.y = 110;
btn1.setStyle("focusRectSkin", "focus_custom");
btn1.setStyle("overSkin", "Button_over_custom");
addChild(btn1);
}
private function handleFocusIn(event) {
event.currentTarget.setStyle("upSkin", "TextInput_upSkin_custom");
}
private function handleFocusOut(event) {
event.currentTarget.setStyle("upSkin", "TextInput_upSkin");
}
}
}This is demonstrated in working version of A thick blue border to indicate focus. The source of working version of A thick blue border to indicate focus is available.
Resources are for information purposes only, no endorsement implied.
When a Flash movie contains focusable components, confirm that:
The visual highlight is applied by modifying the component's skins
A visual highlight is shown when the components receive focus
#1 and #2 are true
If this is a sufficient technique for a success criterion, failing this test procedure does not necessarily mean that the success criterion has not been satisfied in some other way, only that this technique has not been successfully implemented and can not be used to claim conformance.
Adobe Flash Professional version MX and higher
Adobe Flex
This technique relates to:
See User Agent Support Notes for FLASH21. Also see Flash Technology Notes.
The intent of this Technique is to ensure that information and relationships that are implied visually by data tables are also made available programmatically. Specifically, the association between table column headers and their corresponding cells must be exposed to assistive technology. In Flash, the DataGrid component can be used to achieve this. When accessibility is enabled for the DataGrid component, Flash will automatically prepend the column name in front of each cell value when exposing the grid row's accessible name to assistive technology. For example, the row in the screenshot below would be announced by a screen reader as "Row 6 of 13 Name Patty Crawford Bats L Throws L Year Jr Home Whittier, CA".
Note: The DataGrid component in Flash only supports column headings, not row headings.
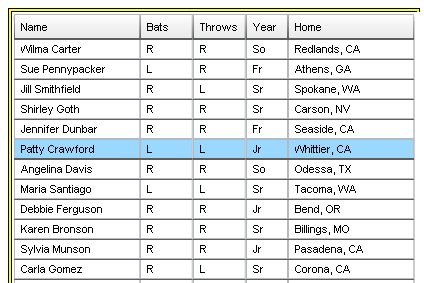
In this example, statistical data is used as data provider for a dynamically created DataGrid component. The lines import fl.accessibility.DataGridAccImpl; DataGridAccImpl.enableAccessibility(); are required to enable accessibility for the Datagrid Component.
Example Code:
import fl.accessibility.DataGridAccImpl;
DataGridAccImpl.enableAccessibility();
import fl.data.DataProvider;
bldRosterGrid(aDg);
var aRoster: Array = new Array();
aRoster = [ {
Name: "Wilma Carter", Bats: "R", Throws: "R", Year: "So", Home: "Redlands, CA"}, {
Name: "Sue Pennypacker", Bats: "L", Throws: "R", Year: "Fr", Home: "Athens, GA"}, {
Name: "Jill Smithfield", Bats: "R", Throws: "L", Year: "Sr", Home: "Spokane, WA"}, {
Name: "Shirley Goth", Bats: "R", Throws: "R", Year: "Sr", Home: "Carson, NV"}, {
Name: "Jennifer Dunbar", Bats: "R", Throws: "R", Year: "Fr", Home: "Seaside, CA"}, {
Name: "Patty Crawford", Bats: "L", Throws: "L", Year: "Jr", Home: "Whittier, CA"}, {
Name: "Angelina Davis", Bats: "R", Throws: "R", Year: "So", Home: "Odessa, TX"}, {
Name: "Maria Santiago", Bats: "L", Throws: "L", Year: "Sr", Home: "Tacoma, WA"}, {
Name: "Debbie Ferguson", Bats: "R", Throws: "R", Year: "Jr", Home: "Bend, OR"}, {
Name: "Karen Bronson", Bats: "R", Throws: "R", Year: "Sr", Home: "Billings, MO"}, {
Name: "Sylvia Munson", Bats: "R", Throws: "R", Year: "Jr", Home: "Pasadena, CA"}, {
Name: "Carla Gomez", Bats: "R", Throws: "L", Year: "Sr", Home: "Corona, CA"}, {
Name: "Betty Kay", Bats: "R", Throws: "R", Year: "Fr", Home: "Palo Alto, CA"}
];
aDg.dataProvider = new DataProvider(aRoster);
aDg.rowCount = aDg.length;
function bldRosterGrid(dg: DataGrid) {
dg.setSize(400, 300);
dg.columns =[ "Name", "Bats", "Throws", "Year", "Home"];
dg.columns[0].width = 120;
dg.columns[1].width = 50;
dg.columns[2].width = 50;
dg.columns[3].width = 40;
dg.columns[4].width = 120;
dg.move(50, 50);
};This is demonstrated in the working version of A statistical data table. The source of A statistical data table is available.
For Flash content that contains tabular data:
Open the SWF file in Internet Explorer 6 or higher (using Flash Player 6 or higher), or Firefox 3 or higher (using Flash Player 9 or higher)
Use a tool which is capable of showing an object's accessibility name, such as ACTF aDesigner 1.0 to open the Flash movie.
In the GUI summary panel, inspect the accessibility name for the DataGrid rows and cells to ensure that the heading data is presented in conjunction with the data cell data.
Authors may also test with a screen reader, by reading the Flash content and listening to hear that the heading and data cell data are read when reading the DataGrid.
Authors may also verify in the Flash authoring tool that the DataGrid component is used to structure the data and that the DataGrid has been made accessible using the DataGridAccImpl.enableAccessibility method.
Check 3, 4, or 5 is true
If this is a sufficient technique for a success criterion, failing this test procedure does not necessarily mean that the success criterion has not been satisfied in some other way, only that this technique has not been successfully implemented and can not be used to claim conformance.
Adobe Flash Professional version MX and higher
Adobe Flex
This technique relates to:
Note: This technique must be combined with other techniques to meet SC 2.1.1. See Understanding SC 2.1.1 for details.
Note: This technique must be combined with other techniques to meet SC 2.1.3. See Understanding SC 2.1.3 for details.
See User Agent Support Notes for FLASH22. Also see Flash Technology Notes.
The objective of this technique is to demonstrate how to provide keyboard
access to a Flash MovieClip that is not keyboard accessible by default.
This technique ensures that the element is focusable by setting the
tabEnabled property, and it ensures that the action can be triggered
from the keyboard by providing a keydown handler in addition to a click
handler.
In this example, a custom MovieClip is used as a button. To make it
keyboard accessible, the MovieClip is placed in the tab order using
the tabEnabled. Additionally, redundant event handlers are added so
that the custom button responds to both a mouse click and a space bar
keypress. Finally, the custom button is provided an accessible name
using the MovieClip's AccessibilityProperties object. This makes the
button's label perceivable by assistive technology.
This result can be viewed in the working version of MovieClip used as a button. The source of MovieClip used as a button is available.
Note: Using a generic MovieClip is generally not recommended, since the custom button will be perceived as a focusable graphic rather than a button. Instead, a better approach would be to use the standard Flash Button component, or create a new symbol with a type of "button".
Example Code:
import flash.accessibility. *
import flash.events.KeyboardEvent;
import flash.events.MouseEvent;
import flash.net.navigateToURL;
import flash.net.URLRequest;
testMC.tabEnabled = true;
updateAccName(testMC);
testMC.addEventListener(MouseEvent.CLICK, clickHandler, false);
testMC.addEventListener(KeyboardEvent.KEY_DOWN, keyDownHandler);
updateAccName(testMC);
function clickHandler(e) {
testMC.labelText.text = "THANKS";
updateAccName(testMC);
}
function keyDownHandler(e) {
if (e.keyCode == 32)
clickHandler(e);
}
function updateAccName(mc: MovieClip) {
if (! mc.accessibilityProperties)
mc.accessibilityProperties = new AccessibilityProperties();
mc.accessibilityProperties.name = mc.labelText.text;
Accessibility.updateProperties();
}When a Flash Movie contains generic MovieClip instances that are used as interactive controls, confirm that:
The MovieClip instance has its tabEnabled property set to true
The MovieClip instance has event handlers for both mouse and keyboard events
#1 and #2 are true
If this is a sufficient technique for a success criterion, failing this test procedure does not necessarily mean that the success criterion has not been satisfied in some other way, only that this technique has not been successfully implemented and can not be used to claim conformance.
Adobe Flash Professional version MX and higher
Adobe Flex
This technique relates to:
See User Agent Support Notes for FLASH23. Also see Flash Technology Notes.
The objective of this technique is to provide a brief overview of how data has been organized into a DataGrid or a brief explanation of how to navigate the grid.
As Flash does not provide a summary attribute, this descriptive text will be added to the DataGrid's accessible desription instead. This approach will make the summary information available to people who use screen readers; the information is not displayed visually.
The summary is useful when the table has a complex structure (for example, when there are several sets of row or column headers, or when there are multiple groups of columns or rows). The summary may also be helpful for simple data tables that contain many columns or rows of data.
This is an example of a DataGrid being added to the stage in Flash Professional from the Components panel. The description field is used in the Accessibility control panel in Flash to serve as the summary information for the DataGrid.
Create a new Flash file (.fla) or open an existing one to put a DataGrid into.
Open the Flash components panel from the Window menu
Drag a DataGrid component onto the stage and position as desired.
Select the DataGrid component and add the summary information to the description field for DataGrid, using the Accessibility control panel.
This is a basic AS3 example of a DataGrid component that has summary text added as its accessible description.
Example Code:
import fl.accessibility.DataGridAccImpl;
import fl.controls.DataGrid;
import fl.controls.Label;
import fl.data.DataProvider;
import flash.accessibility.Accessibility;
import flash.accessibility.AccessibilityProperties;
import flash.system.Capabilities;
DataGridAccImpl.enableAccessibility();
createGrid();
//set the summary text as accessible description
var accProps: AccessibilityProperties = new AccessibilityProperties();
accProps.description = "The first column shows the player's name," +
"the second and third column shows the player's gaming statistics." +
"the fourth column shows the player's year as FR (Freshman), JR (junior) or SO (Sophomore)." +
"The fifth column shows the player's home city and state";
aDg.accessibilityProperties = accProps;
if (Capabilities.hasAccessibility)
Accessibility.updateProperties();
function createGrid() {
//create and add the components
var aDg: DataGrid = new DataGrid();
addChild(aDg);
aDg.move(50, 50);
bldRosterGrid(aDg);
var aRoster: Array = new Array();
aRoster =[ {
Name: "Wilma Carter", Bats: "R", Throws: "R", Year: "So", Home: "Redlands, CA"
}, {
Name: "Sue Pennypacker", Bats: "L", Throws: "R", Year: "Fr", Home: "Athens, GA"
}, {
Name: "Jill Smithfield", Bats: "R", Throws: "L", Year: "Sr", Home: "Spokane, WA"
}, {
Name: "Betty Kay", Bats: "R", Throws: "R", Year: "Fr", Home: "Palo Alto, CA"
},];
aDg.dataProvider = new DataProvider(aRoster);
aDg.rowCount = aDg.length;
}
function bldRosterGrid(dg: DataGrid) {
dg.setSize(400, 300);
dg.columns =[ "Name", "Bats", "Throws", "Year", "Home"];
dg.columns[0].width = 120;
dg.columns[1].width = 50;
dg.columns[2].width = 50;
dg.columns[3].width = 40;
dg.columns[4].width = 120;
};For a demonstration, see the working version of Adding a summary to a DataGrid with ActionScript 3. The source of Adding a summary to a DataGrid with ActionScript 3 is available.
If the Flash movie contains a DataGrid component, confirm that summary text has been added to it through the corresponding accessible description property.
The above is true.
If this is a sufficient technique for a success criterion, failing this test procedure does not necessarily mean that the success criterion has not been satisfied in some other way, only that this technique has not been successfully implemented and can not be used to claim conformance.
Adobe Flash Professional version MX and higher
Adobe Flex
This technique relates to:
See User Agent Support Notes for FLASH24. Also see Flash Technology Notes.
The objective of this technique is to allow the user to extend the default time limit by providing a mechanism to extend the time when scripts provide functionality that has default time limits. In order to allow the user to request a longer time limit, the script can provide a form (for example) allowing the user to enter a larger time limit or indicating that more time is needed.
This is a basic AS2 example where the timeout duration can be changed by the user through a dropdown list. In this example there is a combobox with the instance name sessionLimitDuration.
Example Code:
import mx.controls.Alert;
import mx.accessibility.AlertAccImpl;
import mx.accessibility.ComboBoxAccImpl;
ComboBoxAccImpl.enableAccessibility();
AlertAccImpl.enableAccessibility();
var sessionTimeout;
var sessionNotificationTimeout;
var timeLimit: Number;
var sessionAlert: Alert;
adjustTimeoutDuration();
// reset the timeout when interaction occurs
testField.addEventListener("change", resetTimeout);
//
//update limit duration when the combobox value changes
//
sessionLimitDuration.addEventListener("change", adjustTimeoutDuration);
function adjustTimeoutDuration(e) {
timeLimit = sessionLimitDuration.value * 1000;
resetTimeout();
timeoutDescription.text = "A session timeout will be simulated after " +
sessionLimitDuration.selectedLabel + " without interaction in the form field below."
}
function resetTimeout() {
clearTimeout(sessionTimeout);
sessionTimeout = setTimeout(endSession, timeLimit);
}
function endSession() {
sessionAlert.deletePopUp();
Alert.show("please log in again",
"Your session has expired");
}For a demonstration, see the working version of Changing timeout with a dropdown list. The source of Changing timeout with a dropdown list is available. Please note that the session times are purposefully short for demonstration purposes, developers will want to provide durations that are sufficient to meet the requirements of Success Criterion 2.2.1 (Timing Adjustable) .
For Flash content that include a time limit:
Check that there is a control to adjust the time limit near the top of the page that allows the user to adjust the time to at least ten times longer than the default.
Verify that the default time limit for the page is long enough that a user can easily navigate to the control even if they are 10 times slower than most users.
The above is true
If this is a sufficient technique for a success criterion, failing this test procedure does not necessarily mean that the success criterion has not been satisfied in some other way, only that this technique has not been successfully implemented and can not be used to claim conformance.
Adobe Flash Professional version MX and higher
Adobe Flex
This technique relates to:
See User Agent Support Notes for FLASH25. Also see Flash Technology Notes.
The objective of this technique is to provide an accessible name to
the built in form components provided by Flash. Some components, such
as radio buttons, checkboxes and buttons, have their own label property.
For other components, the developer needs to specify the component's
label text as accessible name. This can be either be achieved through
the Accessibility panel (for components placed on the stage during
authoring) or through scripting (for components that are dynamically
created at runtime).
ActionScript 2
In ActionScript 2 the accessible name needs to be set on a component's
_accProps property. This property must be an object. If the property
has not been set yet, the developer needs to create a custom object
and assign it to the _accProps property. The object itself can have
several accessibility related properties, one of them being _accProps.name,
which specifies the accessible name. When an _accProps property is
updated, the developer must call Accessibility.UpdateProperties() for
the changes to take effect. Before calling Accessibility.UpdateProperties(),
it is recommended to check the System.capabilities.hasAccessibility
flag. this will prevent an error on environments that do not support
MSAA.
ActionScript 2 provides the following accessible components:
SimpleButton
CheckBox
RadioButton
Label
TextInput
TextArea
ComboBox
ListBox
Window
Alert
DataGrid
ActionScript 3
In ActionScript 3 the accessible name needs to be set on a component's
accessibilityProperties property. This property must be an an instance
of flash.accessibility.AccessibilityProperties. If the property has
not been set yet, the developer needs to create the a new AccessibilityProperties
instance and assign it to the accessibilityProperties property. The
object itself can have several accessibility related properties, one
of them being accessibilityProperties.name which specifies the accessible
name. When an accessibilityProperties property is updated, the developer
must call flash.accessibility.Accessibility.UpdateProperties() for the
changes to take effect. Before calling Accessibility.UpdateProperties(),
it is recommended to check the flash.system.capabilities.hasAccessibility
flag. this will prevent an error on environments that do not support
MSAA.
ActionScript 3 provides the following accessible components.
Button
CheckBox
ComboBox
List
RadioButton
TileList
To add and label a component control, follow these steps:
From the 'Components' panel, drag the component on to the stage, or use scripting to create a new instance.
With the newly created component instance selected, enter its label text in the Accessibility Panel's Name field.
The code example below shows how a ListBox component is created and assigned an accessible name.
Example Code:
mx.accessibility.ListAccImpl.enableAccessibility();
this.createClassObject(mx.controls.List, "my_list", 1);
my_list.addItem({label: "R. Davis", data: 1});
my_list.addItem({label: "V. Mann", data: 2});
my_list.addItem({label: "L. Heart", data: 3});
my_list.addItem({label: "P. Hill", data: dt4});
my_list.addItem({label: "D. Gribble", data: 5});
my_list.move(10, 10);
if (System.capabilities.hasAccessibility) {
my_list._accProps = new Object();
my_list._accProps.name = "Staff Members";
Accessibility.updateProperties();
}This result can be viewed in the working version of Setting the accessible name through ActionScript 2.0. The source of Setting the accessible name through ActionScript 2.0 is available.
The code example below shows how a ListBox component is created and assigned an accessible name.
Example Code:
import fl.controls.List;
import fl.accessibility.ListAccImpl;
import flash.system.Capabilities;
import flash.accessibility.*;
ListAccImpl.enableAccessibility();
var my_list:List = new List();
my_list.addItem({label:"R. Davis", data:1});
my_list.addItem({label:"V. Mann", data:2});
my_list.addItem({label:"L. Heart", data:3});
my_list.addItem({label:"P. Hill", data:4});
my_list.addItem({label:"D. Gribble", data:5});
my_list.x = my_list.y = 10;
if (Capabilities.hasAccessibility) {
var accProps:AccessibilityProperties = new AccessibilityProperties();
accProps.name = "Staff Members";
my_list.accessibilityProperties = accProps;
Accessibility.updateProperties();
}
addChild(my_list);This result can be viewed in the working version of Setting the accessible name through ActionScript 3.0. The source of Setting the accessible name through ActionScript 3.0 is available.
For Flash movies that contain form components, confirm that either:
The selected component's label text is specified in the Accessibility Panel's "name" field.
In ActionScript 2.0: Scripting is used to dynamically set the
component's _accProps.name property
In ActionScript 3.0: Scripting is used to dynamically set the
component's accessibilityProperties.name property
One of the above is true
If this is a sufficient technique for a success criterion, failing this test procedure does not necessarily mean that the success criterion has not been satisfied in some other way, only that this technique has not been successfully implemented and can not be used to claim conformance.
Flash CS3 and higher
ActionScript 3.0 and higher
This technique relates to:
See User Agent Support Notes for FLASH26. Also see Flash Technology Notes.
The objective of this technique is to provide a way for people who are blind or otherwise have trouble seeing the video in audio-visual material to be able to access the material. With this technique a description of the video is provided via audio description that will fit into the gaps in the dialogue in the audio-visual material.
In this example, the FLVPlayback component is used to create a video player. A custom class called "AudioDescriptions" is added to manage the playback of extended audio descriptions. This class provides event listeners to listen for cue points in the media that have been identified by the audio description provider. When these cuepoints are reached, an mp3 file containing the corresponding description will start playing. The recorded descriptions have been timed to fit with in the gaps in the movie's dialog.
By default, audio descriptions will be enabled. A button (which must itself be accessible to meet other success criteria) is provided below the video player that allows the user to turn audio descriptions on or off.
Example Code:
package {
import fl.video. *;
import flash.events. *;
import flash.media.Sound;
import flash.media.SoundChannel;
import flash.net.URLRequest;
import flash.display.Sprite;
public class AudioDescriptions extends Sprite {
private var channel: SoundChannel = new SoundChannel;
private var myPlayer: FLVPlayback;
private var _enabled: Boolean = true;
private var _toggleBtn: Button;
private var snd: Sound = new Sound();
public function AudioDescriptions() {
// point myPlayer to the FLVPlayback component instance on the stage,
// which should be loaded with a valid video source.
myPlayer = my_FLVPlybk;
// add cue points. When any of these are reached, the
// MetadataEvent.CUE_POINT event will fire
myPlayer.addASCuePoint(8.35, "ASpt1");
myPlayer.addASCuePoint(23.23, "ASpt2");
enable();
enable_AD_btn.addEventListener(MouseEvent.CLICK, handleBtnClick);
}
private function handleBtnClick(e) {
_enabled = ! _enabled;
if (! _enabled) {
disable();
enable_AD_btn.label = "Enable Audio Descriptions";
} else {
enable();
enable_AD_btn.label = "Disable Audio Descriptions";
}
}
public function enable() {
// set up an event handler which will be called each time a cue point is reached
myPlayer.addEventListener(MetadataEvent.CUE_POINT, cp_listener);
}
public function disable() {
// remove the event handler called each time a cue point is reached, so
// that audio description is disabled.
myPlayer.removeEventListener(MetadataEvent.CUE_POINT, cp_listener);
}
private function cp_listener(eventObject: MetadataEvent): void {
snd = new Sound();
//recreate sound object as it can only load one mp3 file
//check to see which cue point was reached
switch (eventObject.info.name) {
case "ASpt1":
snd.load(new URLRequest("sphere.mp3"));
//create a new Sound object, and load the appropriate mp3
channel = snd.play();
// play the audio description, and assign it to the SoundChannel object
break;
case "ASpt2":
snd.load(new URLRequest("transfrm.mp3"));
channel = snd.play();
break;
}
}
}
}The result can be viewed in the working version of Playing descriptions when cue points are reached. The source of Playing descriptions when cue points are reached is available.
Audio description can also be provided via an additional audio track that is the same length and plays simultaneously as the primary media, but that only includes sound for the segments when audio description needs to be played and silence at other times. A Flash author can provide a toggle to turn this additional audio track on or off, based on the listener's preference. When the additional track is enabled, there are two parallel audio tracks, one being the primary audio, and the second being the one containing only audio description. It is still necessary to ensure that the audio description and primary audio do not overlap in ways that make comprehension difficult. This method will achieve the same result as the method used in Example 1, but may be chosen because of the type of audio description files that are provided to the Flash author.
When Flash content contains video with an audio soundtrack, confirm that:
Audio descriptions have been made available using separate sound files.
A button is provided that allows users to enable or disable the audio descriptions
#1 and #2 are true
If this is a sufficient technique for a success criterion, failing this test procedure does not necessarily mean that the success criterion has not been satisfied in some other way, only that this technique has not been successfully implemented and can not be used to claim conformance.
Adobe Flash Professional version MX and higher
Adobe Flex
This technique relates to:
See User Agent Support Notes for FLASH27. Also see Flash Technology Notes.
The objective of this technique is to describe the purpose of a button by providing descriptive text as the button's accessible name. The description lets a user distinguish this button from other buttons in the Flash movie and helps the user determine whether to activate the button. An empty string is not sufficient as a button's accessible name.
For buttons with text labels, the label text will be used as a buttons accessible name. If a button is image based and does not have a text label, the button's accessible name will have to be set separately using the Accessibility panel or through scripting.
Example Code:
import fl.controls.Button;
import fl.accessibility.ButtonAccImpl;
ButtonAccImpl.enableAccessibility();
var myButton:Button = new Button();
myButton.label = "View Items in Cart";
In this example, the button's label property is deliberately set to an empty string. To be perceivable to assistive technology, the button's accessibilityProperties.name property is set.
Example Code:
import fl.controls.Button;
import fl.accessibility.ButtonAccImpl;
import flash.accessibility.*;
import flash.system.Capabilities;
ButtonAccImpl.enableAccessibility();
var soundIsMuted = false;
var myButton:Button = new Button();
myButton.setStyle("icon", unmuted);
myButton.label = "";
myButton.x = myButton.y = 10;
myButton.width = myButton.height = 50;
updateAccName(myButton, "mute sound");
myButton.setStyle("icon", unmuted);
myButton.addEventListener(MouseEvent.CLICK, handleBtnClick);
addChild(myButton);
function handleBtnClick(e) {
soundIsMuted = !soundIsMuted;
myButton.setStyle("icon", soundIsMuted ? muted : unmuted);
updateAccName(myButton, soundIsMuted ? "unmute sound" : "mute sound");
}
function updateAccName(obj, newName:String) {
if (!obj.accessibilityProperties)
obj.accessibilityProperties = new AccessibilityProperties();
obj.accessibilityProperties.name = newName;
if (Capabilities.hasAccessibility)
Accessibility.updateProperties();
}For each button in the Flash movie that uses this technique:
Check that the button's label text correctly describes the button's purpose
If a button does not have a text label, confirm that descriptive text has been added as the button's accessible name.
If a button contains both label text and an accessible name, confirm that the combination of the two makes sense as a description for the button's purpose.
Checks #1, #2, and #3 are true.
If this is a sufficient technique for a success criterion, failing this test procedure does not necessarily mean that the success criterion has not been satisfied in some other way, only that this technique has not been successfully implemented and can not be used to claim conformance.
Adobe Flash Professional version MX and higher
Adobe Flex
This technique relates to:
See User Agent Support Notes for FLASH28. Also see Flash Technology Notes.
ASCII characters, emoticons, and leetspeek are sometimes used and present accessibility challenges since the meaning is conveyed through the visual appearance of groupings of individual characters.
In Flash, such groupings of characters can be made accessible
by wrapping them in a MovieClip, and providing an accessible
name. It is crucial that the forceSimple property for the
MovieClip is set to true also. This will hide the actual ASCII
characters from assistive technology.
This example contains words written in ASCII art using leetspeek (the text says "WCAG 2 rulez"). To make this text accessible, the following steps are followed:
Place the ASCII characters in a MovieClip instance
Select the MovieClip instance containing the text, and make the following changes in the Accessibility panel:
Add a meaningful text alternative for the ASCII art, without leetspeak (such as "WCAG 2 RULEZ").
Uncheck the "Make child objects accessible" checkbox, so that the ASCII characters will not be read by screen readers
These steps are ilustrated in the screenshot below:
This example is the same as example 1, except using ActionScript instead of the Accessibility control panel in the Flash Professional authoring tool.
Place the ASCII characters in a MovieClip instance
Provide an instance name for the MovieClip instance (e.g. myASCII)
Set the accessible name for the MovieClip and set the
forceSimple property to true to hide the text inside the
MovieClip.
Example Code:
// 'myASCII' is a MovieClip instance placed on the movie's main timeline
myASCII.accessibilityProperties = new AccessibilityProperties();
myASCII.accessibilityProperties.name = "WCAG 2 Rulez";
myASCII.accessibilityProperties.forceSimple = true;
This technique is demonstrated in the working version of Providing a text alternative for ASCII art using ActionScript. The source of Providing a text alternative for ASCII art using ActionScript is available.
Publish the SWF file
Use a tool which is capable of showing an object's name to open the Flash movie.
Locate the ASCII grouping, leet speak, or emoticon and verify in the tool that the accessibility name represents the same information.
Authors may also test with a screen reader, by reading the Flash content and listening to hear that the equivalent text is read when tabbing to the non-text object (if it is tabbable) or hearing the alternative text read when reading the content line-by-line.
#3 or #4 above is true
If this is a sufficient technique for a success criterion, failing this test procedure does not necessarily mean that the success criterion has not been satisfied in some other way, only that this technique has not been successfully implemented and can not be used to claim conformance.
Adobe Flash Professional version MX and higher
Adobe Flex
This technique relates to:
See User Agent Support Notes for FLASH29. Also see Flash Technology Notes.
The objective of this technique is to explicitly associate a form
component with its label text by setting the component's label property.
Setting this property will visually place a label next to the component,
and exposes the label text to assistive technology.
Components that support the label property are:
For other components, the label text has to placed adjacent to the form component manually. For these components, the label text can be associated with the form component using one of these approaches:
In order for these form controls to be accessible to assistive technology, the following lines of code will have to be added once to the movie's script:
When the Button component is used:
import fl.accessibility.ButtonAccImpl;
ButtonAccImpl.enableAccessibility();
When the RadioButton component is used:
import fl.accessibility.RadioButtonAccImpl;
RadioButtonAccImpl.enableAccessibility();
When the CheckBox component is used:
import fl.accessibility.CheckBoxAccImpl;
CheckBoxAccImpl.enableAccessibility();
Add the Button, CheckBox or RadioButton component to the movie by dragging it on the the stage from the 'Components' panel.
With the component selected, open the 'Component Inspector' panel by selecting it in the 'Window' menu or using the Shift + F7 shortcut.
In the Component Inspector, under the 'Parameters' tab, enter the label text for the 'label' parameter.
The screenshot below illustrates this technique.
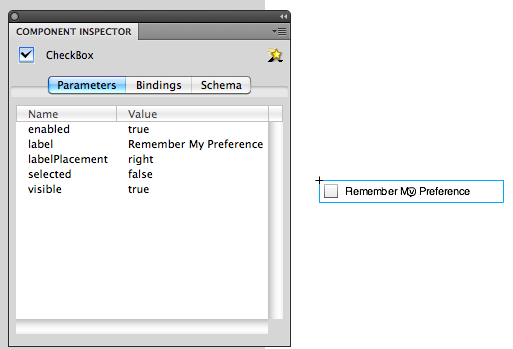
Example Code:
import fl.accessibility.ButtonAccImpl
import fl.accessibility.CheckBoxAccImpl
import fl.accessibility.RadioButtonAccImpl
import fl.controls.Button;
import fl.controls.CheckBox;
import fl.controls.RadioButton;
ButtonAccImpl.enableAccessibility();
var myButton: Button = new Button();
myButton.label = "Submit Details";
myButton.x = 10;
myButton.y = 10
addChild(myButton);
CheckBoxAccImpl.enableAccessibility();
var myCheckBox: CheckBox = new CheckBox();
myCheckBox.label = "notify me";
myCheckBox.x = 10;
myCheckBox.y = 40
addChild(myCheckBox);
RadioButtonAccImpl.enableAccessibility();
var myRadioButton: RadioButton = new RadioButton();
myRadioButton.label = "Male";
myRadioButton.x = 10;
myRadioButton.y = 60;
addChild(myRadioButton);This technique is demonstrated in the working example of Setting the label on a Button, CheckBox and RadioButton component using ActionScript 3.0. The source of Setting the label on a Button, CheckBox and RadioButton component using ActionScript 3.0 is available.
When the Button, CheckBox or RadioButton components are used:
confirm that labels describing the purpose of the button have
been provided through the component's label label property.
#1 is true
If this is a sufficient technique for a success criterion, failing this test procedure does not necessarily mean that the success criterion has not been satisfied in some other way, only that this technique has not been successfully implemented and can not be used to claim conformance.
Adobe Flash Professional version MX and higher
Adobe Flex
This technique relates to:
See User Agent Support Notes for FLASH30. Also see Flash Technology Notes.
For image based Button components the accessible name needs to be set to provide a functional label. This label indicates the button's function, but does not attempt to describe the image. The label is especially important if there are multiple buttons on the page that each lead to different results.
The accessible name for a button may need to be updated if the button changes during the use of the Flash movie.
In this example, an icon based button is given an accessible name through scripting. When the button is clicked a web page is opened.
Example Code:
//provide text equivalent for image button
this.check_btn.accessibilityProperties = new AccessibilityProperties();
this.check_btn.accessibilityProperties.name = "Check page validation";
//set up event listener and function to navigate to URL
this.check_btn.addEventListener(MouseEvent.CLICK, onClickHandler);
function onClickHandler(e: MouseEvent): void {
var btn = e.target;
var url: String = "http://validator.w3.org";
var request: URLRequest = new URLRequest(url);
navigateToURL(request, '_blank');
}The result is demonstrated in the working version of Accessible name for a simple image button. The source of Accessible name for a simple image button is available.
Example Code:
import fl.controls.Button;
import fl.accessibility.ButtonAccImpl;
ButtonAccImpl.enableAccessibility();
var soundIsMuted = false;
var myButton: Button = new Button();
myButton.label = "";
myButton.x = myButton.y = 10;
myButton.width = myButton.height = 50;
updateAccName(myButton, "mute sound");
myButton.setStyle("icon", unmuted);
myButton.addEventListener(MouseEvent.CLICK, handleBtnClick);
addChild(myButton);
function handleBtnClick(e) {
soundIsMuted = ! soundIsMuted;
myButton.setStyle("icon", soundIsMuted? muted: unmuted);
updateAccName(myButton, soundIsMuted? "unmute sound": "mute sound");
}
function updateAccName(obj, newName: String) {
if (! obj.accessibilityProperties)
obj.accessibilityProperties = new AccessibilityProperties();
obj.accessibilityProperties.name = newName;
if (Capabilities.hasAccessibility)
Accessibility.updateProperties();
}The result is demonstrated in the working version of Accessible name for a dynamic image button. The source of Accessible name for a dynamic image button is available.
When a Flash Movie contains image based buttons, confirm that:
An accessible name is provided for the button that describes the button's action
If the button's action changes (for example when it is clicked) the accessible name changes correspondingly
#1 and #2 are true
If this is a sufficient technique for a success criterion, failing this test procedure does not necessarily mean that the success criterion has not been satisfied in some other way, only that this technique has not been successfully implemented and can not be used to claim conformance.
Adobe Flash Professional version MX and higher
Adobe Flex
This technique relates to:
See User Agent Support Notes for FLASH31. Also see Flash Technology Notes.
The objective of this technique is to programmatically associate captions for DataGrids where captions are provided in the presentation. Normally, the caption for a table is a table identifier and acts like a title or heading for the table.
Flash does not have a caption element for the DataGrid component, but the same effect can be achieved through the following approach:
Place a label component or textfield above the DataGrid, containing the grid's caption text.
Duplicate the caption text and add it as the grid's accessible
name. This can either be achieved by setting a value to the grid's "name" field
in the Accessibility panel or by setting the grid's AccessibilityProperties.name
property.
This is an example of a DataGrid being added to the stage in Flash Professional from the Components panel. A label element is also added from the Components panel to contain the caption text and the caption text is used in the Accessibility control panel in Flash to serve as the accessibility name for the DataGrid.
Create a new Flash file (.fla) or open an existing one to put a DataGrid into.
Open the Flash components panel from the Window menu
Drag a DataGrid component onto the stage and position as desired.
Drag a label component onto the stage and position as desired.
Add text to the label component.
Select the DataGrid component and add the same text as is used in the label component to the name field for DataGrid, using the Accessibility control panel.
This is a basic AS3 example of a DataGrid generated through scripting. Additionally a label element is created, containing the caption text, and the caption text is added to the grid as an accessible name.
Example Code:
import fl.accessibility.DataGridAccImpl;
import fl.controls.DataGrid;
import fl.controls.Label;
import fl.data.DataProvider;
import flash.accessibility.Accessibility;
import flash.accessibility.AccessibilityProperties;
import flash.system.Capabilities;

// enable accessibility for the DataGrid
DataGridAccImpl.enableAccessibility();

createGrid();

// set the data grid caption text
var gridCaptionText: String = "Game Results";
gridCaption.text = gridCaptionText;
//add the caption text as the DataGrid's accessible name
var accProps: AccessibilityProperties = new AccessibilityProperties();
accProps.name = gridCaptionText;
aDg.accessibilityProperties = accProps;
if (Capabilities.hasAccessibility)
Accessibility.updateProperties();

function createGrid() {

  //create and add the components
  var aDg: DataGrid = new DataGrid();
  var gridCaption: Label = new Label();
  addChild(aDg);
  addChild(gridCaption);
  aDg.move(50, 50);
  gridCaption.move(50, 20);

  var captionFormat: TextFormat = new TextFormat();
  captionFormat.size = 24;
  gridCaption.setStyle("textFormat", captionFormat);
  gridCaption.width = 300;
  gridCaption.height = 100;
  bldRosterGrid(aDg);
  //prepare the data
  var aRoster: Array = new Array();
  aRoster =[
    {Name: "Wilma Carter", Bats: "R", Throws: "R", Year: "So", Home: "Redlands, CA"},
    {Name: "Sylvia Munson", Bats: "R", Throws: "R", Year: "Jr", Home: "Pasadena, CA"},
    {Name: "Carla Gomez", Bats: "R", Throws: "L", Year: "Sr", Home: "Corona, CA"},
    {Name: "Betty Kay", Bats: "R", Throws: "R", Year: "Fr", Home: "Palo Alto, CA"},
  ];
  aDg.dataProvider = new DataProvider(aRoster);
  aDg.rowCount = aDg.length;
};

function bldRosterGrid(dg: DataGrid) {
  dg.setSize(400, 300);
  dg.columns =[ "Name", "Bats", "Throws", "Year", "Home"];
  dg.columns[0].width = 120;
  dg.columns[1].width = 50;
  dg.columns[2].width = 50;
  dg.columns[3].width = 40;
  dg.columns[4].width = 120;
};
Notes on this code sample:
For a demonstration, see the working version of Associating a caption with a DataGrid using ActiveScript 3. The source of Associating a caption with a DataGrid using ActiveScript 3 is available.
The accessible name can also be applied to the DataGrid using the Accessibility panel in the Flash authoring tool.
In the above example, the text used for the DataGrid caption will
be read twice, once as the text label that is offered for sighted
users, and again as the accessible name for the DataGrid. Authors
can avoid duplicate voicing by setting the silent property for the
label text to true.
Check whether the Flash movie contains a DataGrid component.
Confirm that each DataGrid's caption text has been added to the component as an accessible name.
Step 2 is true.
If this is a sufficient technique for a success criterion, failing this test procedure does not necessarily mean that the success criterion has not been satisfied in some other way, only that this technique has not been successfully implemented and can not be used to claim conformance.
Adobe Flash Professional version MX and higher
Adobe Flex
This technique relates to:
See User Agent Support Notes for FLASH32. Also see Flash Technology Notes.
Except for the CheckBox and RadioButton component, the built in Flash
components are not automatically provided an associated label. For
these components, label text has to be placed adjacent to their control
manually, using the Label component. If the 'auto-label' feature is
enabled in the Accessibility panel, then the Flash Player will automatically
associate the label text for the TextInput and TextArea components.
This means that for these components, it is not necessary to duplicate
the label text for the control using the Accessibility panel. The auto
label feature is enabled by default.
Additionally, the auto label feature will enable the Flash Player to automatically add text contained by Button symbols as the symbol's accessible name. This will only work if the Button symbol only consists of one layer, containing the text label.
Note: Since auto-labeling associates labels without human intervention the accuracy of the association should be verified. For more predictable results authors are encouraged to explicitly add labels to all controls.
To auto labeling, perform the following steps:
Ensure that the textual descriptions for each form control within the flash application are placed adjacent to the control itself. Text eligible to be used for auto-labeling must not be set to be hidden from assistive technology.
Select the movie stage, and open the Accessibility panel.
Ensure that the 'Auto Label' option is checked. This will automatically associate labels with their TextInput and TextArea controls, and add text inside custom button symbols as their accessible name.
If the auto label behavior is inappropriate to your Flash content, uncheck the 'Auto label' option, and ensure that each control receives a meaningful 'name' value in the Accessibility panel.
To disable auto labeling for a particular object but not the whole movie, convert the text to the 'dynamic text' type using the 'Property inspector'. Then select it, and uncheck its 'Make object accessible' option in the Accessibility panel.
Note: As an alternative to using the Accessibility panel, the auto
label feature can also be turned off by setting the AccessibilityProperties.noAutoLabel
to true for the stage object.
This example shows two TextInput components, a TextArea component and a custom button symbol instance. For the TextInput components, a separate label element has been placed to the left of the control. For the TextArea component, the label has been placed above the control. For the custom button, the label text is placed inside the button symbol. Because the "Auto Label" option is enabled in the Accessibility panel, all these controls will be provided an accessible name based on their label.
The screenshot below illustrates the example: 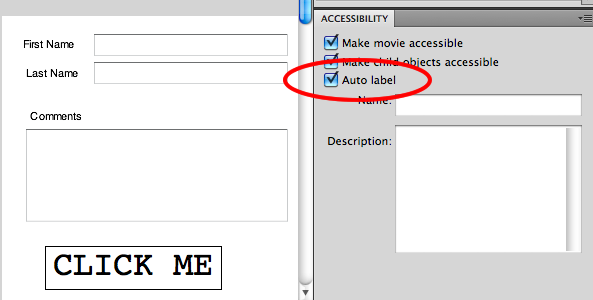
The results of this technique can be viewed in the working version of Using the "Auto Label" option in the Accessibility panel. The source of Using the "Auto Label" option in the Accessibility panel is available.
If a Flash form contains TextInput or TextArea components, or custom button symbols with text labels, confirm that:
The Auto Label option is enabled in the movie's Accessibility panel
Use a screen reader or MSAA checker to ensure that the label text is indeed exposed as the control's accessible name
#1 and #2 are true
If this is a sufficient technique for a success criterion, failing this test procedure does not necessarily mean that the success criterion has not been satisfied in some other way, only that this technique has not been successfully implemented and can not be used to claim conformance.
Adobe Flash Professional version MX and higher
Adobe Flex
This technique relates to:
Note: This technique must be combined with other techniques to meet SC 1.4.8. See Understanding SC 1.4.8 for details.
See User Agent Support Notes for FLASH33. Also see Flash Technology Notes.
The objective of this technique is to specify the width and/or height
of an embedded Flash object using relative units such as em values.
The size of the Flash object is allowed to expand to fill the size
of its container (a parent element) by setting the movie width and
height to 100%. The container's width and height is set with relative
units. This will allow user agents that support text resizing to resize
the Flash object in line with changes in text size settings. When the
Flash object's dimensions are adjusted its contents will be scaled,
making it easier to read for low vision users.
Note: This technique is not necessary to support users who use zoom functionality in their browsers.
In this example, a Flash object is loaded into an HTML document using SWFObject's
dynamic publishing method. The Flash object's container element
is given a class name of "flashPlaceHolder". This class
name is then targeted using CSS to set its width and height using
relative em values. When the user increases or decreases the browser's
text size, the Flash object will scale accordingly. To ensure that
the object does not become too small when text size is decreased,
the min-width and min-height properties are set to the default dimensions.
Example Code:
<!DOCTYPE html PUBLIC "-//W3C//DTD XHTML 1.0 Transitional//EN"
  "http://www.w3.org/TR/xhtml1/DTD/xhtml1-transitional.dtd">
<html xmlns="http://www.w3.org/1999/xhtml">
  <head>
    <meta content="text/html; charset=UTF-8" http-equiv="Content-Type"/>
    <title>Flash Resize example</title>
    <script src="swfobject/swfobject.js" type="text/javascript"/>
    <script type="text/javascript">
    swfobject.embedSWF("scale_movie_dimensions_on_text_resize_as3.swf",
    "flashPlaceHolder", "100%", "100%", "8")
</script>

    <style type="text/css">
  #flashPlaceHolder {
    width: 20em;
    height: 15em;
    min-width: 320px;
    min-height: 240px;
  }
</style>
  </head>
  <body id="header">
    <h1>Flash Resize Demonstration</h1>
    <p>When the browser's text size is changed, the Flash movie will be
      resized accordingly.</p>
    <p id="flashPlaceHolder">Flash needs to be installed for this
      example to work</p>
  </body>
</html>
The result of this technique can be viewed in the working version of Scaling text while keeping a minimum size. The source of Scaling text while keeping a minimum size is available.
Open a web page containing an embedded flash object
View the HTML to confirm that the width and height dimensions for the object containing the Flash object are specified using relative units such as em or percent (%).
Check #2 is true.
If this is a sufficient technique for a success criterion, failing this test procedure does not necessarily mean that the success criterion has not been satisfied in some other way, only that this technique has not been successfully implemented and can not be used to claim conformance.
Adobe Flash Professional version MX and higher
Adobe Flex
This technique relates to:
See User Agent Support Notes for FLASH34. Also see Flash Technology Notes.
The intent of this technique is to prevent sounds from playing when the Flash movie loads. This is useful for those who utilize assistive technologies (such as screen readers, screen magnifiers, switch mechanisms, etc.) and those who may not (such as those with cognitive, learning and language disabilities). By default, the sound will be played automatically. When a screen reader such as JAWS is detected however, the sound will have to be started manually.
To perform screen reader detection, Flash provides the flash.accessibility.Accessibility.active
property. If this property is set to true, it means that the Flash
player has detected running assistive technology. Based on this flag,
the Flash developer can choose to run different functionality.
Note 1:
The Flash Player requires some time to detect active assistive
technology and set the Accessibility.active property. To get accurate
results, do not check for this property immediately on the first frame
of the movie. Instead, perform the check 5 frames in or based on a
timed event.
Note 2: Not every screen reader will be detected using this mechanism. In general, the property will be set to true when any MSAA client is running.
Note 3:
Other assistive technology tools, including screen magnifiers,
or tools not used as assistive technologies may also utilize MSAA in
ways that result in Accessibility.active being set to true.
A class called SoundHandler is created which automatically starts
playing an MP3 file only when Accessibility.active is set to false.
Note that this example also checks the flash.system.Capabilities.hasAccessibility
property. This property does not check whether a screen reader is running,
but instead indicates whether the Flash Player is running in an environment
that supports MSAA (which basically means the Windows operating system).
Example Code:
package wcagSamples {
  import flash.accessibility.Accessibility;
  import flash.display.Sprite;
  import flash.net.URLRequest;
  import flash.media.Sound;
  import flash.media.SoundChannel;
  import flash.system.Capabilities;
  import fl.controls.Button;
  import fl.accessibility.ButtonAccImpl;
  import fl.controls.Label;
  import flash.events.MouseEvent;

  public class SoundHandler extends Sprite {
    private var snd: Sound = new Sound();
    private var button: Button = new Button();
    private var req: URLRequest = new URLRequest(
      "http://av.adobe.com/podcast/csbu_dev_podcast_epi_2.mp3");
    private var channel: SoundChannel = new SoundChannel();
    private var statusLbl: Label = new Label();
    public function SoundHandler() {
      snd.load(req);
      ButtonAccImpl.enableAccessibility();
      button.x = 10;
      button.y = 10;
      statusLbl.autoSize = "left";
      statusLbl.x = 10;
      statusLbl.y = 40;
      addChild(statusLbl);
      button.addEventListener(MouseEvent.CLICK, clickHandler);
      this.addChild(button);
      if (! Capabilities.hasAccessibility || ! Accessibility.active) {
        channel = snd.play();
        button.label = "Stop Sound";
        statusLbl.text = "No Assistive technology detected. \
          Sound will play automatically";
      } else {
        button.label = "Start Sound";
        statusLbl.text = "Assistive technology detected. \
          Sound will not play automatically";
      }
    }
    private function clickHandler(e: MouseEvent): void {
      if (button.label == "Stop Sound") {
        button.label = "Start Sound";
        channel.stop();
      } else {
        channel = snd.play();
        button.label = "Stop Sound";
      }
    }
  }
}
This technique can be viewed in the working version of A SoundHandler class. The source of A SoundHandler class is available.
Resources are for information purposes only, no endorsement implied.
Start a screen reader that supports MSAA.
Open a page containing a Flash movie that starts playing audio automatically when a screen reader is not running
Confirm that the audio is stopped.
#3 is true
If this is a sufficient technique for a success criterion, failing this test procedure does not necessarily mean that the success criterion has not been satisfied in some other way, only that this technique has not been successfully implemented and can not be used to claim conformance.
Adobe Flash Professional version MX and higher
Adobe Flex
This technique relates to:
See User Agent Support Notes for FLASH35. Also see Flash Technology Notes.
The objective of this technique is to provide a way for users to stop scrolling content when the scrolling is created by a script. Scrolling content can be difficult or impossible to read by users with low vision or with cognitive disabilities. The movement can also be distracting for some people making it difficult for them to concentrate on other parts of the Web page.
In this example, text scrolls from left to right. A toggle button is provided that allows the user to pause and resume the scrolling behavior. Additionally, a checkbox is provided which can be used to slow down the scrolling speed.
Note: Users may prefer a greater variety of scrolling speed options than are offered in this example. Developers might choose to provide several speed choices with a slider or drop down list control in order to accomplish this.
Example Code:
import fl.accessibility.ButtonAccImpl;
import fl.accessibility.CheckBoxAccImpl;

ButtonAccImpl.enableAccessibility();
CheckBoxAccImpl.enableAccessibility();

var scrollInterval: int;
var intervalLength: int = 15;

var expandedViewer: MovieClip = exampleScroller.expandedViewer;
var scrollText: MovieClip = exampleScroller.scrollText;
var scrollViewer: MovieClip = exampleScroller.scrollViewer;

var scrollingPaused: Boolean = true;

scrollStopper.addEventListener(MouseEvent.CLICK, handleBtnClick, false);
slowDown_chk.addEventListener(MouseEvent.CLICK, handleChkClick, false);

function handleBtnClick(e) {
  toggleScroll(false);
  e.target.label = scrollingPaused? "Resume Scrolling": "Stop Scrolling";
}

//slow down scrolling speed
function handleChkClick(e) {
  intervalLength = e.target.selected? 50: 15;
  if (! scrollingPaused) {
    clearTimeout(scrollInterval);
    toggleScroll(true);
  }
}

//pause or resume scrolling
function toggleScroll(noToggle: Boolean) {
  if (noToggle || scrollingPaused)
  scrollInterval = setInterval(moveText, intervalLength); else
  clearTimeout(scrollInterval);
  if (! noToggle)
  scrollingPaused = ! scrollingPaused;
}

function moveText() {
  if (scrollText.x + scrollText.width < scrollViewer.x)
  scrollText.x = scrollViewer.x + scrollViewer.width;
  scrollText.x -= 1;
}

//initiate scrolling
toggleScroll(false);
The technique is demonstrated in the working version of A toggle button to pause and resume scrolling. The source of A toggle button to pause and resume scrolling is available.
When a Flash Movie contains scrolling content:
Confirm that a button is provided that allows users to pause and resume the scrolling behavior
Confirm that pressing the button stops the scrolling
Confirm that pressing the button again restarts the scrolling
Checks #1, #2, and #3 are true.
If this is a sufficient technique for a success criterion, failing this test procedure does not necessarily mean that the success criterion has not been satisfied in some other way, only that this technique has not been successfully implemented and can not be used to claim conformance.
Adobe Flash Professional version MX and higher
Adobe Flex
This technique relates to:
See User Agent Support Notes for FLASH36. Also see Flash Technology Notes.
The objective of this technique is to control blinking with script
so it can be set to stop in less than five seconds by the script. The
ActionScript setTimeout() method is used to stop the MovieClip's blinking
behavior in less than 5 seconds.
In this example a MovieClip (blinkingTextMC) uses its timeline to
generate a blinking effect. Before 5 seconds has passed, the MovieClip's
gotoAndStop() method is called, which stops the blinking effect.
Example Code:
setTimeout(stopBlinking, 4500);
function stopBlinking() {
  var blinkingTextMC = getChildByName('blinkingTextMC');
  blinkingTextMC.gotoAndStop(1);
}
For a demonstration, view the working version of Stopping blinking after a timeout. The source of Stopping blinking after a timeout is available.
For each instance of blinking content:
Start a timer for 5 seconds at the start of the blink effect.
When the timer expires, determine if the blinking has stopped.
For each instance of blinking content, #2 is true.
If this is a sufficient technique for a success criterion, failing this test procedure does not necessarily mean that the success criterion has not been satisfied in some other way, only that this technique has not been successfully implemented and can not be used to claim conformance.