This Web page lists Client-side Scripting Techniques from Techniques for WCAG 2.0: Techniques and Failures for Web Content Accessibility Guidelines 2.0. Technology-specific techniques do not replace the general techniques: content developers should consider both general techniques and technology-specific techniques as they work toward conformance.
Publication of techniques for a specific technology does not imply that the technology can be used in all situations to create content that meets WCAG 2.0 success criteria and conformance requirements. Developers need to be aware of the limitations of specific technologies and provide content in a way that is accessible to people with disabilities.
For information about the techniques, see Introduction to Techniques for WCAG 2.0. For a list of techniques for other technologies, see the Table of Contents.
Time limits that are controlled by client-side scripting.
This technique relates to:
Note: This technique must be combined with other techniques to meet SC 2.2.1. See Understanding SC 2.2.1 for details.
The objective of this technique is to allow user to extend the default time limit by providing a mechanism to extend the time when scripts provide functionality that has default time limits. In order to allow the user to request a longer time limit, the script can provide a form (for example) allowing the user to enter a larger time limit or indicating that more time is needed. If the user is being warned that a time limit is about to expire (see SCR16: Providing a script that warns the user a time limit is about to expire), this form can be made available from the warning dialog. The user can extend the time limit to at least 10 times the default time limit, either by allowing the user to indicate how much additional time is needed or by repeatedly allowing the user to extend the time limit.
A Web page contains current stock market statistics and is set to refresh periodically. When the user is warned prior to refreshing the first time, the user is provided with an option to extend the time period between refreshes.
In an online chess game, each player is given a time limit for completing each move. When the player is warned that time is almost up for this move, the user is provided with an option to increase the time.
Resources are for information purposes only, no endorsement implied.
On a Web page that uses scripts to enforce a time limit, wait until the time limit has expired.
Determine if an option was provided to extend the time limit.
#2 is true and more time is provided to complete the interaction.
If this is a sufficient technique for a success criterion, failing this test procedure does not necessarily mean that the success criterion has not been satisfied in some other way, only that this technique has not been successfully implemented and can not be used to claim conformance.
HTML and XHTML with scripting support.
This technique relates to:
The objective of this technique is to demonstrate using device independent events to change a decorative image in response to a mouse or focus event. Use the onmouseover and onmouseout events to change a decorative image when the mouse moves on top of or away from an element on the page. Also, use the onfocus and onblur events to change the image when the element receives and loses focus.
The example below has a decorative image in front of an anchor element. When the user mouses over the anchor tag, the decorative image in front of the anchor is changed. When the mouse moves off of the anchor, the image is changed back to its original version. The same image change effect occurs when the user gives keyboard focus to the anchor element. When focus is received the image changes, when focus is lost the image is changed back. This is accomplished by attaching onmouseover, onmouseout, onfocus and onblur event handlers to the anchor element. The event handler is a JavaScript function called updateImage(), which changes the src attribute of the image. The updateImage() is called in response to the onmouseover, onmouseout, onfocus, and onblur events.
Each image is given a unique id. This unique id is passed to updateImage() along with a boolean value indicating which image is to be used: updateImage(imgId, isOver);. The boolean value of true is passed when the mouse is over the anchor element or it has focus. A false value is passed when the mouse moves off of the anchor element or it loses focus. The updateImage() function uses the image id to load the image and then changes the src attribue based on the boolean value. Note that since the image is for decorative purposes, it has a null alt attribute.
Note: It is best to use images that are similar in size and to specify the height and width attributes on the image element. This will prevent any changes to the layout of the page when the image is updated. This example uses images which are identical in size.
Example Code:
<!DOCTYPE HTML PUBLIC "-//W3C//DTD HTML 4.01 Transitional//EN"  "http://www.w3.org/TR/html4/loose.dtd">
 <html lang="en">
 <head>
 <meta http-equiv="Content-Type" content="text/html; charset=ISO-8859-1">
 <title>Changing Image Source in a Device Independent Manner</title>
 <script type="text/javascript">
 /* This function will change the image src of an image element.
  * param imgId - the id of the image object to change
  * param isOver - true when mouse is over or object has focus,
  *                false when mouse move out or focus is lost
 */
 function updateImage(imgId, isOver) {
   var theImage = document.getElementById(imgId);
   if (theImage != null) { //could use a try/catch block for user agents supporting at least JavaScript 1.4
                           // These browsers support try/catch - NetScape 6, IE 5, Mozilla, Firefox
      if (isOver) {
        theImage.setAttribute("src","yellowplus.gif");
      }
      else {
        theImage.setAttribute("src","greyplus.gif");
      }
   }
 }
 </script>
 </head>
 <body>
 <p>Mouse over or tab to the links below and see the image change.</p>
 <a href="http://www.w3.org/wai" onmouseover="updateImage('wai', true);" onfocus="updateImage('wai', true);"
   onmouseout="updateImage('wai',false);" onblur="updateImage('wai',false);">
 <img src="greyplus.gif" border="0" alt="" id="wai">
   W3C Web Accessibility Initiative</a> &
 <a href="http://www.w3.org/International/" onmouseover="updateImage('i18n', true);"
   onfocus="updateImage('i18n',true);" onmouseout="updateImage('i18n',false);"
   onblur="updateImage('i18n',false);">
   <img src="greyplus.gif" border="0" alt="" id="i18n">
   W3C Internationalization</a>
 </body>
 </html>
Load the Web page and test the events using a mouse and via the keyboard.
Check that the "standard" image is displayed as expected when the Web page is loaded.
Using the Mouse
Move the mouse over the element containing the event handlers (in this example it is an anchor element). Check that the image changes to the expected image.
Move the mouse off of the element. Check that the image changes back to the "standard" image.
Using the Keyboard
Use the keyboard to set focus to the element containing the event handlers. Check that the image changes to the expected image.
Use the keyboard to remove focus from the element (generally by moving focus to another element). Check that the image changes to the "standard" image.
Verify that the layout of other elements on the page is not affected when the image is changed.
All of the steps for the above checks are true.
If this is a sufficient technique for a success criterion, failing this test procedure does not necessarily mean that the success criterion has not been satisfied in some other way, only that this technique has not been successfully implemented and can not be used to claim conformance.
Scripting technologies which use scripting alerts for non-emergency communication.
This technique relates to:
The objective of this technique is to display a dialog containing a message (alert) to the user. When the alert is displayed, it receives focus and the user must activate the OK button on the dialog to dismiss it. Since these alerts cause focus to change they may distract the user, especially when used for non-emergency information. Alerts for non-emergency purposes such as displaying a quote of the day, helpful usage tip, or count down to a particular event, are not presented unless the user enables them through an option provided in the Web page.
This technique assigns a global JavaScript variable to store the user preference for displaying alerts. The default value is false. A wrapper function is created to check the value of this variable before displaying an alert. All calls to display an alert are made to this wrapper function rather than calling the alert() function directly. Early in the page, a button is provided for the user to enable the display of alerts on the page. This technique works on a visit by visit basis. Each time the page is loaded, alerts will be disabled and the user must manually enable them. Alternatively, the author could use cookies to store user preferences across sessions.
The script below will display a quote in an alert box every ten seconds, if the user selects the "Turn Alerts On" button. The user can turn the quotes off again by choosing "Turn Alerts Off".
Example Code:
<script type="text/javascript">
var bDoAlerts = false; // global variable which specifies whether to
// display alerts or not
/* function to enable/disable alerts.
* param boolean bOn - true to enable alerts, false to disable them.
*/
function modifyAlerts(isEnabled) {
bDoAlerts = isEnabled;
}
/* wrapper function for displaying alerts. Checks the value of bDoAlerts
*and only calls the alert() function when bDoAlerts is true.
*/
function doAlert(aMessage) {
if (bDoAlerts) {
alert(aMessage);
}
}
// example usage - a loop to display famous quotes.
var gCounter = -1; // global to store counter
// quotes variable would be initialized with famous quotations
var quotes = new Array("quote 1", "quote 2", "quote 3", "quote 4", "quote 5");
function showQuotes() {
if (++gCounter >= quotes.length) {
gCounter = 0;
}
doAlert(quotes[gCounter]);
setTimeout("showQuotes();", 10000);
}
showQuotes();
</script>
Within the body of the page, include a way to turn the alerts on and off. Below is one example:
Example Code:
<body>
<p>Press the button below to enable the display of famous quotes
using an alert box<br />
<button id="enableBtn" type="button" onclick="modifyAlerts(true);">
Turn Alerts On</button><br />
<button id="disableBtn" type="button" onclick="modifyAlerts(false);">
Turn Alerts Off</button></p>
Working example of this code: Demonstration of Alerts.
For a Web page that supports non-emergency interruptions using a JavaScript alert:
Load the Web page and verify that no non-emergency alerts are displayed.
Verify there is a mechanism to activate the non-emergency alerts.
Activate the non-emergency alerts and verify that the alerts are displayed.
For a Web page that supports non-emergency interruptions using a JavaScript alert, checks 1, 2, and 3 above are true.
If this is a sufficient technique for a success criterion, failing this test procedure does not necessarily mean that the success criterion has not been satisfied in some other way, only that this technique has not been successfully implemented and can not be used to claim conformance.
Time limits exist that are controlled by script.
This technique relates to:
Note: This technique must be combined with other techniques to meet SC 2.2.1. See Understanding SC 2.2.1 for details.
The objective of this technique is to notify users that they are almost out of time to complete an interaction. When scripts provide functionality that has time limits, the script can include functionality to warn the user of imminent time limits and provide a mechanism to request more time. 20 seconds or more before the time limit occurs, the script provides a confirm dialog that states that a time limit is imminent and asks if the user needs more time. If the user answers "yes" then the time limit is reset. If the user answers "no" or does not respond, the time limit is allowed to expire.
This technique involves time limits set with the window.setTimeout() method. If, for example, the time limit is set to expire in 60 seconds, you can set the time limit for 40 seconds and provide the confirm dialog. When the confirm dialog appears, a new time limit is set for the remaining 20 seconds. Upon expiry of the "grace period time limit" the action that would have been taken at the expiry of the 60 second time limit in the original design is taken.
A page of stock market quotes uses script to refresh the page every five minutes in order to ensure the latest statistics remain available. 20 seconds before the five minute period expires, a confirm dialog appears asking if the user needs more time before the page refreshes. This allows the user to be aware of the impending refresh and to avoid it if desired.
Example Code:
<!DOCTYPE html PUBLIC "-//W3C//DTD HTML 4.01 Transitional//EN"
   "http://www.w3.org/TR/html4/loose.dtd">
<html lang="en">
<head>
<title>Stock Market Quotes</title>
<script type="text/javascript">
<!--
function timeControl() {
	// set timer for 4 min 40 sec, then ask user to confirm.
	setTimeout('userCheck()', 280000);
}
function userCheck() {
	// set page refresh for 20 sec
	var id=setTimeout('pageReload()', 20000);
	// If user selects "OK" the timer is reset
	// else the page will refresh from the server.
	if (confirm("This page is set to refresh in 20 seconds.
	Would you like more time?"))
	{
	clearTimeout(id);
	timeControl();
	}
}
function pageReload() {
	window.location.reload(true);
}
timeControl();
-->
</script>
</head>
<body>
<h1>Stock Market Quotes</h1>
...etc...
</body>
</html>
On a Web page that has a time limit controlled by a script:
load the page and start a timer that is 20 seconds less than the time limit.
when the timer expires, check that a confirmation dialog is displayed warning of the impending time limit.
#2 is true.
If this is a sufficient technique for a success criterion, failing this test procedure does not necessarily mean that the success criterion has not been satisfied in some other way, only that this technique has not been successfully implemented and can not be used to claim conformance.
Content that validates user input.
This technique relates to:
The objective of this technique is to validate user input as values are entered for each field, by means of client-side scripting. If errors are found, an alert dialog describes the nature of the error in text. Once the user dismisses the alert dialog, it is helpful if the script positions the keyboard focus on the field where the error occurred.
The following script will check that a valid date has been entered in the form control.
Example Code:
<label for="date">Date:</label>
<input type="text" name="date" id="date"
onchange="if(isNaN(Date.parse(this.value)))
alert('This control is not a valid date.
Please re-enter the value.');" />
The following sample shows multiple controls in a form. The form element uses the onsubmit attribute which creates an event handler to execute the validation script when the user attempts to submit the form. If the validation is successful, the event returns true and the form submission proceeds; if the validation finds errors, it displays an error message and returns false to cancel the submit attempt so the user can fix the problems.
Note 1: This example demonstrates an alert for simplicity. A more helpful notification to the user would be to highlight the controls with problems and add information to the page about the nature of the errors and how to navigate to the controls that require data fixes.
Note 2:
Although this example uses an onsubmit attribute on the form element for brevity, normal practice is to create a submit event listener when the page is loaded.
Script code:
function validate() {
	// initialize error message
	var msg = "";

	//validate name
	var pattern = /^[a-zA-Z\s]+$/;
	var el = document.getElementById("name");
	if (!pattern.test(el.value))  msg += "Name can only have letters and spaces. ";

	// validate number
	var pattern = /^[\d\-+\.\s]+$/;
	var el = document.getElementById("tel");
	if (!pattern.test(el.value))  msg += "Telephone number can only have digits and separators. ";

	if (msg != "") {
		alert(msg);
		return false;
	} else return true;
}
Form code:
<form action="multiple-controls.html" onsubmit="return validate()">
	<p>
		<label for="name">Name: </label>
		<input type="text" name="name" id="name" />
	</p>
	<p>
		<label for="tel">Telephone number: </label>
		<input type="text" name="tel" id="tel" />
	</p>
	<p>
		<input type="submit" />
	</p>
</form>
This is demonstrated in the working example of checking multiple controls when the user submits the form.
For form fields that require specific input:
enter invalid data
determine if an alert describing the error is provided.
#2 is true
If this is a sufficient technique for a success criterion, failing this test procedure does not necessarily mean that the success criterion has not been satisfied in some other way, only that this technique has not been successfully implemented and can not be used to claim conformance.
HTML and XHTML with support for scripting. This technique uses the try/catch construct of JavaScript 1.4.
This technique relates to:
The objective of this technique is to demonstrate how to correctly use an onchange event with a select element to update other elements on the Web page. This technique will not cause a change of context. When there are one or more select elements on the Web page, an onchange event on one, can update the options in another select element on the Web page. All of the data required by the select elements is included within the Web page.
It is important to note that the select item which is modified is after the trigger select element in the reading order of the Web page. This ensures that assistive technologies will pick up the change and users will encounter the new data when the modified element receives focus. This technique relies on JavaScript support in the user agent.
This example contains two select elements. When an item is selected in the first select, the choices in the other select are updated appropriately. The first select element contains a list of continents. The second select element will contain a partial list of countries located in the selected continent. There is an onchange event associated with the continent select. When the continent selection changes, the items in the country select are modified using JavaScript via the Document Object Model (DOM). All of the data required, the list of countries and continents, is included within the Web page.
Overview of the code below
countryLists array variable which contains the list of countries for each continent in the trigger select element.
countryChange() function which is called by the onchange event of the continent select element.
The XHTML code to create the select elements in the body of the Web page.
Example Code:
<?xml version="1.0" encoding="UTF-8"?>
<!DOCTYPE html PUBLIC "-//W3C//DTD XHTML 1.0 Transitional//EN"
  "http://www.w3.org/TR/xhtml1/DTD/xhtml1-transitional.dtd">
<html xmlns="http://www.w3.org/1999/xhtml" xml:lang="en" lang="en">
  <head>
    <meta http-equiv="content-type" content="text/xhtml; charset=utf-8" />
    <title>Dynamic Select Statements</title>
<script type="text/javascript">
 //<![CDATA[
 // array of possible countries in the same order as they appear in the country selection list
 var countryLists = new Array(4)
 countryLists["empty"] = ["Select a Country"];
 countryLists["North America"] = ["Canada", "United States", "Mexico"];
 countryLists["South America"] = ["Brazil", "Argentina", "Chile", "Ecuador"];
 countryLists["Asia"] = ["Russia", "China", "Japan"];
 countryLists["Europe"]= ["Britain", "France", "Spain", "Germany"];
 /* CountryChange() is called from the onchange event of a select element.
 * param selectObj - the select object which fired the on change event.
 */
 function countryChange(selectObj) {
 // get the index of the selected option
 var idx = selectObj.selectedIndex;
 // get the value of the selected option
 var which = selectObj.options[idx].value;
 // use the selected option value to retrieve the list of items from the countryLists array
 cList = countryLists[which];
 // get the country select element via its known id
 var cSelect = document.getElementById("country");
 // remove the current options from the country select
 var len=cSelect.options.length;
 while (cSelect.options.length > 0) {
 cSelect.remove(0);
 }
 var newOption;
 // create new options
 for (var i=0; i<cList.length; i++) {
 newOption = document.createElement("option");
 newOption.value = cList[i];  // assumes option string and value are the same
 newOption.text=cList[i];
 // add the new option
 try {
 cSelect.add(newOption);  // this will fail in DOM browsers but is needed for IE
 }
 catch (e) {
 cSelect.appendChild(newOption);
 }
 }
 }
//]]>
</script>
</head>
<body>
  <noscript>This page requires JavaScript be available and enabled to function properly</noscript>
  <h1>Dynamic Select Statements</h1>
  <label for="continent">Select Continent</label>
  <select id="continent" onchange="countryChange(this);">
    <option value="empty">Select a Continent</option>
    <option value="North America">North America</option>
    <option value="South America">South America</option>
    <option value="Asia">Asia</option>
    <option value="Europe">Europe</option>
  </select>
  <br/>
  <label for="country">Select a country</label>
  <select id="country">
    <option value="0">Select a country</option>
  </select>
</body>
 </html>
Here is a working example: Dynamic Select
Resources are for information purposes only, no endorsement implied.
(none currently listed)
Navigate to the trigger select element (in this example, the one to select continents) and change the value of the select.
Navigate to the select element that is updated by the trigger (in this example, the one to select countries).
Check that the matching option values are displayed in the other select element.
Navigate to the trigger select element, navigate through the options but do not change the value.
Check that the matching option values are still displayed in the associated element.
It is recommended that the select elements are tested with an assistive technology to verify that the changes to the associated element are recognized.
Step #3 and #5 are true.
If this is a sufficient technique for a success criterion, failing this test procedure does not necessarily mean that the success criterion has not been satisfied in some other way, only that this technique has not been successfully implemented and can not be used to claim conformance.
Applies to all content that uses Script to implement functionality.
This technique relates to:
The objective of this technique is to illustrate the use of both keyboard-specific and mouse-specific events with code that has a scripting function associated with an event. Using both keyboard-specific and mouse-specific events together ensures that content can be operated by a wide range of devices. For example, a script may perform the same action when a keypress is detected that is performed when a mouse button is clicked. This technique goes beyond the Success Criterion requirement for keyboard access by including not only keyboard access but access using other devices as well.
In JavaScript, commonly used event handlers include, onblur, onchange, onclick, ondblclick, onfocus, onkeydown, onkeypress, onkeyup, onload, onmousedown, onmousemove, onmouseout, onmouseover, onmouseup, onreset, onselect, onsubmit, onunload. Some mouse-specific functions have a logical corresponding keyboard-specific function (such as 'onmouseover' and 'onfocus'). A keyboard event handler should be provided that executes the same function as the mouse event handler.
The following table suggests keyboard event handlers to pair mouse event handlers.
| Use... | ...with |
|---|---|
mousedown
|
keydown
|
mouseup
|
keyup
|
click
[1]
|
keypress
[2]
|
mouseover
|
focus
|
mouseout
|
blur
|
1 Although click is in principle a mouse event handler, most HTML and XHTML user agents also process this event when a native HTML control (e.g. a button or a link) is activated, regardless of whether it was activated with the mouse or the keyboard. In practice, therefore, it is not necessary to duplicate this event when adding handlers to natively focusable HTML elements. However, it is necessary when adding handlers to other events, such as in Example 2 below.
2 Since the keypress event handler reacts to any key, the event handler function should check first to ensure the Enter key was pressed before proceeding to handle the event. Otherwise, the event handler will run each time the user presses any key, even the tab key to leave the control, and this is usually not desirable.
Some mouse-specific functions (such as dblclick and mousemove) do not have a corresponding keyboard-specific function. This means that some functions may need to be implemented differently for each device (for example, including a series of buttons to execute, via keyboard, the equivalent mouse-specific functions implemented).
In this example of an image link, the image is changed when the user positions the pointer over the image. To provide keyboard users with a similar experience, the image is also changed when the user tabs to it.
Example Code:
<a href="menu.php" onmouseover="swapImageOn('menu')" onfocus="swapImageOn('menu')"
onmouseout="swapImageOff('menu')" onblur="swapImageOff('menu')">
<img id="menu" src="menu_off.gif" alt="Menu" />
</a>
This example shows a custom image control for which both the mouse and the keyboard can be used to activate the function. The mouse event onclick is duplicated by an appropriate keyboard event onkeypress. The tabindex attribute ensures that the keyboard will have a tab stop on the image. Note that in this example, the nextPage() function should check that the keyboard key pressed was Enter, otherwise it will respond to all keyboard actions while the image has focus, which is not the desired behavior.
Example Code:
<img onclick="nextPage();" onkeypress="nextPage();" tabindex="0" src="arrow.gif"
alt="Go to next page">
Note: This example uses tabindex on an img element. Even though this is currently invalid, it is provided as a transitional technique to make this function work. Custom controls like this should also use WAI-ARIA to expose the role and state of the control.
Resources are for information purposes only, no endorsement implied.
Find all interactive functionality
Check that all interactive functionality can be accessed using the keyboard alone
#2 is true
If this is a sufficient technique for a success criterion, failing this test procedure does not necessarily mean that the success criterion has not been satisfied in some other way, only that this technique has not been successfully implemented and can not be used to claim conformance.
ECMAScript used inside HTML and XHTML
This technique relates to:
The objective of this technique is to demonstrate how to use functions of the Document Object Model (DOM) to add content to a page instead of using document.write or object.innerHTML. The document.write() method does not work with XHTML when served with the correct MIME type (application/xhtml+xml), and the innerHTML property is not part of the DOM specification and thus should be avoided. If the DOM functions are used to add the content, user agents can access the DOM to retrieve the content. The createElement() function can be used to create elements within the DOM. The createTextNode() is used to create text associated with elements. The appendChild(), removeChild(), insertBefore() and replaceChild() functions are used to add and remove elements and nodes. Other DOM functions are used to assign attributes to the created elements.
Note: When adding focusable elements into the document, do not add tabindex attributes to explicitly set the tab order as this can cause problems when adding focusable elements into the middle of a document. Let the default tab order be assigned to the new element by not explicitly setting a tabindex attribute.
This example demonstrates use of client-side scripting to validate a form. If errors are found appropriate error messages are displayed. The example uses the DOM functions to add error notification consisting of a title, a short paragraph explaining that an error has occurred, and a list of errors in an ordered list. The content of the title is written as a link so that it can be used to draw the user's attention to the error using the focus method. Each item in the list is also written as a link that places the focus onto the form field in error when the link is followed.
For simplicity, the example just validates two text fields, but can easily be extended to become a generic form handler. Client-side validation should not be the sole means of validation , and should be backed up with server-side validation. The benefit of client-side validation is that you can provide immediate feedback to the user to save them waiting for the errors to come back from the server, and it helps reduce unnecessary traffic to the server.
Here is the script that adds the event handlers to the form. If scripting is enabled, the validateNumbers() function will be called to perform client-side validation before the form is submitted to the server. If scripting is not enabled, the form will be immediately submitted to the server, so validation should also be implemented on the server.
Example Code:
window.onload = initialise;
function initialise()
{
  // Ensure we're working with a relatively standards compliant user agent
  if (!document.getElementById || !document.createElement || !document.createTextNode)
    return;

  // Add an event handler for the number form
  var objForm = document.getElementById('numberform');
  objForm.onsubmit= function(){return validateNumbers(this);};
}
Here is the validation function. Note the use of the createElement(), createTextNode(), and appendChild() DOM functions to create the error message elements.
Example Code:
function validateNumbers(objForm)
{
  // Test whether fields are valid
  var bFirst = isNumber(document.getElementById('num1').value);
  var bSecond = isNumber(document.getElementById('num2').value);
  // If not valid, display errors
  if (!bFirst || !bSecond)
  {
    var objExisting = document.getElementById('validationerrors');
    var objNew = document.createElement('div');
    var objTitle = document.createElement('h2');
    var objParagraph = document.createElement('p');
    var objList = document.createElement('ol');
    var objAnchor = document.createElement('a');
    var strID = 'firsterror';
    var strError;
    // The heading element will contain a link so that screen readers
    // can use it to place focus - the destination for the link is
    // the first error contained in a list
    objAnchor.appendChild(document.createTextNode('Errors in Submission'));
    objAnchor.setAttribute('href', '#firsterror');
    objTitle.appendChild(objAnchor);
    objParagraph.appendChild(document.createTextNode('Please review the following'));
    objNew.setAttribute('id', 'validationerrors');
    objNew.appendChild(objTitle);
    objNew.appendChild(objParagraph);
    // Add each error found to the list of errors
    if (!bFirst)
    {
      strError = 'Please provide a numeric value for the first number';
      objList.appendChild(addError(strError, '#num1', objForm, strID));
      strID = '';
    }
    if (!bSecond)
    {
      strError = 'Please provide a numeric value for the second number';
      objList.appendChild(addError(strError, '#num2', objForm, strID));
      strID = '';
    }
    // Add the list to the error information
    objNew.appendChild(objList);
    // If there were existing errors, replace them with the new lot,
    // otherwise add the new errors to the start of the form
    if (objExisting)
      objExisting.parentNode.replaceChild(objNew, objExisting);
    else
    {
      var objPosition = objForm.firstChild;
      objForm.insertBefore(objNew, objPosition);
    }
    // Place focus on the anchor in the heading to alert
    // screen readers that the submission is in error
    objAnchor.focus();
    // Do not submit the form
    objForm.submitAllowed = false;
    return false;
  }
  return true;
}

// Function to validate a number
function isNumber(strValue)
{
  return (!isNaN(strValue) && strValue.replace(/^\s+|\s+$/, '') !== '');
}
Below are the helper functions to create the error message and to set focus to the associated form field.
Example Code:
// Function to create a list item containing a link describing the error
// that points to the appropriate form field
function addError(strError, strFragment, objForm, strID)
{
  var objAnchor = document.createElement('a');
  var objListItem = document.createElement('li');
  objAnchor.appendChild(document.createTextNode(strError));
  objAnchor.setAttribute('href', strFragment);
  objAnchor.onclick = function(event){return focusFormField(this, event, objForm);};
  objAnchor.onkeypress = function(event){return focusFormField(this, event, objForm);};
  // If strID has a value, this is the first error in the list
  if (strID.length > 0)
    objAnchor.setAttribute('id', strID);
  objListItem.appendChild(objAnchor);
  return objListItem;
}

// Function to place focus to the form field in error
function focusFormField(objAnchor, objEvent, objForm)
{
  // Allow keyboard navigation over links
  if (objEvent && objEvent.type == 'keypress')
    if (objEvent.keyCode != 13 && objEvent.keyCode != 32)
      return true;
  // set focus to the form control
  var strFormField = objAnchor.href.match(/[^#]\w*$/);
  objForm[strFormField].focus();
  return false;
}
Here is the HTML for the example form.
Example Code:
<!DOCTYPE HTML PUBLIC "-//W3C//DTD HTML 4.01//EN" "http://www.w3.org/TR/html4/strict.dtd">
<html>
<head>
	<title>ECMAScript Form Validation</title>
	<meta http-equiv="Content-Type" content="text/html; charset=utf-8">
	<script type="text/javascript" src="validate.js"></script>
</head>
<body>
<h1>Form Validation</h1>
<form id="numberform" method="post" action="form.php">
<fieldset>
<legend>Numeric Fields</legend>
<p>
<label for="num1">Enter first number</label>
<input type="text" size="20" name="num1" id="num1">
</p>
<p>
<label for="num2">Enter second number</label>
<input type="text" size="20" name="num2" id="num2">
</p>
</fieldset>
<p>
<input type="submit" name="submit" value="Submit Form">
</p>
</form>
</body>
</html>
This example is limited to client-side scripting, and should be backed up with server-side validation. The example is limited to the creation of error messages when client-side scripting is available.
Here is a link to a working example: Form Validation
Resources are for information purposes only, no endorsement implied.
HTML 4.01 The Document Object Model, More methods from Webreference.com
(none currently listed)
For pages that dynamically create new content:
Examine the source code and check that the new content is not created using document.write(), innerHTML, outerHTML, innerText or outerText.
Check #1 is true.
If this is a sufficient technique for a success criterion, failing this test procedure does not necessarily mean that the success criterion has not been satisfied in some other way, only that this technique has not been successfully implemented and can not be used to claim conformance.
Technologies that support script-controlled blinking of content.
This technique relates to:
The objective of this technique is to control blinking with script so it can be set to stop in less than five seconds by the script. Script is used to start the blinking effect of content, control the toggle between visible and hidden states, and also stop the effect at five seconds or less. The setTimeout() function can be used to toggle blinking content between visible and hidden states, and stop when the number of iterations by the time between them adds up to nearly five seconds.
This example uses JavaScript to control blinking of some HTML and XHTML content. JavaScript creates the blinking effect by changing the visibility status of the content. It controls the start of the effect and stops it within five seconds.
Example Code:
...
<div id="blink1" class="highlight">New item!</div>
<script type="text/javascript">
<!--
// blink "on" state
function show()
{
	if (document.getElementById)
	document.getElementById("blink1").style.visibility = "visible";
}
// blink "off" state
function hide()
{
	if (document.getElementById)
	document.getElementById("blink1").style.visibility = "hidden";
}
// toggle "on" and "off" states every 450 ms to achieve a blink effect
// end after 4500 ms (less than five seconds)
for(var i=900; i < 4500; i=i+900)
{
	setTimeout("hide()",i);
	setTimeout("show()",i+450);
}
-->
</script>
...
Working example of this code: Using script to control blinking.
For each instance of blinking content:
Start a timer for 5 seconds at the start of the blink effect.
When the timer expires, determine if the blinking has stopped.
For each instance of blinking content, #2 is true.
If this is a sufficient technique for a success criterion, failing this test procedure does not necessarily mean that the success criterion has not been satisfied in some other way, only that this technique has not been successfully implemented and can not be used to claim conformance.
HTML 4.01 and XHTML 1.0
This technique relates to:
The objective of this technique is to avoid confusion that may be caused by
the appearance of new windows that were not requested by the user. Suddenly
opening new windows can disorient or be missed completely by some users.
If the document type does not allow the target attribute (it
does not exist in HTML 4.01 Strict or XHTML 1.0 Strict) or if the developer
prefers not to use it, new windows can be opened with ECMAScript. The
example below demonstrates how to open new windows with script: it adds an
event handler to a link (a element) and warns the user that the
content will open in a new window.
Markup:
The script is included in the head of the document, and the link has an id that can be used as a hook by the script.
Example Code:
<script type="text/javascript" src="popup.js"></script>
…
<a href="help.html" id="newwin">Show Help</a
Script:
Example Code:
// Use traditional event model whilst support for event registration
// amongst browsers is poor.
window.onload = addHandlers;

function addHandlers()
{
  var objAnchor = document.getElementById('newwin');

  if (objAnchor)
  {
    objAnchor.firstChild.data = objAnchor.firstChild.data + ' (opens in a new window)';
    objAnchor.onclick = function(event){return launchWindow(this, event);}
    // UAAG requires that user agents handle events in a device-independent manner
    // but only some browsers do this, so add keyboard event to be sure
    objAnchor.onkeypress = function(event){return launchWindow(this, event);}
  }
}

function launchWindow(objAnchor, objEvent)
{
  var iKeyCode, bSuccess=false;

  // If the event is from a keyboard, we only want to open the
  // new window if the user requested the link (return or space)
  if (objEvent && objEvent.type == 'keypress')
  {
    if (objEvent.keyCode)
      iKeyCode = objEvent.keyCode;
    else if (objEvent.which)
      iKeyCode = objEvent.which;

    // If not carriage return or space, return true so that the user agent
    // continues to process the action
    if (iKeyCode != 13 && iKeyCode != 32)
      return true;
  }

  bSuccess = window.open(objAnchor.href);

  // If the window did not open, allow the browser to continue the default
  // action of opening in the same window
  if (!bSuccess)
    return true;

  // The window was opened, so stop the browser processing further
  return false;
}
Resources are for information purposes only, no endorsement implied.
Activate each link in the document to check if it opens a new window.
For each link that opens a new window, check that it uses script to accomplish each of the following:
indicates that the link will open in a new window,
uses device-independent event handlers, and
allows the browser to open the content in the same window if a new window was not opened.
#2 is true.
If this is a sufficient technique for a success criterion, failing this test procedure does not necessarily mean that the success criterion has not been satisfied in some other way, only that this technique has not been successfully implemented and can not be used to claim conformance.
HTML and XHTML, script
This technique relates to:
The objective of this technique is to place inserted user interface elements into the Document Object Model (DOM) in such a way that the tab order and screen-reader reading order are set correctly by the default behavior of the user agent. This technique can be used for any user interface element that is hidden and shown, such as menus and dialogs.
The reading order in a screen-reader is based on the order of the HTML or XHTML elements in the Document Object Model, as is the default tab order. This technique inserts new content into the DOM immediately following the element that was activated to trigger the script. The triggering element must be a link or a button, and the script must be called from its onclick event. These elements are natively focusable, and their onclick event is device independent. Focus remains on the activated element and the new content, inserted after it, becomes the next thing in both the tab order and screen-reader reading order.
Note that this technique works for synchronous updates. For asynchronous updates (sometimes called AJAX), an additional technique is needed to inform the assistive technology that the asynchronous content has been inserted.
This example creates a menu when a link is clicked and inserts it after the link. The onclick event of the link is used to call the ShowHide script, passing in an ID for the new menu as a parameter.
Example Code:
<a href="#" onclick="ShowHide('foo',this)">Toggle</a>The ShowHide script creates a div containing the new menu, and inserts a link into it. The last line is the core of the script. It finds the parent of the element that triggered the script, and appends the div it created as a new child to it. This causes the new div to be in the DOM after the link. When the user hits tab, the focus will go to the first focusable item in the menu, the link we created.
Example Code:
function ShowHide(id,src)
{
	var el = document.getElementById(id);
	if (!el)
	{
		el = document.createElement("div");
		el.id = id;
		var link = document.createElement("a");
		link.href = "javascript:void(0)";
		link.appendChild(document.createTextNode("Content"));
		el.appendChild(link);
		src.parentElement.appendChild(el);
	}
	else
	{
		el.style.display = ('none' == el.style.display ? 'block' : 'none');
	}
}
CSS is used to make the div and link look like a menu.
Find all areas of the page that trigger dialogs that are not pop-up windows.
Check that the dialogs are triggered from the click event of a button or a link.
Using a tool that allows you to inspect the DOM generated by script, check that the dialog is next in the DOM.
#2 and #3 are true.
If this is a sufficient technique for a success criterion, failing this test procedure does not necessarily mean that the success criterion has not been satisfied in some other way, only that this technique has not been successfully implemented and can not be used to claim conformance.
HTML and XHTML, script
This technique relates to:
The objective of this technique is to provide a mechanism for re-ordering component which is both highly usable and accessible. The two most common mechanisms for reordering are to send users to a set-up page where they can number components, or to allow them to drag and drop components to the desired location. The drag and drop method is much more usable, as it allows the user to arrange the items in place, one at a time, and get a feeling for the results. Unfortunately, drag and drop relies on the use of a mouse. This technique allows users to interact with a menu on the components to reorder them in place in a device independent way. It can be used in place of, or in conjunction with drag and drop reordering functionality.
The menu is a list of links using the device-independent onclick event to trigger scripts which re-order the content. The content is re-ordered in the Document Object Model (DOM), not just visually, so that it is in the correct order for all devices.
This example does up and down reordering. This approach can also be used for two-dimensional reordering by adding left and right options.
The components in this example are list items in an unordered list. Unordered lists are a very good semantic model for sets of similar items, like these components. The menu approach can also be used for other types of groupings.
The modules are list items, and each module, in addition to content in div elements, contains a menu represented as a nested list.
Example Code:
<ul id="swapper">
    <li id="black">
        <div class="module">
            <div class="module_header">
                <!-- menu link -->
                <a href="#" onclick="ToggleMenu(event);">menu</a>
                <!-- menu -->
                <ul class="menu">
                    <li><a href="#" onclick="OnMenuClick(event)"
                        onkeypress="OnMenuKeypress(event);">up</a></li>
                    <li><a href="#" onclick="OnMenuClick(event)"
                        onkeypress="OnMenuKeypress(event);">down</a></li>
                </ul>
            </div>
            <div class="module_body">
                Text in the black module
            </div>
        </div>
    </li>
    ...
</ul>
Since we've covered the showing and hiding of menus in the simple tree samples, we'll focus here just on the code that swaps the modules. Once we harmonize the events and cancel the default link action, we go to work. First, we set a bunch of local variables for the elements with which we'll be working: the menu, the module to be reordered, the menuLink. Then, after checking the reorder direction, we try to grab the node to swap. If we find one, we then call swapNode() to swap our two modules, and PositionElement() to move the absolutely-positioned menu along with the module, and then set focus back on the menu item which launched the whole thing.
Example Code:
function MoveNode(evt,dir)
{
    HarmonizeEvent(evt);
    evt.preventDefault();

    var src = evt.target;
    var menu = src.parentNode.parentNode;
    var module = menu.parentNode.parentNode.parentNode;
    var menuLink = module.getElementsByTagName("a")[0];
    var swap = null;

    switch(dir)
    {
        case 'up':
        {
            swap = module.previousSibling;
            while (swap && swap.nodeType != 1)
            {
                swap = swap.previousSibling;
            }
            break;
        }
        case 'down':
        {
            swap = module.nextSibling;
            while (swap && swap.nodeType != 1)
            {
                swap = swap.nextSibling;
            }
            break;
        }
    }
    if (swap && swap.tagName == node.tagName)
    {
        module.swapNode(swap);
        PositionElement(menu,menuLink,false,true);
    }
    src.focus();
}
The CSS for the node swap is not much different than that of our previous tree samples, with some size and color adjustment for the modules and the small menu.
Example Code:
ul#swapper { margin:0px; padding:0px; list-item-style:none; }
ul#swapper li { padding:0; margin:1em; list-style:none; height:5em; width:15em;
    border:1px solid black; }
ul#swapper li a { color:white; text-decoration:none; font-size:90%; }

ul#swapper li div.module_header { text-align:right; padding:0 0.2em; }
ul#swapper li div.module_body { padding:0.2em; }

ul#swapper ul.menu { padding:0; margin:0; list-style:none; background-color:#eeeeee;
    height:auto; position:absolute; text-align:left; border:1px solid gray; display:none; }
ul#swapper ul.menu li { height:auto; border:none; margin:0; text-align:left;
    font-weight:normal; width:5em; }
ul#swapper ul.menu li a { text-decoration:none; color:black; padding:0 0.1em;
    display:block; width:100%; }
Find all components in the Web Unit which can be reordered via drag and drop.
Check that there is also a mechanism to reorder them using menus build of lists of links.
Check that the menus are contained within the reorderable items in the DOM.
Check that scripts for reordering are triggered only from the onclick event of links.
Check that items are reordered in the DOM, not only visually.
#2 through #5 are true.
If this is a sufficient technique for a success criterion, failing this test procedure does not necessarily mean that the success criterion has not been satisfied in some other way, only that this technique has not been successfully implemented and can not be used to claim conformance.
Technologies that provide client side scripting.
This technique relates to:
This technique allows users to skip repeated material by placing that material in a menu that can be expanded or collapsed under user control. The user can skip the repeated material by collapsing the menu. The user invokes a user interface control to hide or remove the elements of the menu. The resources section lists several techniques for menus, toolbars and trees, any of which can be used to provide a mechanism for skipping navigation.
Note: Similiar approaches can be implemented using server-side scripting and reloading a modified version of the Web page.
The navigation links at top of a Web page are all entries in a menu implemented using HTML, CSS, and Javascript. When the navigation bar is expanded, the navigation links are available to the user. When the navigation bar is collapsed, the links are not available.
Example Code:
...

  <script type="text/javascript">
  function toggle(id){
    var n = document.getElementById(id);
    n.style.display =  (n.style.display != 'none' ? 'none' : '' );
  }
  </script>

...

  <a href="#" onclick="toggle('navbar')">Toggle Navigation Bar</a>

  <ul id="navbar">
  <li><a href="http://target1.html">Link 1</a></li>
  <li><a href="http://target2.html">Link 2</a></li>
  <li><a href="http://target3.html">Link 3</a></li>
  <li><a href="http://target4.html">Link 4</a></li>
  </ul>

...
Working example of this code: Toggle navigation bar with a link.
The table of contents for a set of Web pages is repeated near the beginning of each Web page. A button at the beginning of the table of contents lets the user remove or restore it on the page.
Example Code:
...

   <script type="text/javascript">
  function toggle(id){
    var n = document.getElementById(id);
    n.style.display =  (n.style.display != 'none' ? 'none' : '' );
  }
  </script>

  ...

  <button onclick="return toggle('toc');">Toggle Table of Contents</button>
  <div id="toc">
    ...
  </div>

...
Working example of this code: Toggle table of contents with a button.
Resources are for information purposes only, no endorsement implied.
Check that some user interface control allows the repeated content to be expanded or collapsed.
Check that when the content is expanded, it is included in the programmatically determined content at a logical place in the reading order.
Check that when the content is collapsed, it is not part of the programmatically determined content.
All checks above are true.
If this is a sufficient technique for a success criterion, failing this test procedure does not necessarily mean that the success criterion has not been satisfied in some other way, only that this technique has not been successfully implemented and can not be used to claim conformance.
HTML and XHTML, Script
This technique relates to:
The objective of this technique is to demonstrate how to provide keyboard access to a user interface control that is implemented by actions to static HTML elements such as div or span. This technique ensures that the element is focusable by setting the tabindex attribute, and it ensures that the action can be triggered from the keyboard by providing an onkeyup or onkeypress handler in addition to an onclick handler.
When the tabindex attribute has the value 0, the element can be focused via the keyboard and is included in the tab order of the document. When the tabindex attribute has the value -1, the element cannot be tabbed to, but focus can be set programmatically, using element.focus().
Because static HTML elements do not have actions associated with them, it is not possible to provide a backup implementation or explanation in environments in which scripting is not available. This technique should only be used in environments in which client-side scripting can be relied upon.
Note: Such user interface controls must still satisfy Success Criterion 4.1.2. Applying this technique without also providing role, name, and state information about the user interface control will results in Failure F59, Failure of Success Criterion 4.1.2 due to using script to make div or span a user interface control in HTML.
The div element on the page is given a unique id attribute and a tabindex attribute with value 0. A script uses the Document Object Model (DOM) to find the div element by its id and add the onclick handler and the onkeyup handler. The onkeyup handler will invoke the action when the Enter key is pressed. Note that the div element must be loaded into the DOM before it can be found and modified. This is usually accomplished by calling the script from the onload event of the body element. The script to add the event handlers will only execute if the user agent supports and has JavaScript enabled.
Example Code:
...
<script type="text/javascript">
 // this is the function to perform the action. This simple example toggles a message.
 function doSomething(event) {
   var msg=document.getElementById("message");
   msg.style.display = msg.style.display=="none" ? "" : "none";
   //return false from the function to make certain that the href of the link does not get invoked
   return false;
 }
 // this is the function to perform the action when the Enter key has been pressed.
 function doSomethingOnEnter(event) {
   var key = 0;
   // Determine the key pressed, depending on whether window.event or the event object is in use
   if (window.event) {
     key = window.event.keyCode;
   } else if (event) {
     key = event.keyCode;
   }
   // Was the Enter key pressed?
   if (key == 13) {
     return doSomething(event);
   }
   // The event has not been handled, so return true
   return true;
 }
 // This setUpActions() function must be called to set the onclick and onkeyup event handlers onto the existing
 // div element. This function must be called after the div element with id="active" has been loaded into the DOM.
 // In this example the setUpActions() function is called from the onload event for the body element.
 function setUpActions() {
   // get the div object
   var active=document.getElementById("active");
   // assign the onclick handler to the object.
   // It is important to return false from the onclick handler to prevent the href attribute
   // from being followed after the function returns.
   active.onclick=doSomething;
   // assign the onkeyup handler to the object.
   active.onkeyup=doSomethingOnEnter;
 }
 </script>

 <body onload="setUpActions();">
 <p>Here is the link to modify with a javascript action:</p>
 <div>
  <span id="active" tabindex="0">Do Something</span>
 </div>
 <div id="message">Hello, world!</div>
...
Working example of this code: Creating Divs with Actions using JavaScript.
Resources are for information purposes only, no endorsement implied.
HTML 4.01 Scripts
HTML 4.01 Giving focus to an element
Accessible Rich Internet Applications (WAI-ARIA) Version 1.0 Global States and Properties
WAI-ARIA Primer, Provision of the keyboard or input focus
Internet Explorer, HTML and DHTML Reference, tabIndex Property
In a user agent that supports Scripting:
Click on the control with the mouse
Check that the scripting action executes properly
Check that it is possible to navigate to and give focus to the control via the keyboard
Set keyboard focus to the control
Check that pressing ENTER invokes the scripting action.
All of the checks are true
If this is a sufficient technique for a success criterion, failing this test procedure does not necessarily mean that the success criterion has not been satisfied in some other way, only that this technique has not been successfully implemented and can not be used to claim conformance.
Client-side scripting used with HTML and XHTML
This technique relates to:
The purpose of this technique is to allow users to choose to have additional information added to the text of links so that the links can be understood out of context.
Some users prefer to have links that are self-contained, where there is no need to explore the context of the link. Other users find including the context information in each link to be repetitive and to reduce their ability to use a site. Among users of assistive technology, the feedback to the working group on which is preferable has been divided. This technique allows users to pick the approach that works best for them.
A link is provided near the beginning of the page that will expand the link text of the links on the page so that no additional context is needed to understand the purpose of any link. It must always be possible to understand the purpose of the expansion link directly from its link text.
This technique expands the links only for the current page view. It is also possible, and in some cases would be advisable, to save this preference in a cookie or server-side user profile, so that users would only have to make the selection once per site.
This example uses Javascript to add contextual information directly to the text of a link. The link class is used to determine which additional text to add. When the "Expand Links" link is activated, each link on the page is tested to see whether additional text should be added.
Example Code:
...
<script type="text/javascript">
var expanded = false;
var linkContext = {
	"hist":" version of The History of the Web",
	"cook":" version of Cooking for Nerds"
};

function doExpand() {
	var links = document.links;

	for (link of links) {
		var cn = link.className;
		if (linkContext[cn]) {
			span = link.appendChild(document.createElement("span"));
			span.setAttribute("class", "linkexpansion");
			span.appendChild(document.createTextNode(linkContext[cn]));
		}
	}
	objUpdate = document.getElementById('expand');
	if (objUpdate)
	{
		objUpdate.childNodes[0].nodeValue = "Collapse links";
	}
	expanded = true;
}

function doCollapse() {
	objUpdate = document.getElementById('expand');
	var spans = document.getElementsByTagName("span");
	var span;

	// go backwards through the set as removing from the front changes indices
	// and messes up the process
	for (i = spans.length - 1; i >= 0; i--) {
		span = spans[i];
		if (span.getAttribute("class") == "linkexpansion")
			span.parentNode.removeChild(span);
	}
	if (objUpdate)
	{
		objUpdate.childNodes[0].nodeValue = "Expand links";
	}
	expanded = false;
}

function toggle() {
	if (expanded) doCollapse();
	else doExpand();
}
</script>

...

<h1>Books for download</h1>
<p><button id="expand" onclick="toggle();">Expand Links</button></p>
<ul>
	<li>The History of the Web: <a href="history.docx" class="hist">Word</a>, <a href="history.pdf" class="hist">PDF</a>, <a href="history.html" class="hist">HTML</a> </li>

	<li>Cooking for Nerds: <a href="history.docx" class="cook">Word</a>, <a href="history.pdf" class="cook">PDF</a>, <a href="history.html" class="cook">HTML</a> </li>
</ul>

...
Working example of this code: Providing link expansions on demand.
Check that there is a link near the beginning of the page to expand links
Check that the link identified in step 1 can be identified from link text alone
Find any links on the page that cannot be identified from link text alone
Activate the control identified in step 1
Check that the purpose of the links identified in step 3 can now be identified from link text alone
Checks #1, #2, and #5 are true
If this is a sufficient technique for a success criterion, failing this test procedure does not necessarily mean that the success criterion has not been satisfied in some other way, only that this technique has not been successfully implemented and can not be used to claim conformance.
HTML and XHTML, CSS, Script
This technique relates to:
This purpose of this technique is to allow the author to use JavaScript to apply CSS, in order to make the focus indicator more visible than it would ordinarily be. When an element receives focus, the background color or border is changed to make it visually distinct. When the element loses focus, it returns to its normal styling. This technique can be used on any HTML user agent that supports Script and CSS, regardless of whether it supports the :focus pseudoclass.
In this example, when the link receives focus, its background turns yellow. When it loses focus, the yellow is removed. Note that if the link had a background color to begin with, you would use that color rather than "" in the script.
Example Code:
...
<script>
 function toggleFocus(el)
 {
  el.style.backgroundColor =  el.style.backgroundColor=="yellow" ? "inherit" : "yellow";
 }
</script>

...

<a href="example.html" onfocus="toggleFocus(this)" onblur="toggleFocus(this)">focus me</a>
...
Tab to each element in the page
Check that the focus indicator is visible
Step #2 is true
If this is a sufficient technique for a success criterion, failing this test procedure does not necessarily mean that the success criterion has not been satisfied in some other way, only that this technique has not been successfully implemented and can not be used to claim conformance.
Script used with HTML or XHTML.
This technique relates to:
The objective of this technique is to demonstrate the display of an error message when client side validation of a form field has failed. Anchor elements are used to display the error messages in a list and are inserted above the fields to be validated. Anchor elements are used in the error messages so that focus can be placed on the error message(s), drawing the user's attention to it. The href of the anchor elements contain an in-page link which references the fields where error(s) have been found.
In a deployed application, if Javascript is turned off, client side validation will not occur. Therefore, this technique would only be sufficient in situations where scripting is relied upon for conformance or when server side validation techniques are also used to catch any errors and return the page with information about the fields with errors.
This example validates required fields as well as fields where a specific format is required. When an error is identified, the script inserts a list of error messages into the DOM and moves focus to them.
HTML and Javascript code
Here is the HTML for the example form:
Example Code:
<!DOCTYPE HTML PUBLIC "-//W3C//DTD HTML 4.01//EN" "http://www.w3.org/TR/html4/strict.dtd">
<html>
<head>
<title>Form Validation</title>
<meta http-equiv="Content-Type" content="text/html; charset=utf-8"/>
<link href="css/validate.css" rel="stylesheet" type="text/css"/>
<script type="text/javascript" src="scripts/validate.js"/>
</head>
<body>
<h1>Form Validation</h1>
<p>The following form is validated before being submitted if scripting is available,
otherwise the form is validated on the server. All fields are required, except those
marked optional. If errors are found in the submission, the form is cancelled and
a list of errors is displayed at the top of the form.</p>
<p> Please enter your details below. </p>
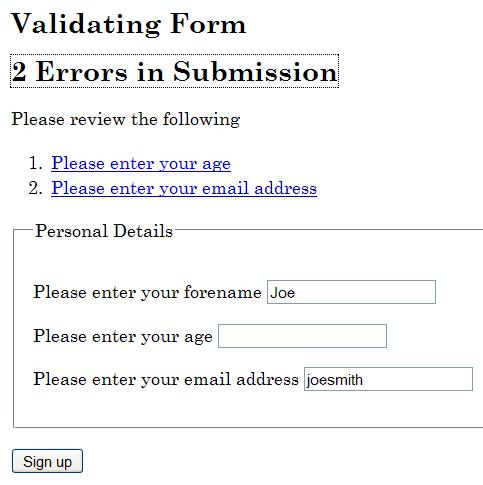
<h2>Validating Form</h2>
<form id="personalform" method="post" action="index.php">
<div class="validationerrors"/>
<fieldset>
<legend>Personal Details</legend>
<p>
<label for="forename">Please enter your forename</label>
<input type="text" size="20" name="forename" id="forename" class="string"
value=""/>
</p>
<p>
<label for="age">Please enter your age</label>
<input type="text" size="20" name="age" id="age" class="number" value=""/>
</p>
<p>
<label for="email">Please enter your email address</label>
<input type="text" size="20" name="email" id="email" class="email" value=""/>
</p>
</fieldset>
<p>
<input type="submit" name="signup" value="Sign up"/>
</p>
</form>
<h2>Second Form</h2>
<form id="secondform" method="post" action="index.php#focuspoint">
<div class="validationerrors"/>
<fieldset>
<legend>Second Form Details</legend>
<p>
<label for="suggestion">Enter a suggestion</label>
<input type="text" size="20" name="suggestion" id="suggestion"
class="string" value=""/>
</p>
<p>
<label for="optemail">Please enter your email address (optional)</label>
<input type="text" size="20" name="optemail" id="optemail"
class="optional email" value=""/>
</p>
<p>
<label for="rating">Please rate this suggestion</label>
<input type="text" size="20" name="rating" id="rating"
class="number" value=""/>
</p>
<p>
<label for="jibberish">Enter some jibberish (optional)</label>
<input type="text" size="20" name="jibberish" id="jibberish" value=""/>
</p>
</fieldset>
<p>
<input type="submit" name="submit" value="Add Suggestion"/>
</p>
</form>
</body>
</html> Here is the Javascript which performs the validation and inserts the error messages:
Example Code:
window.onload = initialise;

function initialise()
{
   var objForms = document.getElementsByTagName('form');
   var iCounter;

   // Attach an event handler for each form
   for (iCounter=0; iCounter<objForms.length; iCounter++)
   {
      objForms[iCounter].onsubmit = function(){return validateForm(this);};
   }
}


// Event handler for the form
function validateForm(objForm)
{
   var arClass = [];
   var iErrors = 0;
   var objField = objForm.getElementsByTagName('input');
   var objLabel = objForm.getElementsByTagName('label');
   var objList = document.createElement('ol');
   var objError, objExisting, objNew, objTitle, objParagraph, objAnchor, objPosition;
   var strLinkID, iFieldCounter, iClassCounter, iCounter;

   // Get the id or name of the form, to make a unique
   // fragment identifier
   if (objForm.id)
   {
      strLinkID = objForm.id + 'ErrorID';
   }
   else
   {
      strLinkID = objForm.name + 'ErrorID';
   }

   // Iterate through input form controls, looking for validation classes
   for (iFieldCounter=0; iFieldCounter<objField.length; iFieldCounter++)
   {
      // Get the class for the field, and look for the appropriate class
      arClass = objField[iFieldCounter].className.split(' ');
      for (iClassCounter=0; iClassCounter<arClass.length; iClassCounter++)
      {
         switch (arClass[iClassCounter])
         {
            case 'string':
               if (!isString(objField[iFieldCounter].value, arClass))
               {
                  if (iErrors === 0)
                  {
                     logError(objField[iFieldCounter], objLabel, objList, strLinkID);
                  }
                  else
                  {
                     logError(objField[iFieldCounter], objLabel, objList, '');
                  }
                  iErrors++;
               }
               break;
            case 'number':
               if (!isNumber(objField[iFieldCounter].value, arClass))
               {
                  if (iErrors === 0)
                  {
                     logError(objField[iFieldCounter], objLabel, objList, strLinkID);
                  }
                  else
                  {
                     logError(objField[iFieldCounter], objLabel, objList, '');
                  }
                  iErrors++;
               }
               break;

            case 'email' :
               if (!isEmail(objField[iFieldCounter].value, arClass))
               {
                  if (iErrors === 0)
                  {
                     logError(objField[iFieldCounter], objLabel, objList, strLinkID);
                  }
                  else
                  {
                     logError(objField[iFieldCounter], objLabel, objList, '');
                  }
                  iErrors++;
               }
               break;
         }
      }
   }

   if (iErrors > 0)
   {
      // If not valid, display error messages
      objError = objForm.getElementsByTagName('div');

      // Look for existing errors
      for (iCounter=0; iCounter<objError.length; iCounter++)
      {
         if (objError[iCounter].className == 'validationerrors')
         {
            objExisting = objError[iCounter];
         }
      }

      objNew = document.createElement('div');
      objTitle = document.createElement('h2');
      objParagraph = document.createElement('p');
      objAnchor = document.createElement('a');

      if (iErrors == 1)
      {
         objAnchor.appendChild(document.createTextNode('1 Error in Submission'));
      }
      else
      {
         objAnchor.appendChild(document.createTextNode(iErrors + ' Errors in Submission'));
      }
      objAnchor.href = '#' + strLinkID;
      objAnchor.className = 'submissionerror';

      objTitle.appendChild(objAnchor);
      objParagraph.appendChild(document.createTextNode('Please review the following'));
      objNew.className = 'validationerrors';

      objNew.appendChild(objTitle);
      objNew.appendChild(objParagraph);
      objNew.appendChild(objList);

      // If there were existing error, replace them with the new lot,
      // otherwise add the new errors to the start of the form
      if (objExisting)
      {
         objExisting.parentNode.replaceChild(objNew, objExisting);
      }
      else
      {
         objPosition = objForm.firstChild;
         objForm.insertBefore(objNew, objPosition);
      }

      // Allow for latency
      setTimeout(function() { objAnchor.focus(); }, 50);

      // Don't submit the form
      objForm.submitAllowed = false;
      return false;
   }

   // Submit the form
   return true;
}

// Function to add a link in a list item that points to problematic field control
function addError(objList, strError, strID, strErrorID)
{
   var objListItem = document.createElement('li');
   var objAnchor = document.createElement('a');

   // Fragment identifier to the form control
   objAnchor.href='#' + strID;

   // Make this the target for the error heading
   if (strErrorID.length > 0)
   {
      objAnchor.id = strErrorID;
   }

   // Use the label prompt for the error message
   objAnchor.appendChild(document.createTextNode(strError));
   // Add keyboard and mouse events to set focus to the form control
   objAnchor.onclick = function(event){return focusFormField(this, event);};
   objAnchor.onkeypress = function(event){return focusFormField(this, event);};
   objListItem.appendChild(objAnchor);
   objList.appendChild(objListItem);
}

function focusFormField(objAnchor, objEvent)
{
   var strFormField, objForm;

   // Allow keyboard navigation over links
   if (objEvent && objEvent.type == 'keypress')
   {
      if (objEvent.keyCode != 13 && objEvent.keyCode != 32)
      {
         return true;
      }
   }

   // set focus to the form control
   strFormField = objAnchor.href.match(/[^#]\w*$/);
   objForm = getForm(strFormField);
   objForm[strFormField].focus();
   return false;
}

// Function to return the form element from a given form field name
function getForm(strField)
{
   var objElement = document.getElementById(strField);

   // Find the appropriate form
   do
   {
      objElement = objElement.parentNode;
   } while (!objElement.tagName.match(/form/i) && objElement.parentNode);

   return objElement;
}

// Function to log the error in a list
function logError(objField, objLabel, objList, strErrorID)
{
   var iCounter, strError;

   // Search the label for the error prompt
   for (iCounter=0; iCounter<objLabel.length; iCounter++)
   {
      if (objLabel[iCounter].htmlFor == objField.id)
      {
         strError = objLabel[iCounter].firstChild.nodeValue;
      }
   }

   addError(objList, strError, objField.id, strErrorID);
}

// Validation routines - add as required

function isString(strValue, arClass)
{
   var bValid = (typeof strValue == 'string' && strValue.replace(/^\s*|\s*$/g, '')
     !== '' && isNaN(strValue));

   return checkOptional(bValid, strValue, arClass);
}

function isEmail(strValue, arClass)
{
   var objRE = /^[\w-\.\']{1,}\@([\da-zA-Z\-]{1,}\.){1,}[\da-zA-Z\-]{2,}$/;
   var bValid = objRE.test(strValue);

   return checkOptional(bValid, strValue, arClass);
}

function isNumber(strValue, arClass)
{
   var bValid = (!isNaN(strValue) && strValue.replace(/^\s*|\s*$/g, '') !== '');

   return checkOptional(bValid, strValue, arClass);
}

function checkOptional(bValid, strValue, arClass)
{
   var bOptional = false;
   var iCounter;

   // Check if optional
   for (iCounter=0; iCounter<arClass.length; iCounter++)
   {
      if (arClass[iCounter] == 'optional')
      {
         bOptional = true;
      }
   }

   if (bOptional && strValue.replace(/^\s*|\s*$/g, '') === '')
   {
      return true;
   }

   return bValid;
   }
Working example of this technique implemented using PHP, Javascript, CSS and XHTML: Form Validation Example.
Create error messages using anchor tags and appropriate scripting via the technique above.
Load the page.
Enter a valid value in the field(s) associated with an error message and verify that no error messages are displayed.
Enter an invalid value in the field(s) associated with an error message and verify that the correct error message for the field is displayed.
Verify that the error messages receive focus.
Enter a valid value in the field(s) associated with the displayed error message and verify that the error message is removed.
Repeat for all fields with associated error messages created via anchor tags.
Note: It is recommended that you also run the above procedure using an assistive technology.
Checks #2, #3, #4, and #5 are all true.
If this is a sufficient technique for a success criterion, failing this test procedure does not necessarily mean that the success criterion has not been satisfied in some other way, only that this technique has not been successfully implemented and can not be used to claim conformance.
Technologies that support script-controlled scrolling of content.
This technique relates to:
The objective of this technique is to provide a way for users to stop scrolling content when the scrolling is created by a script. Scrolling content can be difficult or impossible to read by users with low vision or with cognitive disabilities. The movement can also be distracting for some people making it difficult for them to concentrate on other parts of the Web page.
In this example CSS and Javascript are used to visually present some text in a scrolling format. A link is included to pause the scrolling movement.
This implementation will display the full text and omit the link when Javascript or CSS are unsupported or inactive.
The following code is an amended version of webSemantic's Accessible Scroller (as at July 2008).
The XHTML component:
Example Code:
...
<div id="scroller">
<p id="tag">This text will scroll and a Pause/Scroll link will be present
when Javascript and CSS are supported and active.</p>
</div>
...
The CSS component:
Example Code:
...
body {font:1em verdana,sans-serif; color:#000; margin:0}

/* position:relative and overflow:hidden are required */
#scroller { position:relative; overflow:hidden; width:15em; border:1px solid #008080; }

/* add formatting for the scrolling text */
#tag { margin:2px 0; }

/* #testP must also contain all text-sizing properties of #tag  */
#testP { visibility:hidden; position:absolute; white-space:nowrap; }

/* used as a page top marker and to limit width */
#top { width:350px; margin:auto; }
...
The JavaScript component:
Example Code:
var speed=50        // speed of scroller
var step=3          // smoothness of movement
var StartActionText= "Scroll"  // Text for start link
var StopActionText = "Pause"   // Text for stop link

var x, scroll, divW, sText=""

function onclickIE(idAttr,handler,call){
  if ((document.all)&&(document.getElementById)){idAttr[handler]="Javascript:"+call}
}

function addLink(id,call,txt){
  var e=document.createElement('a')
  e.setAttribute('href',call)
  var linktext=document.createTextNode(txt)
  e.appendChild(linktext)
  document.getElementById(id).appendChild(e)
}

function getElementStyle() {
    var elem = document.getElementById('scroller');
    if (elem.currentStyle) {
        return elem.currentStyle.overflow;
    } else if (window.getComputedStyle) {
        var compStyle = window.getComputedStyle(elem, '');
        return compStyle.getPropertyValue("overflow");
    }
    return "";
}

function addControls(){
// test for CSS support first
// test for the overlow property value set in style element or external file
if (getElementStyle()=="hidden") {
  var f=document.createElement('div');
  f.setAttribute('id','controls');
  document.getElementById('scroller').parentNode.appendChild(f);
  addLink('controls','Javascript:clickAction(0)',StopActionText);
  onclickIE(document.getElementById('controls').childNodes[0],"href",'clickAction(0)');
  document.getElementById('controls').style.display='block';
  }
}

function stopScroller(){clearTimeout(scroll)}

function setAction(callvalue,txt){
  var c=document.getElementById('controls')
  c.childNodes[0].setAttribute('href','Javascript:clickAction('+callvalue+')')
  onclickIE(document.getElementById('controls').childNodes[0],"href",'clickAction

('+callvalue+')')
  c.childNodes[0].firstChild.nodeValue=txt
}

function clickAction(no){
  switch(no) {
    case 0:
      stopScroller();
      setAction(1,StartActionText);
      break;
    case 1:
      startScroller();
      setAction(0,StopActionText);
  }
}

function startScroller(){
  document.getElementById('tag').style.whiteSpace='nowrap'
  var p=document.createElement('p')
  p.id='testP'
  p.style.fontSize='25%' //fix for mozilla. multiply by 4 before using
  x-=step
  if (document.getElementById('tag').className) p.className=document.getElementById

('tag').className
  p.appendChild(document.createTextNode(sText))
  document.body.appendChild(p)
  pw=p.offsetWidth
  document.body.removeChild(p)
  if (x<(pw*4)*-1){x=divW}
  document.getElementById('tag').style.left=x+'px'
  scroll=setTimeout('startScroller()',speed)
}

function initScroller(){
  if (document.getElementById && document.createElement && document.body.appendChild) {
    addControls();
    divW=document.getElementById('scroller').offsetWidth;
    x=divW;
    document.getElementById('tag').style.position='relative';
    document.getElementById('tag').style.left=divW+'px';
    var ss=document.getElementById('tag').childNodes;
    for (i=0;i<ss.length;i++) {sText+=ss[i].nodeValue+" "};
    scroll=setTimeout('startScroller()',speed);
  }
}

function addLoadEvent(func) {
  if (!document.getElementById | !document.getElementsByTagName) return
  var oldonload = window.onload
  if (typeof window.onload != 'function') {
    window.onload = func;
  } else {
    window.onload = function() {
      oldonload()
      func()
    }
  }
}

addLoadEvent(initScroller)
A working example of this code, Example of using script to scroll content and providing a mechanism to pause it, is available.
Resources are for information purposes only, no endorsement implied.
Check that a mechanism is provided to pause the scrolling content.
Use the pause mechanism to pause the scrolling content.
Check that the scrolling has stopped and does not restart by itself.
Check that a mechanism is provided to restart the paused content.
Use the restart mechanism provided to restart the scrolling content.
Check that the scrolling has resumed from the point where it was stopped.
Checks #3 and #6 are true.
If this is a sufficient technique for a success criterion, failing this test procedure does not necessarily mean that the success criterion has not been satisfied in some other way, only that this technique has not been successfully implemented and can not be used to claim conformance.
Client-side scripting.
This technique relates to:
Note: This technique must be combined with other techniques to meet SC 1.4.4. See Understanding SC 1.4.4 for details.
Note: This technique must be combined with other techniques to meet SC 1.4.8. See Understanding SC 1.4.8 for details.
The objective of this technique is to calculate the size and position of elements in a way that will scale appropriately as the text size is scaled.
There are four properties in JavaScript that help determine the size and position of elements:
offsetHeight (the height of the element in pixels)
offsetWidth (the width of the element in pixels)
offsetLeft (the distance of the element from the left of its parent (offsetParent) in pixels)
offsetTop (the distance of the element from the top of its parent (offsetParent) in pixels)
Calculating the height and width using offsetHeight and offsetWidth is straightforward, but when calculating an object's left and top position as absolute values, we need to consider the parent element. The calculatePosition function below iterates through all of an element's parent nodes to give a final value. The function takes two parameters; objElement (the name of the element in question), and the offset property (offsetLeft or offsetTop):
The Javascript function:
Example Code:
function calculatePosition(objElement, strOffset)
{
    var iOffset = 0;

    if (objElement.offsetParent)
    {
        do
        {
            iOffset += objElement[strOffset];
            objElement = objElement.offsetParent;
        } while (objElement);
    }

    return iOffset;
}
The following example illustrates using the function above by aligning an object beneath a reference object, the same distance from the left:
Example Code:
// Get a reference object
var objReference = document.getElementById('refobject');
// Get the object to be aligned
var objAlign = document.getElementById('lineup');

objAlign.style.position = 'absolute';
objAlign.style.left = calculatePosition(objReference, 'offsetLeft') + 'px';
objAlign.style.top = calculatePosition(objReference, 'offsetTop') + objReference.offsetHeight + 'px';
Resources are for information purposes only, no endorsement implied.
Open a page that is designed to adjust container sizes as text size changes.
Increase the text size up to 200% using the browser's text size adjustment (not the zoom feature).
Examine the text to ensure the text container size is adjusted to accommodate the size of the text.
Ensure that no text is "clipped" or has disappeared as a result of the increase in text size.
Checks #3 and #4 are true.
If this is a sufficient technique for a success criterion, failing this test procedure does not necessarily mean that the success criterion has not been satisfied in some other way, only that this technique has not been successfully implemented and can not be used to claim conformance.
Script used with HTML or XHTML.
This technique relates to:
The objective of this technique is to demonstrate how to invoke a scripting function in a way that is keyboard accessible by attaching it to a keyboard-accessible control. In order to ensure that scripted actions can be invoked from the keyboard, they are associated with "natively actionable" HTML elements (links and buttons). The onclick event of these elements is device independent. While "onclick" sounds like it is tied to the mouse, the onclick event is actually mapped to the default action of a link or button. The default action occurs when the user clicks the element with a mouse, but it also occurs when the user focuses the element and hits enter or space, and when the element is triggered via the accessibility API.
This technique relies on client-side scripting. However, it is beneficial to provide a backup implementation or explanation for environments in which scripting is not available. When using anchor elements to invoke a JavaScript action, a backup implementation or explanation is provided via the href attribute. When using buttons, it is provided via a form post.
Link that runs a script and has no fallback for non-scripted browsers. This approach should only be used when script is relied upon as an Accessibility Supported Technology.
Even though we do not want to navigate from this link, we must use the href attribute on the a element in order to make this a true link and get the proper eventing. In this case, we're using "#" as the link target, but you could use anything. This link will never be navigated.
The "return false;" at the end of the doStuff() event handling function tells the browser not to navigate to the URI. Without it, the page would refresh after the script ran.
Example Code:
<script>
function doStuff()
 {
  //do stuff
    return false;
  }
</script>
<a href="#" onclick="return doStuff();">do stuff</a>
Link that runs script, but navigates to another page when script is not available. This approach can be used to create sites that don't rely on script, if and only if the navigation target provides the same functionality as the script. This example is identical to the example 1, except that its href is now set to a real page, dostuff.htm. Dostuff.htm must provide the same functionality as the script.The "return false;" at the end of the doStuff() event handling function tells the browser not to navigate to the URI. Without it, the browser would navigate to dostuff.htm after the script ran.
Example Code:
<script>
function doStuff()
 {
  //do stuff
  return false;
 }
</script>
<a href="dostuff.htm" onclick="return doStuff();">do stuff</a>
A working example of this code is available. Refer to Creating Action Links using JavaScript.
Button that runs a script and falls back to a form post for users without script. This approach can be used by sites that do not rely on script, if and only if the form post provides the same functionality as the script. The onsubmit="return false;" prevents the form from submitting.
Example Code:
<script>
  function doStuff()
 {
     //do stuff
 }
</script>
<form action="doStuff.aspx" onsubmit="return false;">
 <input type="submit" value="Do Stuff" onclick="doStuff();" />
</form>
A working example of this code is available. Refer to Creating Action Buttons using JavaScript.
Button that runs a script, implemented with input type="image". Note that an alt attribute must be added to the input to provide a text equivalent for the image. This approach should only be used when script is relied upon.
Example Code:
<script>
  function doStuff()
  {
     //do stuff
   return false;
  }
</script>
<input  type="image"  src="stuff.gif"  alt="Do stuff"  onclick="return doStuff();" />
Button that runs a script, implemented with input type="submit", input type="reset" or input type="button". This approach should only be used when script is relied upon.
Example Code:
<input type="submit" onclick="return doStuff();" value=”Do Stuff” />
Button that runs a script, implemented with button…/button. This is valuable when you want more control over the look of your button. In this particular example, the button contains both an icon and some text. This approach should only be used when script is relied upon.
Example Code:
<button onclick="return doStuff();">
 <img src="stuff.gif" alt="stuff icon">
 Do Stuff
</button>
Resources are for information purposes only, no endorsement implied.
For all script actions associated with a, button, or input elements:
In a user agent that supports Scripting
Click on the control with the mouse.
Check that the scripting action executes properly.
If the control is an anchor element, check that the URI in the href attribute of the anchor element is not invoked.
Check that it is possible to navigate to and give focus to the control via the keyboard.
Set keyboard focus to the control.
Check that pressing ENTER invokes the scripting action.
If the control is an anchor element, check that the URI in the href attribute of the anchor element is not invoked.
In a user agent that does not support Scripting
Click on the control with the mouse.
If the control is an anchor element, check that the URI in the href attribute of the anchor element is invoked.
Check that it is possible to navigate to and give focus to the control via the keyboard.
Set keyboard focus to the control.
If the control is an anchor element, check that pressing ENTER invokes the URI of the anchor element's href attribute.
All of the above checks are true.
If this is a sufficient technique for a success criterion, failing this test procedure does not necessarily mean that the success criterion has not been satisfied in some other way, only that this technique has not been successfully implemented and can not be used to claim conformance.
Any technology that moves, blinks, or updates text and can create a static block of text.
This technique relates to:
Some Web pages display scrolling text because there is limited space available. Scrolling the text in a small text window makes the content available for users who can read quickly enough, but causes problems for users who read more slowly or use assistive technology. This technique provides a mechanism to stop the movement and make the entire block of text available statically. The text may be made available in a separate window or in a (larger) section of the page. Users can then read the text at their own speed.
This technique does not apply when the text that is moving can not be displayed all at once on the screen (e.g., a long chat conversation).
Note: This technique can be used in combination with a style switching technique to present a page that is a conforming alternate version for non-conforming content. Refer to C29: Using a style switcher to provide a conforming alternate version (CSS) and Understanding Conforming Alternate Versions for more information.
A large block of text is scrolled through a small marquee area of the page. A button lets the user stop the scrolling and display the entire block of text.
Note: This code example requires that both CSS and JavaScript be turned on and available.
The CSS component:
Example Code:
#scrollContainer {
        visibility: visible;
        overflow: hidden;
        top: 50px; left: 10px;
        background-color: darkblue;
      }
      .scrolling {
        position: absolute;
        width: 200px;
        height: 50px;
      }
      .notscrolling {
        width: 500px;
        margin:10px;
      }
      #scrollingText {
        top: 0px;
        color: white;
      }
      .scrolling #scrollingText {
        position: absolute;
      }
      </a>
The script and HTML content:
Example Code:
<script type="text/javascript">

      var tid;
      function init() {
        var st = document.getElementById('scrollingText');
        st.style.top = '0px';
        initScrolling();
      }
      function initScrolling () {
        tid = setInterval('scrollText()', 300);
      }
      function scrollText () {
        var st = document.getElementById('scrollingText');
        if (parseInt(st.style.top) > (st.offsetHeight*(-1) + 8)) {
          st.style.top = (parseInt(st.style.top) - 5) + 'px';
        } else {
          var sc = document.getElementById('scrollContainer');
          st.style.top = parseInt(sc.offsetHeight) + 8 + 'px';
        }
      }
      function toggle() {
        var scr = document.getElementById('scrollContainer');
        if (scr.className == 'scrolling') {
          scr.className = 'notscrolling';
          clearInterval(tid);
           document.getElementById('scrollButton').value="Shrink";
        } else {
          scr.className = 'scrolling';
          initScrolling();
          document.getElementById('scrollButton').value="Expand";
        }
      }
  <input type="button" id="scrollButton" value="Expand" onclick="toggle()" />
  <div id="scrollContainer" class="scrolling">
    <div id="scrollingText" class="on">
    .... Text to be scrolled ...
    </div>
  </div>
...
Working example of this code: Expanding Scrolling Text in Place.
No tests available for this technique.
HTML and XHTML used with script.
This technique relates to:
Site designers often want to create dialogs that do not use the pop-up windows supplied by the browser. This is typically accomplished by enclosing the dialog contents in a div and placing the div above the page content using z-order and absolute positioning in CSS.
To be accessible, these dialogs must follow a few simple rules.
Trigger the script that launches the dialog from the onclick event of a link or button.
Place the dialog div into the Document Object Model (DOM) immediately after the element that triggered it. The triggering element will maintain focus, and inserting the dialog content after that element will make the content inside the dialog next in the screen-reader reading order and next in the tab order. The dialog can still be absolutely positioned to be elsewhere on the page visually. This can be done either by creating the dialog in the HTML and hiding it with CSS, as in the example below, or by inserting it immediately after the triggering element with script.
Ensure that the HTML inside the dialog div meets the same accessibility standard as other content.
It is also nice, but not always necessary, to make the launching link toggle the dialog open and closed, and to close the dialog when the keyboard focus leaves it.
The HTML for this example includes a triggering Element, in this case a button, and a div that acts as the frame for the dialog.
The triggering element is a button and the script is triggered from the onclick event. This sends the appropriate events to the operating system so that assistive technology is aware of the change in the DOM.
In this example, the Submit and Reset buttons inside the dialog simply hide the div.
Example Code:
...
<button onclick="TogglePopup(event,true)"
	name="pop0001">Options</button>

<div class="popover" id="pop0001">
  <h3>Edit Sort Information</h3>
  <form action="default.htm" onsubmit="this.parentNode.style.display='none'; return false;" onreset="this.parentNode.style.display='none'; return false;">
    <fieldset>
      <legend>Sort Order</legend>
      <input type="radio" name="order" id="order_alpha" /><label for="order_alpha">Alphabetical</label>
      <input type="radio" name="order" id="order_default" checked="true" /><label for="order_default">Default</label>
    </fieldset>
<div class="buttons">
  <input type="submit" value="OK" />
  <input type="reset" value="Cancel" />
</div>
</form>

</div>
...
The div, heading and form elements are styled with CSS to look like a dialog.
Example Code:
...
a { color:blue; }
a.clickPopup img { border:none; width:0; }

div.popover { position:absolute; display:none; border:1px outset; background-color:beige; font-size:80%; background-color:#eeeeee; color:black; }
div.popover h3 { margin:0; padding:0.1em 0.5em; background-color:navy; color:white; }
#pop0001 { width:20em; }
#pop0001 form { margin:0; padding:0.5em; }
#pop0001 fieldset { margin-bottom:0.3em; padding-bottom:0.5em; }
#pop0001 input, #pop0001 label { vertical-align:middle; }
#pop0001 div.buttons { text-align:right; }
#pop0001 div.buttons input { width:6em; }
...
The script toggles the display of the popup div, showing it and hiding it.
Example Code:
...
function TogglePopup(evt,show)
{
	HarmonizeEvent(evt);
	var src = evt.target;
	if ("click" == evt.type)
	{
		evt.returnValue = false;
	}
	var popID = src.getAttribute("name");
	if (popID)
	{
		var popup = document.getElementById(popID);
		if (popup)
		{
			if (true == show)
			{
				popup.style.display = "block";
			}
			else if (false == show)
			{
				popup.style.display = "none";
			}
			else
			{
				popup.style.display = "block" == popup.style.display ? "none" : "block";
			}
			if ("block" == popup.style.display)
			{
				//window.alert(document.documentElement.scrollHeight);
				popup.style.top = ((document.documentElement.offsetHeight - popup.offsetHeight) / 2 ) + 'px';
				popup.style.left = ((document.documentElement.offsetWidth - popup.offsetWidth) / 2) + 'px';
			}
		}
	}
}

function SubmitForm(elem)
{
	elem.parentNode.style.display='none';
	return false;
}

function ResetForm(elem)
{
	elem.parentNode.style.display='none';
	return false;
}
...
A working example, an options button that opens a dialog, is available.
Resources are for information purposes only, no endorsement implied.
Microsoft Developer Network Whitepaper: Writing Accessible Web Applications by Cynthia C. Shelly and George Young. (Microsoft Word Format)
Microsoft Active Accessibility 2.0 SDK. Includes Inspect32.exe and other MSAA tools.
Using the Inspect tool to find name Name, Role and Value for Javascript
Microsoft Internet Explorer Developer Toolbar.. Allows examination of script-generated DOM in Microsoft Internet Explorer
Firebug. Allows examination of script-generated DOM in Firefox.
Find all areas of the page that trigger dialogs that are not pop-up windows.
Check that the dialogs can be opened by tabbing to the area and hitting enter.
Check that, once opened, the dialog is next in the tab order.
Check that the dialogs are triggered from the click event of a button or a link.
Using a tool that allows you to inspect the DOM generated by script, check that the dialog is next in the DOM.
Checks #2, #3, #4 and #5 are true.
If this is a sufficient technique for a success criterion, failing this test procedure does not necessarily mean that the success criterion has not been satisfied in some other way, only that this technique has not been successfully implemented and can not be used to claim conformance.
HTML with scripting.
This technique relates to:
This objective of this technique is to offer a conforming alternate version for a web page designed with progressive enhancement. The technique demonstrates how to use a scripting technique to accomplish this by:
Storing the initial pre-enhanced version of the web page so that it can act as a "conforming alternate version" for any later enhanced versions of the content; and
Inserting a mechanism into all enhanced versions of the web page which allows a user to revert the content back to the stored pre-enhanced Alternate Version.
Web pages designed with progressive enhancement detect features in the web-enabled accessing device (size, capability and software) to allow those supported web technologies to be applied in layers on top of an HTML foundation. The basic content and functionality of such a web page are available through the HTML foundation to anyone using a more simple web-enabled accessing device, whilst enhanced versions of the page are created to suit the different features in more advanced accessing devices.
The current guidance for web pages delivered in alternate versions reads: "Note 4: Alternate versions may be provided to accommodate different technology environments or user groups. Each version should be as conformant as possible. One version would need to be fully conformant in order to meet conformance requirement 1." With regard to web pages designed with progressive enhancement this leaves the problem of which version to select as the one fully conformant version - all whilst trying to ensure that no set of users is disadvantaged by that choice.
One solution to this challenge is to select the pre-enhanced version of the web page (e.g. the DOM state created solely from the HTML in the source code in the absence of support for scripts, styles or non-HTML plugins) as the "fully conformant version", due to its broad reach, with regard to support, across all the possible web-enabled devices accessing the content.
Note: This technique removes all scripts, styles, and plugins, but it is important to state that this is not required for conformance with WCAG 2.0. An author could use a similar technique, but retain a reduced set of styles and scripts in the “pre-enhanced” version.
While this technique offers a way to base conformance claims on a single version, authors should continue to work to ensure that each enhanced version of the web page is as conformant as possible.
The example uses JavaScript in the "accToggle.js" file to store the initial pre-enhanced version of the web page, created solely from the HTML in the source code, so that it can act as a "conforming alternate version" for any later enhanced versions of the web page; and inserts a toggle link into all enhanced versions of the web page which allows a user to revert the web page back to the stored pre-enhanced "Conforming Alternate Version". Note: The "sayhello.js" file is simply there as an example payload external file, and is to be replaced by any other external scripts which are desired.
The script in the acctoggle.js file stores the pre-enhanced version - assigning the version the url postfix #accessible. Clicking the "WCAG 2.0 conforming alternate version" link (inserted as the first child of the body element in any enhanced versions) changes the url to include the postfix "#accessible" which then resets the html located in the body element and the head element to pre-enhanced code. The pre-enhanced state can be reached from the link, or directly from a url typed into the browser. In addition, a link is inserted into the pre-enhanced "Conforming Alternate Version" which allows the user to re-enhance the web page (something which can also be done using the web browser's back button).
acctoggle.js source code:
window.onload = function(event) {

    // store pre-enhanced element content
    var initialHead = document.head.innerHTML;
    var initialBody = document.body.innerHTML;
    var initialURL = location.href;

    var runOnce = function() {
        // payload you want to run per page call - e.g. Google Analytics code
    }

    var setup = function() {
        // create conforming alternate version link

        var toggleEnhanced = document.querySelector("#toggle_enhanced");
        if (toggleEnhanced) {
            toggleEnhanced.outerHTML = "";
        }

        var nel = document.createElement("a");
        nel.id = "acctoggle";
        nel.setAttribute("href", "#accessible");
        nel.innerHTML = "WCAG 2.0 conforming alternate version";
        document.body.insertBefore(nel, document.body.firstChild);

        // payload
        var s = document.createElement("SCRIPT");
        s.setAttribute("src", "sayhello.js");
        document.querySelector("HEAD").appendChild(s);
       }

    setup();
    runOnce();

    window.onpopstate = function(event) {
        if (location.href.indexOf("#accessible") != -1) {
            // revert element contents to pre-enhanced version
            document.head.innerHTML = initialHead;
            document.body.innerHTML = initialBody;

            // create enhanced version link
            var el = document.createElement("a");
            el.id = "toggle_enhanced";
            el.setAttribute("href", "");
            el.innerHTML = "Enhanced version";
            var back = function(e) {
                 e.preventDefault();
                 window.history.back();
            }
            el.addEventListener("click", back, false);
            document.body.insertBefore(el, document.body.firstChild);
        }
        if (location.href == initialURL) {
            setup();
        }
    };
}
HTML web page source code:
<!DOCTYPE html>
  <html lang="en">
    <head>
        <title>Evaluera Ltd</title>
        <meta charset="UTF-8" />
        <script src="accSwitch.js"></script>
    </head>
    <body>
        <h1>Test Page</h1>
        <p>Say: <span id="change">Goodbye</span></p>
    </body>
</html>
sayhello.js source code
var change = document.querySelector("#change");
         change.innerText = "Hello";
EnhanceJS is an open source JavaScript framework "designed to improve the application of Progressive Enhancement by first testing browser capabilities for key Javascript and CSS support before applying advanced styles and scripts to the page". In addition, the default EnhanceJS script automatically creates a toggle link in any post-enhanced versions of the page which allows a user to return the web page to its pre-enhanced state (in EnhanceJS with default settings this is called the "low bandwidth version"). The setting have been changed in EnhanceJS to indicate that the pre-enhanced state is to be considered the "WCAG 2.0 conforming alternate version", rather than the "low bandwidth version".
HTML Component:
<!DOCTYPE html>
<html lang="en">
    <head>
    <script type="text/javascript" src="enhance.js"></script>
    <script type="text/javascript">
        // Run capabilities test
        enhance({
            loadStyles: [
                "example.css"
            ],
            loadScripts: [
                "example.js"
            ],
            // text shown in enhanced mode
            forceFailText: "WCAG 2.0 conforming alternate version",
            // text shown in accessible mode
            forcePassText: "Enhanced version"
        });
    </script>
    </head>
    ....
Resources are for information purposes only, no endorsement implied.
Check enhanced versions of the web page contain a link to the "Conforming Alternate Version".
Check that the alternate version is a conforming alternate version of the original page and that it conforms to WCAG 2.0 at the claimed conformance level.
Checks #1 and #2 are true.
If this is a sufficient technique for a success criterion, failing this test procedure does not necessarily mean that the success criterion has not been satisfied in some other way, only that this technique has not been successfully implemented and can not be used to claim conformance.