This document is a draft, and is designed to show changes from a previous version. It is presently showing added text,changed text,deleted text,[start]/[end] markers,and Issue Numbers.
Changes are displayed as follows:
Adobe Flash Professional version MX and higher
Adobe Flex
This technique relates to:
See User Agent Support for Flash for general information on user agent support.
Except for the CheckBox and RadioButton component, the built in Flash
components are not automatically provided an associated label. For
these components, label text has to be placed adjacent to their control
manually, using the Label component. If the 'auto-label' feature is
enabled in the Accessibility Panel, then the Flash Player will automatically
associate the label text for the TextInput and TextArea components.
This means that for these components, it is not necessary to duplicate
the label text for the control using the Accessibility Panel. The auto
label feature is enabled by default.
Additionally, the auto label feature will enable the Flash Player to automatically add text contained by Button symbols as the symbol's accessible name. This will only work if the Button symbol only consists of one layer, containing the text label.
Note: Since auto-labeling associates labels without human intervention the accuracy of the association should be verified. For more predictable results authors are encouraged to explicitly add labels to all controls.
To auto labeling, perform the following steps:
Ensure that the textual descriptions for each form control within the flash application is placed adjacent to the control itself. Text eligible to be used for auto-labeling must not be set to be hidden from assistive technology.
Select the movie stage, and open the 'Accessibility' panel.
Ensure that the 'Auto Label' option is checked. This will automatically associate labels with their TextInput and TextArea controls, and add text inside custom button symbols as their accessible name.
If the auto label behavior is inappropriate to your Flash content, uncheck the 'Auto label' option, and ensure that each control receives a meaningful 'name' value in the 'Accessibility' panel.
To disable auto labeling for a particular object but not the whole movie, convert the text to the 'dynamic text' type using the 'Property inspector'. Then select it, and uncheck its 'Make object accessible' option in the 'Accessibility' panel.
Note: As an alternative to using the Accessibility Panel, the auto
label feature can also be turned off by setting the AccessibilityProperties.noAutoLabel
to true for the stage object.
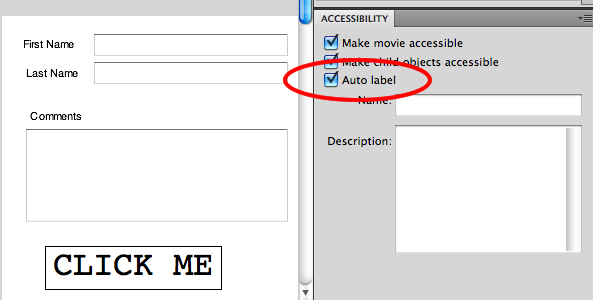
This example shows two TextInput components, a TextArea component and a custom button symbol instance. For the TextInput components, a separate label element has been placed to the left of the control. For the TextArea component, the label has been placed above the control. For the custom button, the label text is placed inside the button symbol. Because the "Auto Label" option is enabled in the Accessibility Panel, all these controls will be provided an accessible name based on their label.
The screenshot below illustrates the example: 
The results of this technique can be viewed in the working version of Using the "Auto Label" option in the Accessibility Panel. The source of Using the "Auto Label" option in the Accessibility Panel is available.
If a Flash form contains TextInput or TextArea components, or custom button symbols with text labels, confirm that:
The Auto Label option is enabled in the movie's Accessibility Panel
Use a screen reader or MSAA checker to ensure that the label text is indeed exposed as the control's accessible name
#1 and #2 are true
If this is a sufficient technique for a success criterion, failing this test procedure does not necessarily mean that the success criterion has not been satisfied in some other way, only that this technique has not been successfully implemented and can not be used to claim conformance.