See Understanding Techniques for WCAG Success Criteria for important information about the usage of these informative techniques and how they relate to the normative WCAG 2.0 success criteria. The Applicability section explains the scope of the technique, and the presence of techniques for a specific technology does not imply that the technology can be used in all situations to create content that meets WCAG 2.0.
Adobe Flash Professional version MX and higher
Adobe Flex
This technique relates to:
See User Agent Support Notes for FLASH20. Also see Flash Technology Notes.
The purpose of this technique is to allow the author to use ActionScript and component skins to apply a strong visual indication when a component receives focus. In this particular technique, both the component's background color and border will change. When the component loses focus, it returns to its normal styling.
The visual highlights will be applied by switching some of the component's skin parts. The Standard Flash components each have their own set of skins that make up the component's visual appearance. Each part is represented by a MovieClip which can be edited or replaced in order to customize how the component looks. The most relevant skin for this technique is the focusRectSkin skin, which is shared by all components. By default this skin applies a subtle visual highlight when the component receives focus.
This technique can be applied through the following steps:
Create a customized version of focusRectSkin.
Use scripting to associate the component with the customized skin.
There are two ways to customize a skin:
Duplicating Existing Skin
With this approach you create a copy of the existing focusRect skin for modification. You will manually have to apply the skin for each individual component instance (as indicated in step 5 below).
Drag the components you want to style to the stage. This will ensure the appropriate component related skins are added to the movie's library.
Open the Library panel, and navigate to the "Component Assets > Shared" folder.
Right-click (or Ctrl-click on a Mac) on the focusRectSkin MovieClip, and choose "Duplicate" from the context menu.
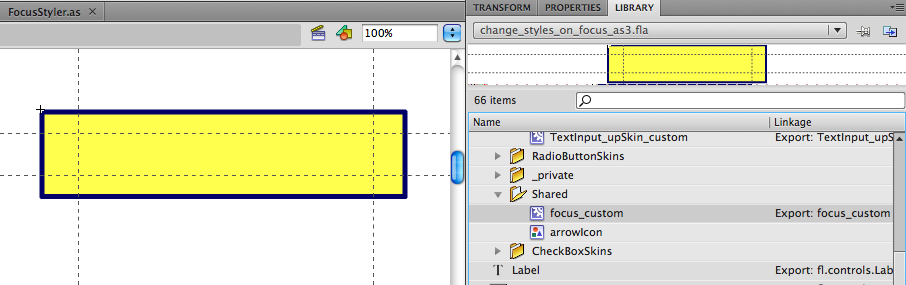
Edit the visual border in the skin's MovieClip. For example, the focus rectangle can be made thicker to stand out more (This step is illustrated in the screenshot below this list).
Using ActionScript, associate form component instances with your customized version of focusRectSkin. This can be achieved using the setStyle method.
Modifying Existing Skin
With this approach, the original focusRect skin is modified. This means that the changes you make will be applied to the visual focus indication of _every_ focusable component.
Drag the components you want to style to the stage. This will ensure the appropriate component related skins are added to the movie's library.
Open the Library panel, and navigate to the "Component Assets > Shared" folder.
Open the focusRectSkin MovieClip for editing by double clicking on it.
Edit the visual border in the skin's MovieClip. For example, the focus rectangle can be made thicker to stand out more.
Note: With this approach you will override the existing skin. If you don't want this, follow the "Duplicate Existing Skin" approach instead.
The focusRect skin applies to all focusable Flash components. If you want to modify other highlights (for example highlights that occur when hovering over a component with the mouse), you will have to edit component specific skins individually. For example, to edit the mouseover highlights for the checkbox component, you will have to modify or duplicate both Checkbox_overIcon and Checkbox_selectedOverIcon. Similarly, for the Button component you will have to modify the Button_over skin.
Also, keep in mind that the existing skins are automatically applied on certain events (focus, mouseover, etc.). It is however also possible to manually switch a skin at a moment of your own choosing (e.g. to indicate invalid content for a text field). this can also be achieved this by calling the setStyle method.
The code below shows an example where form component instances are associated with a modified version of the focusRectSkin MovieClip. The result is that the components receive a thick blue border rather than the default thin border Flash provides. The code makes a reference to a modified skin called Focus_custom, which has been added to the movie's library in advance.
Note that the custom version of focusRectSkin also sets a transparent yellow background to increase the visual highlight further. Components such as Buttons and checkboxes will show this background, but TextInput components will not. To ensure the yellow background will still be applied to the TextInput instance, the following workaround is applied:
A duplicate version of the TextInput "normal" skin (which can be found in the library at "Component Asssets > TextInputSkins > TextInput_upSkin") is created and edited to show a yellow background.
FocusIn, FocusOut, MouseOver and MouseOut handlers are assigned to the TextInput instance, which temporarily swap the default "normal" skin with the custom "normal" skin while the component is focused or hovered over.
Additionally, the button_over skin is duplicated and modified to change the default mouseover highlights for the button component instance. The checkbox_overIcon and checkbox_selectedOverIcon skins are directly modified, which means those changes will be applied to all checkbox instances.
The result of this technique can be found in the working version of A thick blue border to indicate focus.
Example Code:
package wcagSamples {
  import fl.accessibility.ButtonAccImpl;
  import fl.accessibility.CheckBoxAccImpl;
  import fl.controls.CheckBox;
  import fl.controls.Button;
  import fl.controls.Label;
  import fl.controls.TextInput;
  import flash.display.Sprite;
  import flash.events.FocusEvent;
  import flash.events.MouseEvent;

  public class FocusStyler extends Sprite {
    public function FocusStyler() {
      ButtonAccImpl.enableAccessibility()
      CheckBoxAccImpl.enableAccessibility()

      var lbl1: Label = new Label();
      lbl1.text = "name";
      lbl1.x = lbl1.y = 20;
      addChild(lbl1);

      var txt1: TextInput = new TextInput();
      txt1.x = 60;
      txt1.y = 20;
      txt1.width = 200;
      txt1.addEventListener(FocusEvent.FOCUS_IN, handleFocusIn);
      txt1.addEventListener(FocusEvent.FOCUS_OUT, handleFocusOut);
      txt1.addEventListener(MouseEvent.MOUSE_OVER, handleFocusIn);
      txt1.addEventListener(MouseEvent.MOUSE_OUT, handleFocusOut);
      txt1.setStyle("focusRectSkin", "focus_custom");
      addChild(txt1);

      var chk1: CheckBox = new CheckBox();
      chk1.label = "Check Me";
      chk1.x = 60;
      chk1.y = 70;
      chk1.setStyle("focusRectSkin", "focus_custom");
      addChild(chk1);

      var btn1: Button = new Button();
      btn1.label = "Click Me";
      btn1.x = 60;
      btn1.y = 110;
      btn1.setStyle("focusRectSkin", "focus_custom");
      btn1.setStyle("overSkin", "Button_over_custom");
      addChild(btn1);
    }

    private function handleFocusIn(event) {
      event.currentTarget.setStyle("upSkin", "TextInput_upSkin_custom");
    }

    private function handleFocusOut(event) {
      event.currentTarget.setStyle("upSkin", "TextInput_upSkin");
    }
  }
}
This is demonstrated in working version of A thick blue border to indicate focus. The source of working version of A thick blue border to indicate focus is available.
Resources are for information purposes only, no endorsement implied.
When a Flash movie contains focusable components, confirm that:
The visual highlight is applied by modifying the component's skins
A visual highlight is shown when the components receive focus
#1 and #2 are true
If this is a sufficient technique for a success criterion, failing this test procedure does not necessarily mean that the success criterion has not been satisfied in some other way, only that this technique has not been successfully implemented and can not be used to claim conformance.