
Contents
Tables are used to show the relations between pieces of data, by arranging them into labeled rows and columns. CSS2 assumes that the data is already structured as a table, since its facilities for rearranging elements are very limited.
Most of the CSS properties apply to table elements in the same manner they apply to block-level elements. However, due to different constraints on the size and position of cells, some properties behave differently for tables. A few properties apply only to tables.
A table is made up of one table element, several columns possibly grouped into column groups, and several rowgroups, containing rows, which in turn contain cells. (For speech style sheets, the cells are further subdivided into header and data cells.) The spatial layout is governed by a grid. All boxes that make up the table have to align with the grid.
One can think of a table as built from six layers. Each layer hides the lower layers from view, unless it is transparent (or has transparent parts). See Figure 1.
The lowest layer is a single plane, representing the table box itself. (Note that like all boxes, it may be transparent).
The next layer contains the column groups. The columns groups are as tall as the table, but they need not cover the whole table horizontally.
On top of the column groups are the areas representing the column boxes. Like column groups, columns are as tall as the table, but need not cover the whole table horizontally.
Next is the layer containing the row groups. Each row group is as wide as the table. Together, the row groups completely cover the table from top to bottom.
The last but one layer contains the rows. The rows also cover the whole table.
The topmost layer contains the cells themselves, and the borders in between them. As the figure shows, the cells don't have to cover the whole table, but may leave "holes."
To position the table elements, we assume a hypothetical grid, consisting of an infinite number of columns and rows of "grid cells." All table elements (table box, row boxes, cell boxes, etc.) are rectangular and are aligned with the grid: they occupy a whole number of grid cells, determined according to the following rules.
Columns are placed next to each other in the order they occur. Each one occupies the number of grid columns given by its 'column-span' property. A column group occupies the same columns as the columns contained in it. The first column may be either on the left or on the right, depending on the value of the 'direction' property of the table.
Each row box occupies one row of grid cells. Together, the row boxes fill the table from top to bottom in the order they occur in the source document, or, stated differently: the table occupies exactly as many grid rows as there are row elements.
A row group occupies the same grid cells as the rows inside the row group together.
Each cell occupies a rectangle of 'column-span' grid cells wide and 'row-span' grid cells high. The top row of this rectangle of grid cells must be in the row occupied by the cell's parent. The rectangle must be as far to the left as possible, but may not overlap with any other cell, and must be to the right of all cells in the same row that are earlier in the source document. (If the 'direction' of the table is 'right-to-left', interchange "left" and "right" in the previous sentence.)
Cells are 'row-span' high only if there are enough rows: a cell cannot extend below the last row box; it is made shorter until it fits.
Note that there may be "holes" left between the cells. These holes are transparent, and the lower layers of the table are visible through them. Example:
<STYLE>
  TABLE {background: #ff0}
  TD {background: red; border: double black}
</STYLE>
...
<TABLE>
  <TR>
    <TD> 1
    <TD rowspan="2"> 2
    <TD> 3
    <TD> 4
  </TR>
  <TR>
    <TD>
    <TD colspan=2> 5
  </TR>
</TABLE>
| Property name: | 'row-span' |
|---|---|
| Value: | <integer> |
| Initial: | 1 |
| Applies to: | cell elements |
| Inherited: | no |
| Percentage values: | N/A |
How many rows a cell spans. See "Table layout" above for a discussion of how it is used to lay out cells in a table.
| Property name: | 'column-span' |
|---|---|
| Value: | <integer> |
| Initial: | 1 |
| Applies to: | cell, column, and column-group elements |
| Inherited: | no |
| Percentage values: | N/A |
How many columns a cell spans. A cell box occupies a rectangle of 'column-span' by 'row-span' grid cells in a table. An example of its use is:
[COLSPAN] {column-span: attr(COLSPAN)}
This rule is in the recommended default (UA) style sheet for HTML 4.0.
The principle for determining the width of each column is as follows:
The width is determined by the 'width' property of the column box.
However, if there is no column box, the width is given by the width requirements of the cells in the column.
If the value of 'width' for the first cell in the column is 'auto', the UA finds the "optimal" width of the column, based on some heuristics.
More details are given below.
The width of the table is given by its 'width' property. If that is 'auto', the width is the sum of the column widths. More precisely: the sum of the columns and the borders between them. See "Placement of the borders" below.
Finding the optimal width is complicated. In many cases, what is optimal is a matter of taste. CSS therefore doesn't define what the optimal width of each column is; a UA is free to use whatever heuristics is has, and is also free to prefer speed over precision. There are a few implementation hints in chapter [???].
The width computation is complicated by cells that span columns and by widths that are specified as percentages. The problem of finding the widths can be regarded as a constraint resolution system, that may be over- or under-constrained.
A percentage is relative to the table width. If the table's width is 'auto', a percentage represents a constraint on the column's width, which a UA should try to satisfy. (Obviously, this is not always possible: if the column's width is '110%', the constraint cannot be satisfied inside a table whose 'width' is 'auto'.)
A cell that spans columns, provides a constraint on the sum of the widths of the columns it spans.
If a cell's content doesn't "fit" the width of the column, the 'overflow' property determines what happens to it. Similarly, if the 'width' of the table is not 'auto', and the sum of the columns is not equal to the table's width, the 'overflow' property of the table determines what happens.
For block-level and inline elements, the position of the border relative to the content of the element is determined by the margin and the padding. But in a table, the positions of the borders are constrained by the fact that they have to line up from one row to the next and from one column to the next.
The borders are centered on the grid lines between the cells. A renderer has to find a consistent rule for rounding off in the case of an odd number of discrete units (screen pixels, printer dots).
The diagram below shows how the width of the table, the widths of the borders, the padding and the cell width interact. Their relation is given by the following equation, which holds for every row of the table:
table-width = border-width0 + padding-left1 + width1 + padding-right1 + border-width1 + padding-left2 +...+ padding-rightn + border-widthn
Here n is the number of cells in the row, and border-widthi refers to the border between cells i and i + 1.
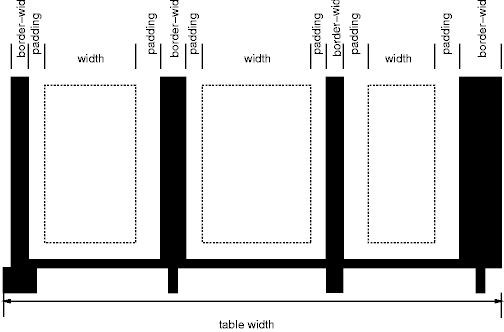
Note that for a table element, the width includes the border, and that a table doesn't have a padding. It does have a margin, however.
The style of the borders between the cells is found by comparing the border properties of all the boxes (cells, columns, the table itself, etc.) that meet at that border. Columns and rows can also have borders, but they are only drawn when they coincide with a cell border.
To find the border style at each side of a grid cell, the following properties have to be compared:
Those of the one or two cells that have an edge here. Less than two can occur at the edge of the table, but also at the edges of "holes" (unoccupied grid cells).
Those of the columns that have an edge here.
Those of the column groups that have an edge here.
Those of the rows that have an edge here.
Those of the row groups that have an edge here.
Those of the table, if this is the edge of the table.
This will give between 0 and 8 'border' values. Each value is made up of a 'border-width', 'border-color' and 'border-style'. The border with the largest width will be drawn. If there are two or more with the same width, but different style, then the one with a style near the start of the following list will be drawn:
'blank', 'double', 'solid', 'dashed', 'dotted', 'ridge', 'groove', 'none'
If the style is 'outset', it will be drawn as 'ridge' instead, and 'inset' will be drawn as 'groove'.
If the borders only differ in color, a color different from the 'color' property of the two cells on either side will be preferred over a color that only differs from one of the cells, which in turn will be chosen over a border that doesn't differ in color from the cells.
If none of these rules determine the color of the border, the UA is free to choose one of the colors.
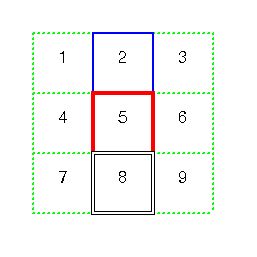
Here is an example:
TD.blue {border: medium solid blue} TD.thick {border: thick solid red}
TD.double {border: thick double black} TR {border: medium dotted
green}
with this document:
<table>
<tr><td>1<td class="blue">2<td>2
<tr><td>4<td class="thick">5<td>6
<tr><td>7<td class="double">8<td>9
</table>
This will be the result:
Only four properties apply to a column box or column-group box: 'border', 'background', 'width', and 'column-span'. The first two are actually shorthand properties, so all the border properties and all the background properties apply.
Only 'border' and 'background' apply to a row or row-group. But note that you can set inherited properties on rows and row-groups, and they will be inherited by the cells.
The cells in a row are aligned somewhat like letters on a line. Each cell, or rather each cell's content, has a baseline, a top, a middle and a bottom, and so does the row itself. The value of the 'vertical-align' property of the cells determines on which of these lines they are aligned:
the baseline of the cell is put at the same height as the baseline of the row (see below for the definition of baselines of cells and rows)
the top of the cell is aligned with the top of the row
the bottom of the cell is aligned with the bottom of the row
the center of the cell is aligned with the center of the row
these values do not apply to cells; the cell is aligned at the baseline instead
The baseline of a cell is the baseline of the first line of text in the cell. If there is no text, the baseline is the baseline of whatever object is displayed in the cell, or, if it has none, the bottom of the cell. The maximum distance between the top of the cell and the baseline over all cells that have 'vertical-align:baseline' is used to set the baseline of the row. Here is an example:
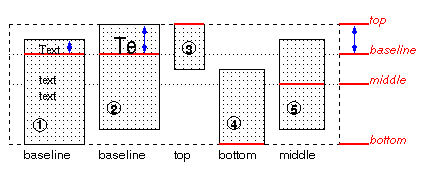
Cells 1 and 2 are aligned at their baselines. Cell 2 has the largest height above the baseline, so that determines the baseline of the row. Note that if there is no cell aligned at its baseline, the row will not have (not need) a baseline.
To avoid ambiguous situations, the alignment of cells proceeds in a certain order. First the cells that are aligned on their baseline are positioned. This will establish the baseline of the row. Next the cells with alignment 'top' are positioned.
The row now has a top, possibly a baseline, and a provisional height, which is the distance from the top to the lowest bottom of the cells positioned so far. (See conditions on the cell padding below.)
If any of the remaining cells, those aligned at the bottom or the middle, have a height that is larger than the current height of the row, the height of the row will be increased to the maximum of those cells, by lowering the bottom.
Finally the remaining cells are positioned.
The area between the cell content and the border is part of the cell's padding. The padding at the top and bottom of each cell after positioning must be at least as large as the 'padding' property specifies. The height of the row must be as small as possible without violating this rule.
A cell is similar to a block in the way its contents are rendered, that means, in particular, that 'alignment' applies to it. However, tables also allow a way of aligning text that does not apply to other blocks, and that is aligning the contents of several cells so that they all align on, e.g., a decimal point (".")
More precisely, if the value of 'alignment' for a certain cell is a string, that cell has an alignment point, which is the start of that string. The alignment point must be straight above or below the alignment points of all other cells in the same column that have an alignment point. (Note that the other cells do not need to have the same value for 'alignment'; as long as they are aligned on a string, they have an alignment point.)
Aligning text in this way is only useful if the text is short enough not to be broken over several lines. The result is undefined if the text is broken.
If the string occurs more than once in the cell's content, the alignment point is the start of the first occurrence.
If the string doesn't occur, the alignment point is the end of the content.
| Property name: | 'caption-side' |
|---|---|
| Value: | top | bottom |
| Initial: | top |
| Applies to: | caption elements |
| Inherited: | yes |
| Percentage values: | N/A |
| Property name: | 'speak-header-cell' |
|---|---|
| Value: | once | always |
| Initial: | once |
| Applies to: | header cells |
| Inherited: | yes |
| Percentage values: | N/A |
[Does 'speak-header' apply to TH or to TD?]
When a table is spoken by a speech generator, the relation between the data cells and the header cells must be expressed in a different way than by horizontal and vertical alignment. Some speech browsers may allow a user to move around in the 2-dimensional space, thus giving them the opportunity to map out the spatially represented relations. When that is not possible, the style sheet must specify at which points the headers are spoken.
CSS supports two possibilities: the headers are spoken before every cell, or only before a cell when that cell is associated with a different header than the previous cell.
[Add speak:header-cell|data-cell, and some way to mirror the axis/axes attributes? BB]
It is assumed that a speech UA analyzes the table as specified in the HTML 4.0 specification, to find for each data cell the header cells with which it is associated. In summary, the algorithm is to go up in the column and find all header cells, and to go towards the start of the row to find all header cells there. If a data cell is found above a header cell, then the search for header cells in the column stops there. Similarly, if a data cell is found in front of a header cell, the search in that row stops.
Since sometimes header cells are not put in the column or row to which they apply (see e.g., the cells "San Jose" and "Seattle" in the example below), an explicit association using the AXIS and AXES attributes must be made. The example below shows the required mark-up
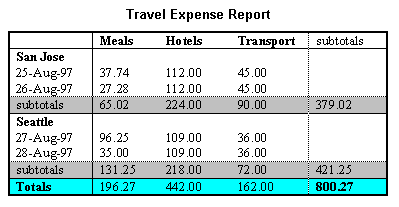
This presents the money spent on meals, hotels and transport in two locations (San Jose and Seattle) for successive days. Conceptually, you can think of the table in terms of a n-dimensional space. The axes of this space are: location, day, category and subtotal. Some cells define marks along an axis while others give money spent at points within this space. The HTML markup for this table is:
<TABLE>
<CAPTION>
  Travel Expense Report
</CAPTION>
<TR>
  <TH></TH>
  <TH>Meals</TH>
  <TH>Hotels</TH>
  <TH>Transport</TH>
  <TH>subtotal</TH>
</TR>
<TR>
  <TH axis="san-jose">San Jose</TH>
</TR>
<TR>
  <TH axes="san-jose">25-Aug-97</TH>
  <TD>37.74</TD>
  <TD>112.00</TD>
  <TD>45.00</TD>
  <TD></TD>
</TR>
<TR>
  <TH axes="san-jose">26-Aug-97</TH>
  <TD>27.28</TD>
  <TD>112.00</TD>
  <TD>45.00</TD>
  <TD></TD>
</TR>
<TR>
  <TH axes="san-jose">subtotal</TH>
  <TD>65.02</TD>
  <TD>224.00</TD>
  <TD>90.00</TD>
  <TD>379.02</TD>
</TR>
<TR>
  <TH axis="seattle">Seattle</TH>
</TR>
<TR>
  <TH axes="seattle">27-Aug-97</TH>
  <TD>96.25</TD>
  <TD>109.00</TD>
  <TD>36.00</TD>
  <TD></TD>
</TR>
<TR>
  <TH axes="seattle">28-Aug-97</TH>
  <TD>35.00</TD>
  <TD>109.00</TD>
  <TD>36.00</TD>
  <TD></TD>
</TR>
<TR>
  <TH axes="seattle">subtotal</TH>
  <TD>131.25</TD>
  <TD>218.00</TD>
  <TD>72.00</TD>
  <TD>421.25</TD>
</TR>
<TR>
  <TH>Totals</TH>
  <TD>196.27</TD>
  <TD>442.00</TD>
  <TD>162.00</TD>
  <TD>800.27</TD>
</TR>
</TABLE>
By providing the data model in this way, authors make it possible for speech enabled-browsers to explore the table in rich ways, e.g. each cell could be spoken as a list, repeating the applicable headers before each data cell:
  San Jose, 25-Aug-97, Meals:  37.74
  San Jose, 25-Aug-97, Hotels:  112.00
  San Jose, 25-Aug-97, Transport:  45.00
 ...
The browser could also speak the headers only when they change:
San Jose, 25-Aug-97, Meals: 37.74
    Hotels: 112.00
    Transport: 45.00
  26-Aug-97, Meals: 27.28
    Hotels: 112.00
...
The 'speak-header-cell' property of a header cell determines when it is spoken: before every data cell, or only when the previous cell spoken wasn't associated with this header.
[Move to appendix]
[Minimum/maximum]