The language enablement work of the W3C involves documenting gaps in Web support for users of a given language or script, and then requesting that those gaps be addressed by spec developers or browser implementers.
Interactive test files provide flexibility and ease of use that is useful for experimental gap-analysis testing. These tests allow you to experiment, and quickly create tests, document them, and record results. They are particularly useful for tests which are likely to result in slightly different results across a number of languages, or for testing features that involve many permutations in the input data. They are also useful for simply exploring what might happen in certain situations.
This page describes practical steps for creating and managing interactive tests to support the write-up of a gap.
The test index & other pages
The main entry point for finding interactive tests that already exist (and tests in the Internationalization Test Suite) is the Internationalization Tests page.
Under the heading Interactive tests & results there are 3 subheadings.
Results summary pages
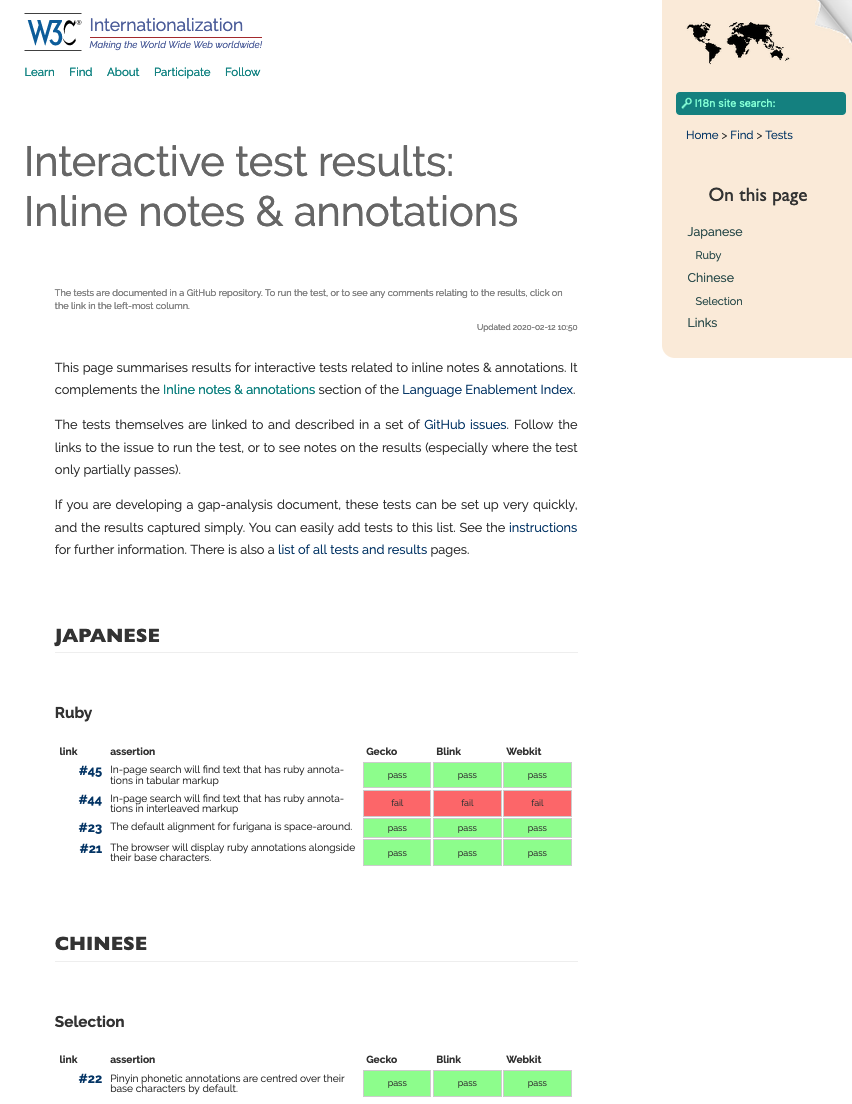
Results summary pages bring together a high-level view of results for a particular topic area. The topics coincide with the sections in the Language Enablement Index.
This is the place to go to if you want to find an existing test, or check whether a test already exists.
These results summary pages are HTML-based, and the framework is created by the staff. The data, however, is pulled at run time from the GitHub issues list, and the location and results tables are determined by the labels set for the GitHub issue relevant for a particular test.
Tests are grouped by language, and then by subsections containing related tests.
Each test occupies a line, which contains a link to a GitHub issue that contains detailed results information and links to the actual tests, the assertion associated with the test, and a set of results.
Test rig
The test rig allows you to set up new tests yourself and produce a URL to capture the test so that it can be shared or stored.
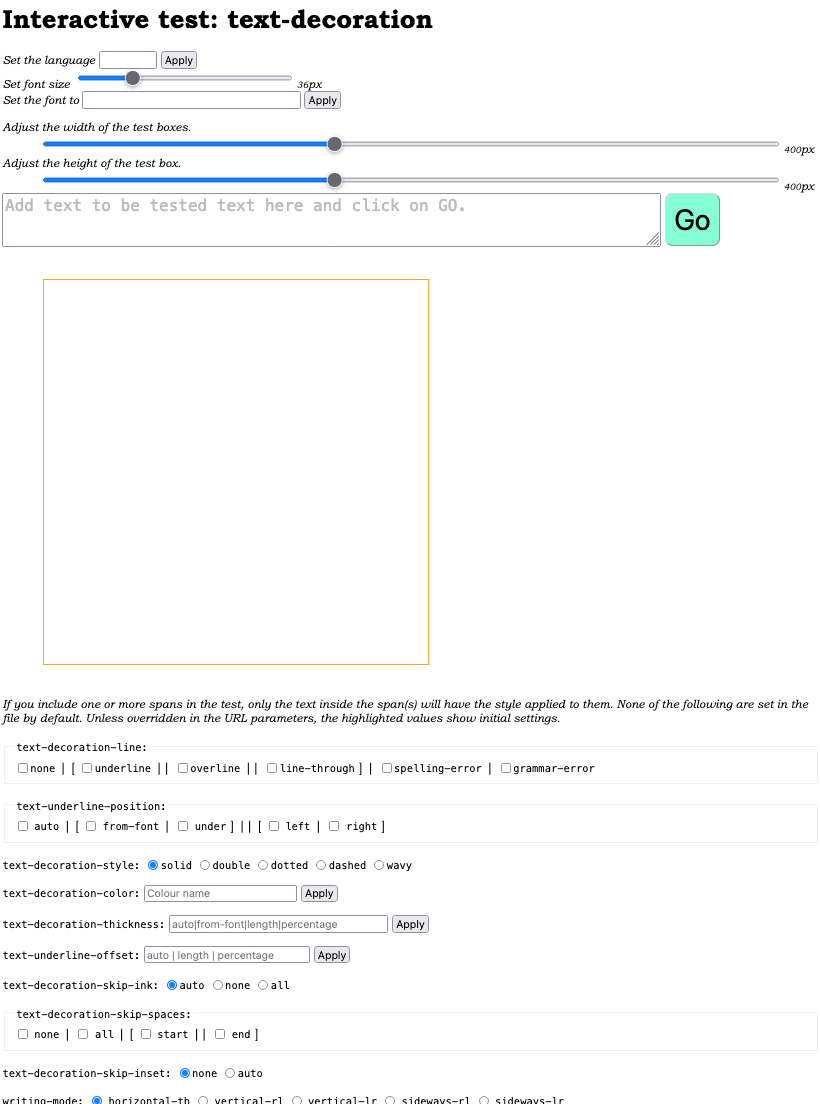
A test rig page will allow you to set language, font and font-size, and the dimensions of the test bounding box. You can then add some text or markup and see what it looks like. Below the test bounding box you'll usually find fields to allow you to apply various CSS property values.
At the bottom of the page is a button that creates a URL for you. That URL captures all the settings on a page, and can be copied wherever you like, so that others can view the test you set up.
W3C staff create these test rigs. A Vanilla canvas is also provided, and can be useful for setting up many kinds of tests if you don't need to apply the CSS properties.
Repositories
The detailed test results, as mentioned, are stored in GitHub issues. Each issue is in one of three repositories, which are named according to the major sections in the Language Enablement Index. This section on the test index page points you to those repositories.
The repositories are another useful place to find existing tests, because the labels used for each issue allow you to filter the list by language, by topic area, or by results for a particular user agent, etc.
You will also need to go to one of the repositories if you have created a test and you want to add it to the list of existing tests (details about how to do that can be found here).

How to create an exploratory test
It's very easy to create an exploratory test.
First, check whether the test already exists, using the links described above on the test index page. If you don't find what you want, you can start with an empty test rig, or modify an existing test.
To create a completely new test page start with the test rig.
Add whatever text or markup you need to the controls on the test rig page. The text is displayed in one or more boxes below with orange borders.
Add a brief assertion for the test. This describes what the test is checking. This assertion will also be used for the title of the GitHub issue describing the results of the test, and so will show up in the GitHub issues lists and the results summary pages.
Add a set of instructions that explain how to know whether the test has passed, and anything that needs to be prepared in advance, etc. The instructions should normally contain a sentence that begins with "The test passes if ...".
To point people to the test, in an email or in a GitHub issue, click on the button Take a snapshot at the bottom of the page. This will produce a URL which you can copy to wherever you like. Anyone who follows the URL will see the page exactly as it was when you snapped it.
Saving a test to a GitHub repo
To save a test for posterity in one of the GitHub repositories dedicated to interactive tests, follow these steps. We will assume that you have already created the test, and have also created a snapshot URL for that test.
Choose the appropriate repo
Your test will usually belong under one or more of the subsection headings in the Language Enablement Index. The choice of repository corresponds to the higher level heading of the index that contains the relevant subsection. They are:
Create an issue
From the GitHub issue page you chose, click on the green New Issue button, and then select Add a test. A template will appear. Follow these steps:
- Add the test's brief assertion to the subject line. This describes what the test is checking. It will be used in the results summary pages, as well as for the issues list. It should be the same assertion as you wrote for the test itself.
- Under Test link(s) add the snapshot URL for the test you created, with some link text. You can add more than one of these lines, if needed. You can also briefly annotate them, so that someone can get an idea about what the test does.
- Fill in the results. The template provides 3 lines, for Gecko, Blink, and Webkit (but if needed it should be possible to add more). You are encouraged to run the test on all three of these engines to give an indication of the interoperability of the feature you are testing.
- If the test passes, delete the ✘. If it fails, delete ✓. If it partially passes, leave both ✓✘.
- The browser name and version and the OS are indicated at the bottom of the test page, and can be copied from there.
- Add any comments you feel are useful. Comments should always appear if the test only partially passes.
- Add a link to the appropriate results page (see a list). This helps people viewing this test to find related tests.
GitHub issue labels
Labels are used to automatically populate the results summary pages, and to allow for filtering of issues in the GitHub repos.
Add the following labels if you are able, or otherwise ask someone else in the Internationalization Working Group to do so. It's fine to have more than one such label, if you think the topic is equally applicable to more than one topic.
The required labels are:
- one or more labels beginning with doc:. These labels indicate which results summary page this test will appear on.
- one or more labels beginning with h2:. These labels indicate the level 2 section(s) on results page where this test will appear. It will usually be a language name, since the tests are first grouped by language on those pages.
- one or more labels beginning with h3:. These labels indicate the level 3 section(s) on results page where this test will appear, if there is one.
- a label beginning with r:, to indicate the result of the test for each of the user agent engines tested. Each of these labels has one of 3 colours: r:... for a pass, r:... for a fail, and r:... for a partial result. Choose the label with the appropriate user agent and colour combination.
The test result summary pages are built automatically from the labels supplied in this step. There is no need to manually intervene in order to add your test to the appropriate page.