In most public descriptions of SMIL, the language is described as "allowing authors to bring TV-like content to the Web." However, one aspect of presentations commonly seen on television has been noticeably absent from SMIL: transitions such as fades and wipes. In SMIL 1.0, any representation of transitions had to be "baked into" the media itself and there was no method of coordinating transitions across multiple media regions and timelines. The purpose of this document is to specify the semantics and syntax for describing transitions within SMIL and other XML-based documents. Also, this specification describes a taxonomy of transitions based on SMPTE 258M-1993 [SMPTE] as well as a compact set of parameters which can be used to express this set of transitions. Although the majority of transitions described in this document are visual transitions, a number of transitions have audio equivalents and are equally applicable.
Any XML language that wants to make use of transitions must have:
For example, consider a simple still image slideshow of four images, each displayed for 5 seconds. In SMIL 1.0 this might look like:
<smil>
<head>
<layout>
<root-layout width="256" height="256" background-color="#000000"/>
<region id="whole" left="32" top="32" width="192" height="192"/>
</layout>
</head>
<body>
<seq>
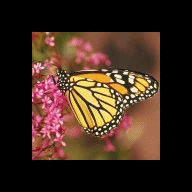
<img src="butterfly.jpg" region="whole" dur="5s"/>
<img src="eagle.jpg" region="whole" dur="5s"/>
<img src="wolf.jpg" region="whole" dur="5s"/>
<img src="seal.jpg" region="whole" dur="5s"/>
</seq>
</body>
</smil>
and the corresponding presentation in HTML+TIME (for the timing model) and CSS2 (for the layout language):
<HTML>
    <HEAD>
        <XML:NAMESPACE PREFIX="t"/>
        <STYLE>
            DIV      { position:         absolute;
                       left:             0px;
                       top:              0px;
                       width:            256px;
                       height:           256px;
                       background-color: #000000 }
            .whole   { position:         absolute;
                       left:             32px;
                       top:              32px;
                       width:            192px;
                       height:           192px }
        </STYLE>

    </HEAD>
    <BODY>
        <DIV STYLE="behavior:url(#default#time);" t:TIMELINE="seq">
            <t:IMG CLASS="whole" STYLE="behavior:url(#default#time);" t:SRC="butterfly.jpg"   t:DUR="5" t:TIMEACTION="display"/>
            <t:IMG CLASS="whole" STYLE="behavior:url(#default#time);" t:SRC="eagle.jpg"       t:DUR="5" t:TIMEACTION="display"/>
            <t:IMG CLASS="whole" STYLE="behavior:url(#default#time);" t:SRC="wolf.jpg"        t:DUR="5" t:TIMEACTION="display"/>
            <t:IMG CLASS="whole" STYLE="behavior:url(#default#time);" t:SRC="seal.jpg"        t:DUR="5" t:TIMEACTION="display"/>
        </DIV>
    </BODY>
</HTML>
Currently when these presentations play, we see a straight "cut" from one image to another, as shown in this animated image. However, what we would like to see are three wipes in between the four images: in between butterfly.jpg and eagle.jpg at 5 seconds, in between eagle.jpg and wolf.jpg at 10 seconds, and in between wolf.jpg and seal.jpg at 15 seconds. Therefore, we must define the following to our presentations:
Adding these two definitions to the previous SMIL 1.0 slideshow example would make the presentation now look like:
<smil>
    <head>
        <layout>
            <root-layout width="256" height="256" background-color="#000000"/>
            <region id="whole" left="32" top="32" width="192" height="192"/>
        </layout>
        <transition id="wipe1" type="wipe" subtype="slideHorizontal" dur="1s"/>
    </head>
    <body>
        <seq>
            <img src="butterfly.jpg" region="whole" dur="5s"/>
            <img src="eagle.jpg"     region="whole" dur="5s" transition="wipe1"/>
            <img src="wolf.jpg"      region="whole" dur="5s" transition="wipe1"/>
            <img src="seal.jpg"      region="whole" dur="5s" transition="wipe1"/>
        </seq>
    </body>
</smil>
and the presentation in HTML+TIME and CSS2 would now look like:
<HTML>
    <HEAD>
        <XML:NAMESPACE PREFIX="t"/>
        <STYLE>
            DIV      { position:         absolute;
                       left:             0px;
                       top:              0px;
                       width:            256px;
                       height:           256px;
                       background-color: #000000 }
            .whole   { position:         absolute;
                       left:             32px;
                       top:              32px;
                       width:            192px;
                       height:           192px }
            .wipe1   { transitionType:    wipe;
                       transitionSubType: slideHorizontal;
                       transitionDur:     1s }
        </STYLE>
    </HEAD>
    <BODY>
        <DIV STYLE="behavior:url(#default#time);" t:TIMELINE="seq">
            <t:IMG CLASS="whole"       STYLE="behavior:url(#default#time);" t:SRC="butterfly.jpg"   t:DUR="5" t:TIMEACTION="display"/>
            <t:IMG CLASS="whole;wipe1" STYLE="behavior:url(#default#time);" t:SRC="eagle.jpg"       t:DUR="5" t:TIMEACTION="display"/>
            <t:IMG CLASS="whole;wipe1" STYLE="behavior:url(#default#time);" t:SRC="wolf.jpg"        t:DUR="5" t:TIMEACTION="display"/>
            <t:IMG CLASS="whole;wipe1" STYLE="behavior:url(#default#time);" t:SRC="seal.jpg"        t:DUR="5" t:TIMEACTION="display"/>
        </DIV>
    </BODY>
</HTML>
Now the presentations play as follows. First, at 0 seconds, we cut directly to butterfly.jpg. Next, at 5 seconds we begin a 1-second wipe into eagle.jpg. Therefore, at 6 seconds, eagle.jpg is fully displayed and remains displayed for 4 more seconds until 10 seconds. At this time, we begin a another 1-second wipe from eagle.jpg to wolf.jpg. At 11 seconds, wolf.jpg is fully displayed until 15 seconds, when we begin another 1-second transition to seal.jpg. At 16 seconds, seal.jpg is fully displayed until 20 seconds at which time the presentation ends. When the presentation ends, there is an immediate cut to black due to the default fill="remove" behavior of SMIL and the TIMEACTION="display" behavior of HTML+TIME. This is visually illustrated by this animated image. Notice that these transitions occur during the timeline each of the images and do not add or subtract from their host timeline. In this case, the transition occurs (by default) at the beginning of the timeline, although we will discuss later a method of placing the transition at the end of a media element's timeline.
This document is structured as follows. In the Taxonomy section, we define a taxonomy of transitions and describe the families of transitions. Next in the Parameters section, we define a set of parameters which can fully describe all the transitions in our taxonomy. Next, in the Applying Transitions to Media Elements section, we describe the semantics of applying a transition class to a media element. Next, in the Multiple-Element Transitions section, we describe how to apply single transitions across multiple media elements.
Using CSS, making text appear in a certain font face and size involves defining a style and then using selectors to apply that style to the appropriate elements. The entire set of possible font faces are grouped into broad font families with specialization within each family. In a similar manner, we define in this section several broad families of transitions and describe the distinguishing characteristics of each family. In the next section, we will define a parameter set which can fully specify all the transitions in each family.
In all of the examples of specific transitions mentioned in this document, we will refer to the following model: we refer to the element being transitioned from as element A (or just A) and we refer to the element being transitioned to as element B (or just B). We define the following eight families (or types) of transitions:
Each of these transition "types" are further divided into many "subtypes". The table below lists the possible subtypes for each type. Also the table lists the mapping between the assigned name and the SMPTE Wipe Code (where applicable).
Transition type |
Transition subtypes (SMPTE Wipe Codes in parentheses) |
| edgeWipe | "slideHorizontal" (1) [default], "slideVertical" (2), "topLeft" (3), "topRight" (4), "bottomRight" (5), "bottomLeft" (6), "fourCorner" (7), "fourBox" (8), "barnVertical" (21), "barnHorizontal" (22), "topCenter" (23), "rightCenter" (24), "bottomCenter" (25), "leftCenter" (26), "diagonalLeftDown" (41), "diagonalRightDown" (42), "verticalBowTie" (43), "horizontalBowTie" (44), "diagonalLeftOut" (45), "diagonalRightOut" (46), "diagonalCross" (47), "diagonalBox" (48), "filledVUp" (61), "filledVRight" (62), "filledVBottom" (63), "filledVLeft" (64), "hollowVUp" (65), "hollowVRight" (66), "hollowVBottom" (67), "hollowVLeft" (68), "verticalZigZag" (71), "horizontalZigZag" (72), "verticalBarnZigZag" (73), "horizontalBarnZigZag" (74) |
| irisWipe | "rectangle" (101) [default], "diamond" (102), "triangleUp" (103), "triangleRight" (104), "triangleDown" (105), "triangleLeft" (106), "arrowheadUp" (107), "arrowheadRight" (108), "arrowheadDown" (109), "arrowheadLeft" (110), "pentagonUp" (111), "pentagonDown" (112), "hexagon" (113), "hexagonSide" (114), "cicle" (119), "oval" (120), "ovalSide" (121), "catEye" (122), "catEyeSide" (123), "roundRect" (124), "roundRectSide" (125), "star4pt" (127), "star5pt" (128), "star6pt" (129), "heart" (130), "keyhole" (131) |
| radialWipe | "top" (201) [default], "right" (202), "bottom" (203), "left" (204), "topBottom" (205), "leftRight" (206), "quadrant" (207), "topBottom180" (211), "rightLeft180" (212), "topBottom90" (213), "rightLeft90" (214), "top180" (221), "right180" (222), "bottom180" (223), "left180" (224), "counterTopBottom" (225), "counterLeftRight" (226), "doubleTopBottom" (227), "doubleLeftRight" (228), "vOpenTop" (231), "vOpenRight" (232), "vOpenBottom" (233), "vOpenLeft" (234), "vOpenTopBottom" (235), "vOpenLeftRight" (236), "topLeft" (241), "bottomLeft" (242), "bottomRight" (243), "topRight" (244), "topLeftBottomRight" (245), "bottomLeftTopRight" (246), "topLeftRight" (251), "leftTopBottom" (252), "bottomLeftRight" (253), "rightTopBottom" (254), "doubleCenterRight" (261), "doubleCenterTop" (262), "doubleCenterTopBottom" (263), "doubleCenterLeftRight" (264) |
| matrixWipe | "horizontal" (301) [default], "vertical" (302), "topLeftDiagonal" (303), "topRightDiagonal" (304), "bottomRightDiagonal" (305), "bottomLeftDiagonal" (306), "cwTopLeft" (310), "cwTopRight" (311), "cwBottomRight" (312), "cwBottomLeft" (313), "ccwTopLeft" (314), "ccwTopRight" (315), "ccwBottomRight" (316), "ccwBottomLeft" (317), "verticalStartTop" (320), "verticalStartBottom" (321), "verticalStartTopOpposite" (322), "verticalStartBottomOpposite" (323), "verticalStartLeft" (324), "verticalStartRight" (325), "verticalStartLeftOpposite" (326), "verticalStartRightOpposite" (327), "doubleDiagonalTopRight" (328), "doubleDiagonalBottomRight" (329), "doubleSpiralTop" (340), "doubleSpiralBottom" (341), "doubleSpiralLeft" (342), "doubleSpiralRight" (343), "quadSpiralVertical" (344), "quadSpiralHorizontal" (345), "verticalWaterfallLeft" (350), "verticalWaterfallRight" (351), "horizontalWaterfallLeft" (352), "horizontalWaterfallRight" (353) |
| pushWipe | "fromTop", "fromRight", "fromBottom", "fromLeft" [default] |
| slideWipe | "fromTop", "fromRight", "fromBottom", "fromLeft" [default], "angular" |
| fade | "crossfade" [default], "fadeToColor", "fadeFromColor" |
| warp | "explode", "implode", "zoomOver" [default], "zoomBoth" |
For each of the types, the first subtype is labeled as the "default" subtype. The purpose of this is to allow for a default transition for this transition family, if either the transition subtype is not specified or not implemented. This is a similar idea to CSS's font-family property, where the value is a comma-separated list of font faces of families. If the first font in the list is not available, then the browser tries the second. Usually, the last font in the list will be very generic, so that all browsers can support it.
In the same way, authors can specify a type and subtype for a transition class. If this transition class is not available or not implemented by the user agent, then the user agent should fall back on the default subtype for that transition family. The side effect of this is that all renderers are required to support a minimum of 8 transitions (the default transition for each of the transition families).
Now that we have a taxonomy of transition types and subtypes defined, now we must define a set of parameters which can span the entire space of transitions. In the following list, not all the parameters apply to every transition type. However, there is enough commonality between parameters for each family that it is not useful to have a separate parameter set for each transition family.
We also present the <transition> element for SMIL. In
SMIL, this element defines a single transition class. If the transition class
is expressed in a stylesheet language such as CSS, then each of these parameters
are properties defined in CSS syntax within the <STYLE> element. In
order not to be distinguished from other CSS properties, the prefix "transition"
should be prepended to each of the parameter names to create the CSS property
name, using camelCase to mark the separation between words. For example,
the transition parameter "dur" would translate directly to "dur" as a SMIL
attribute but would translate to "transitionDur" as a CSS property.
We will reference an Integration section here when that
section is complete.
<transition> element
The <transition> element defines a single transition class
within a SMIL document. This element should appear in the
<head> section of the document. Since there may be multiple
transition classes used in a SMIL document, then there may be multiple
<transition> elements in the
<head> section of the SMIL document.
Element attributes
Element content
The <transition> element is an empty element.
<transition> element.
For example, suppose we wanted to define two transition classes: a simple 2-second fade-to-black and a 5-second keyhole-shaped iris wipe. In SMIL, our definition would look like:
    ...
    <head>
        ...
        <transition id="ftb2" type="fade"     subtype="fadeToColor"
                       dur="2s" color="#000000" />
        <transition id="key5" type="irisWipe" subtype="keyhole"
                       dur="5s" />
        ...
    </head>
    ...
and in a CSS-like syntax our definition would look like:
   ...
    <HEAD>
        ...
        <STYLE>
            .ftb2 { transitionType:    fade;
                    transitionSubtype: fadeToColor;
                    transitionDur:     2s;
                    transitionColor:   #000000 }
            .key5 { transitionType:    irisWipe;
                    transitionSubtype: keyhole;
                    transitionDur:     5s }
        </STYLE>
        ...
    </HEAD>
    ...
Note that in SMIL, the "id" attribute is necessary to identify the transition class. In CSS, the transition class name is implicit in the CSS class selector notation and thus an "id" property is unnecessary.
Transitions parameters can be specified incorrectly in many different ways with varying levels of severity. Therefore, the following errors should be handled with the specified action:
Once a transition class has been defined in the head of a document, then a transition instance can be created by applying the transition class to the timeline of a media object element. For languages which support CSS style, the class selector is used to apply a transition class to a media element. The value of the class attribute is defined in the class selector of the transition definition. For SMIL, a "transition" attribute is added to all media object elements.
The "transition" attribute is added to all media object elements. The default
value of the transition attribute is an empty string, which indicates that
no transition should be performed. The value of the "transition" attribute
should be the same as the value of the "id" attribute of one of the
<transition> elements defined in the <head> of the
document. If the value of the "transition" attribute does not correspond
to the value of the "id" attribute of any one of the
<transition> elements in the <head> of the document,
then this is an error. In this case, the value of the "transition" attribute
should be considered to be the empty string and therefore no transition should
be performed.
In SMIL, this attribute may be applied to any media object element. These
elements are listed in the
SMIL Media Object Module. In other languages, this attribute may be applied
to the appropriate elements which reference media objects. Also this element
may be applied to other non-media elements for which transitions are desired
(such as the <DIV> element in HTML.
Consider the slideshow example in the Introduction of the document with two additions: a fade-from-black is applied to butterfly.jpg and a fade-to-black is applied to seal.jpg. In SMIL this would look like:
<smil>
    <head>
        <layout>
            <root-layout width="256" height="256" background-color="#000000"/>
            <region id="whole" left="32" top="32" width="192" height="192"/>
        </layout>
        <transition id="xfade1s"    type="fade" subtype="crossfade"     dur="1s"/>
        <transition id="fromblack1" type="fade" subtype="fadeFromColor" dur="1s"/>
        <transition id="toblack1"   type="fade" subtype="fadeToColor"   dur="1s" base="end" />
    </head>
    <body>
       <seq>
            <img src="butterfly.jpg" region="whole" dur="5s" transition="fromblack1"/>
            <img src="eagle.jpg"     region="whole" dur="5s" transition="xfade1s"/>
            <img src="wolf.jpg"      region="whole" dur="5s" transition="xfade1s"/>
            <img src="seal.jpg"      region="whole" dur="5s" transition="xfade1s,toblack1"/>
       </seq>
    </body>
</smil>
and
<HTML>
    <HEAD>
        <XML:NAMESPACE PREFIX="t"/>
        <STYLE>
            DIV      { position:         absolute;
                       left:             0px;
                       top:              0px;
                       width:            256px;
                       height:           256px;
                       background-color: #000000 }
            .whole   { position:         absolute;
                       left:             32px;
                       top:              32px;
                       width:            192px;
                       height:           192px }
            .xfade1s { transitionType:    fade;
                       transitionSubType: crossfade;
                       transitionDur:     1s }
            .fromblack1 { transitionType:    fade;
                          transitionSubType: fadeFromColor;
                          transitionDur:     1s;
                          transitionColor:   #000000 }
            .toblack1 { transitionType:    fade;
                        transitionSubType: fadeToColor;
                        transitionDur:     1s;
                        transitionColor:   #000000;
                        transitionBase:    end }
        </STYLE>
    </HEAD>
    <BODY>
        <DIV STYLE="behavior:url(#default#time);" t:TIMELINE="seq">
            <t:IMG CLASS="whole,fromblack1"       STYLE="behavior:url(#default#time);" t:SRC="butterfly.jpg"   t:DUR="5" t:TIMEACTION="display"/>
            <t:IMG CLASS="whole,xfade1s"          STYLE="behavior:url(#default#time);" t:SRC="eagle.jpg"       t:DUR="5" t:TIMEACTION="display"/>
            <t:IMG CLASS="whole,xfade1s"          STYLE="behavior:url(#default#time);" t:SRC="wolf.jpg"        t:DUR="5" t:TIMEACTION="display"/>
            <t:IMG CLASS="whole,xfade1s,toblack1" STYLE="behavior:url(#default#time);" t:SRC="seal.jpg"        t:DUR="5" t:TIMEACTION="display"/>
        </DIV>
    </BODY>
</HTML>
We will use this example to illustrate the following rules for applying transitions to media elements:
    ...
    <par>
        <img src="butterfly.jpg" dur="10s" region="foo"/>
        <img src="eagle.jpg" begin="3s" dur="4s" region="bar" />
    </par>
    ...
Assuming that region "bar" is z-ordered on top of region "foo", then transitions applied to both the beginning and end of eagle.jpg would have the visual appearance of being applied during the timeline of butterfly.jpg. However, from the authoring perspective, they are still applied at the beginning and end of eagle.jpg.
    ...
    <transition id="toblack1s" type="fade" subType="fadeToColor"
                   color="#000000" base="end" dur="1s"/>
    ...
    <par>
        <img   ... dur="10s" transition="toblack1s" fill="freeze"/>
        <video ... dur="30s" transition="toblack1s"/>
    </par>
the effective end of the <img> element is 30s. Therefore both elements fade to black together at 29s. However, in the following:
    ...

    <transition id="toblack1s"   type="fade" subType="fadeToColor"
                   color="#000000" base="end" dur="1s"/>
    ...
    <par>
        <img   ... dur="10s" transition="toblack1s" fill="remove"/>
        <video ... dur="30s" transition="toblack1s"/>
    </par>
the effective end of the <img> element is 10s. Therefore, in this case the <img> element fades to black starting at 9s and the <video> element fades to black starting at 29s.
    ...
    <seq>
        <video src="foo1.mpg" region=<reg1> ... />
        <video src="foo2.mpg" region=<reg1> transition="xfade1s" ... />
    </seq>
    ...
the timelines do not overlap and therefore we are doing a crossfade between the last frame of foo1.mpg and active frames of foo2.mpg. In the following presentation, however:
    ...
    <transition id="xfadebeg" type="fade" subtype="crossfade" dur="1s" />
    <transition id="xfadeend" type="fade" subtype="crossfade" dur="1s" base="end" />
    ...
    <par>
        <video src="foo1.mpg" dur="30s" region="reg1" />
        <video src="foo2.mpg" begin="10s" dur="10s" region="reg2" transition="xfadebeg,xfadeend" />
    </par>
    ...
crossfades both at the beginning and end of foo2.mpg are between active frames of both foo1.mpg and foo2.mpg.
    ...
    <transition id="awipe" type="wipe" dur="1s" ... />
    ...
    <par>
        <img src="img1.jpg" region="whole" dur="2s" transition="awipe" base="end"/>
        <img src="img2.jpg" region="whole" begin="5s" dur="2s"/>
    </par>
    ...
In this example, the timelines for img1.jpg and img2.jpg do not overlap. Therefore, img1.jpg will transition to the background color of the region.
    ...
    <seq>
        <img src="img1.jpg" region="whole" dur="10s" />
        <img src="img2.jpg" region="whole" dur="10s" />
    </par>
    ...
the implementation knows that it can remove the object representing img1.jpg after 10 seconds. However, if we were using a transition between img1.jpg and img2.jpg, then we need the object for img1.jpg to remain until after the transition is completed and then it may be removed. This is a new kind of fill behavior and is specified by a new value for the fill attribute called "transition". In the above example,
    ...
    <seq>
        <img src="img1.jpg" region="whole" dur="10s" fill="transition" transition="awipe"/>
        <img src="img2.jpg" region="whole" dur="10s" />
    </par>
    ...
the implementation is instructed to keep the object for img1.jpg around long enough to complete the transition between img1.jpg and img2.jpg in the region named "whole".
Up until this point in the discussion, we have applied transitions to single media object elements. However, it is common practice to apply transitions across several different media at once. Consider the following example:
<smil>
<head>
<layout>
<root-layout width="320" height="240" background-color="#000000"/>
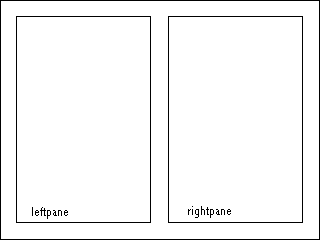
<region id="whole" left="0" top="0" width="320" height="240" z-index="0"/>
<region id="leftpane" left="16" top="16" width="136" height="208" z-index="1"/>
<region id="rightpane" left="168" top="16" width="136" height="208" z-index="1"/>
</layout>
</head>
<body>
<seq>
<par>
<img src="back1.jpg" dur="10s" region="whole"/>
<img src="left1.jpg" dur="10s" region="leftpane"/>
<img src="right1.jpg" dur="10s" region="rightpane"/>
</par>
<par>
<img src="back2.jpg" dur="10s" region="whole"/>
<img src="left2.jpg" dur="10s" region="leftpane"/>
<img src="right2.jpg" dur="10s" region="rightpane"/>
</par>
</seq>
</body>
</smil>
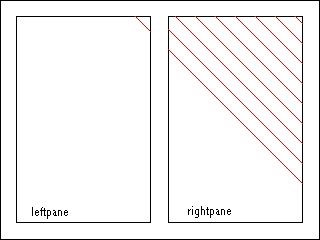
where the regions of this presentation look like:
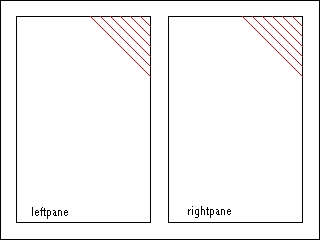
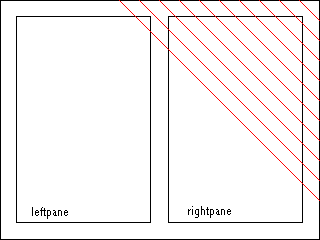
Suppose that we had defined a transition class called "diagwipe" to be a 1-second diagonal wipe from upper right to lower left. In this example, we consider 4 possible different cases of how we might want to apply this transition to this presentation:
 |
 |
Case 1 |
Case 2 |
 |
 |
Case 3 |
Case 4 |
Cases 1 and 4 are fairly straightforward, since they are applying individual transitions to individual media elements, which we discussed in the previous section. The SMIL for Case 1 would look like:
<smil>
    <head>
        <layout>
            <root-layout width="320" height="240" background-color="#000000"/>
            <region id="whole"     left="0"   top="0"  width="320" height="240" z-index="0"/>
            <region id="leftpane"  left="16"  top="16" width="136" height="208" z-index="1"/>
            <region id="rightpane" left="168" top="16" width="136" height="208" z-index="1"/>
        </layout>
        <transition id="diagwipe" type="wipe" subtype="diagonalRightDown" dur="1s"/>
    </head>
    <body>
        <seq>
            <par>
                <img src="back1.jpg"  dur="10s" region="whole"/>
                <img src="left1.jpg"  dur="10s" region="leftpane"/>
                <img src="right1.jpg" dur="10s" region="rightpane"/>
            </par>
            <par>
                <img src="back2.jpg"  dur="10s" region="whole"/>
                <img src="left2.jpg"  dur="10s" region="leftpane"  transition="diagwipe"/>
                <img src="right2.jpg" dur="10s" region="rightpane" transition="diagwipe"/>
            </par>
        </seq>
    </body>
</smil>
and the SMIL for Case 4 would look like:
<smil>
    <head>
        <layout>
            <root-layout width="320" height="240" background-color="#000000"/>
            <region id="whole"     left="0"   top="0"  width="320" height="240" z-index="0"/>
            <region id="leftpane"  left="16"  top="16" width="136" height="208" z-index="1"/>
            <region id="rightpane" left="168" top="16" width="136" height="208" z-index="1"/>
        </layout>
        <transition id="diagwipe" type="wipe" subtype="diagonalRightDown" dur="1s"/>
    </head>
    <body>
        <seq>
            <par>
                <img src="back1.jpg"  dur="10s" region="whole"/>
                <img src="left1.jpg"  dur="10s" region="leftpane"/>
                <img src="right1.jpg" dur="10s" region="rightpane"/>
            </par>
            <par>
                <img src="back2.jpg"  dur="10s" region="whole" transition="diagwipe"/>
                <img src="left2.jpg"  dur="10s" region="leftpane"/>
                <img src="right2.jpg" dur="10s" region="rightpane"/>
            </par>
        </seq>
    </body>
</smil>
In Cases 2 and 3, however, we want to apply the transition to the "whole" region and either have the "leftpane" and "rightpane" regions clip (Case 3) or not clip (Case 2) the transition. In order to express Cases 2 and 3, there are three additional syntactical concepts which need to be added to SMIL:
    <region id="parent" ... >
        <region id="child1" ... />
        <region id="child2" ... />
        ...
    </region>
The reason for introducing parent regions and a lightweight media object element is to maintain consistency with single-media-element transitions. In single-media-element transitions, we associate a transition with a media object element which in turn is associated with a playback region. This, by inference, makes a one-to-one mapping between transition and playback region. Therefore, in order to have transitions which incorporate multiple media objects (and thus multiple regions), we associate a transition with a lightweight media object which is then associated with a parent region.
A secondary purpose of the parent region is to define the bounding rectangle for transitions which will involve multiple media objects. An alternative would be to assume that the bounding rectangle is defined by the convex hull (the minimum bounding rectangle) of the set of all the regions involved. However, formally defining a parent region is simpler and more flexible.
<brush> element
The <brush> element is a lightweight media object element,
meaning that the media object is completely procedural. Since this media
object is procedural, then all the information about the media object is
specified in the attributes of the element itself. Therefore does not have
to specify a "src" attribute.
Element attributes
<brush> element does not require support for "system colors".
The <brush> element also supports all timing and
synchronization attributes which all other media objects support (see the
SMIL Timing and Synchronization Module
and the SMIL Media Object
Module for a list of these attributes).
Element content
The <brush> element is an empty element.
Now, armed with these new syntactical constructs, we can express Cases 2 and 3 in SMIL. First, Case 2:
<smil>
    <head>
        <layout>
            <root-layout width="320" height="240" background-color="#000000"/>
            <region id="whole" left="0" top="0" width="320" height="240" z-index="0">
                <region id="leftpane"  left="16"  top="16" width="136" height="208" z-index="1"/>
                <region id="rightpane" left="168" top="16" width="136" height="208" z-index="1"/>
            </region>
        </layout>
        <transition id="diagwipe" type="wipe" subtype="diagonalRightDown" dur="1s"/>
    </head>
    <body>
        <seq>
            <par>
                <img src="back1.jpg"  dur="10s" region="whole"/>
                <img src="left1.jpg"  dur="10s" region="leftpane"/>
                <img src="right1.jpg" dur="10s" region="rightpane"/>
            </par>
            <par>
                <brush                 dur="10s" region="whole" transition="diagwipe"/>
                <img  src="back2.jpg"  dur="10s" region="whole"/>
                <img  src="left2.jpg"  dur="10s" region="leftpane"/>
                <img  src="right2.jpg" dur="10s" region="rightpane"/>
            </par>
        </seq>
    </body>
</smil>
Note the following changes from other cases. First, we have made the "leftpane" and "rightpane" regions to be children of the "whole" region. Second, we have placed the <brush> element on the timeline and associated the transition with it. Now, Case 3 is a trivial change from Case 2:
<smil>
    <head>
        <layout>
            <root-layout width="320" height="240" background-color="#000000"/>
            <region id="whole" left="0" top="0" width="320" height="240" z-index="0" childrenClip="true">
            <region id="leftpane"  left="16"  top="16" width="136" height="208" z-index="1"/>
            <region id="rightpane" left="168" top="16" width="136" height="208" z-index="1"/>
            </region>
        </layout>
        <transition id="diagwipe" type="wipe" subtype="diagonalRightDown" dur="1s"/>
    </head>
    <body>
        <seq>
            <par>
                <img src="back1.jpg"  dur="10s" region="whole"/>
                <img src="left1.jpg"  dur="10s" region="leftpane"/>
                <img src="right1.jpg" dur="10s" region="rightpane"/>
            </par>
            <par>
                <brush                 dur="10s" region="whole" transition="diagwipe"/>
                <img  src="back2.jpg"  dur="10s" region="whole"/>
                <img  src="left2.jpg"  dur="10s" region="leftpane"/>
                <img  src="right2.jpg" dur="10s" region="rightpane"/>
            </par>
        </seq>
    </body>
</smil>
where all we have done is added childrenClip="true" to the declaration of the parent "whole" region.