At the beginning, editing a web site was easy, a couple of pages, then some more pages, handled by a small number of people. But now, with more and more people working on the same sets of pages, the need of coherent collaborative edition becomes crucial.
The first step was to use CVS to store version information on all the files stored in the website. It helped people to work on the same set of files but... All the users needed to know the underlying tool, CVS. The goal of JigEdit was to hide as much as possible CVS for the users so that it can be use by a larger number of people. The current version is based on the 2.0 version of Jigsaw and require some work to setup, and less work to administrate. It uses pre-"templates" to create accounts.
There are many ways to setup Jigsaw, the "basic" mode is to index all the resources needed. It is ok for very small configuration, but not for larger server. The other way is to use indexers that are in charge of creating all the resources with the right setup. The setup of JigEdit require a quite complex way of setting the indexers, it is what we will present now:
There are three indexers:
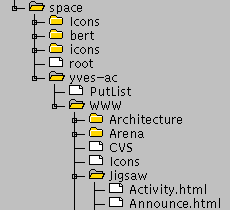
The format of a directory is:

The first indexer is attached to the account name, in the previous image:
yves-ac (means yves's account, autocommited version). This indexers create the
PutList and WWW, it also attached a GrepPutFilter to WWW.
The second indexer is attached to the WWW directory, and is attached
automatically to this resource by the first indexer. The Icons resource is
created, it is just a simple empty FramedResource with a
RelocateFrame to the main /Icons directory. The purpose of that
is to reduce the number of used resource inside the server.
The first step of the installation is to create the /Icons directory:
org.w3c.jigsaw.resources.PassDirectory with "Icons" as the
identifier.
org.w3c.jigsaw.frames.HTTPFrame
/afs/w3.org/pub/WWW/Icons. Rember that each change should be
commited to be taken into account by the server!
The second step is to create the three indexers. Note that some things won't be created automatically and will need some little editing after the creation of a JigEdit account... Note that you can do two version of the indexers, one for a simple account with PUT capabilities and with the separate CVS interface, and another one with the autocommit feature (automatic cvs commit on PUT) and the possibility of autolookup (automatic cvs update on a GET to be sure to work on the latest version). Of course, all the problem that may arise using the second method can be solved easily using the CVS form.
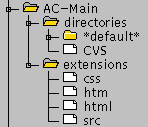
This indexer will create all the resources needed for usual work, putable resource or CVS resources. The main indexer should looks like this:

Of course the possible putable extension can be modified, you can also add gif, png, jpg, txt.... Two kinds of indexers will be presented now, the "normal" Main indexer and the autocommit/autolookup version. The steps 6, 8 and 9 may change, see the second list below.
org.w3c.jigsaw.indexer.ContentTypeIndexer)
org.w3c.tools.resources.FramedResource. This is an empty
resource, as all the work will be done by the ProtocolFrame.
org.w3c.jigedit.cvs.CvsFrame. Now edit the attributes of this
frame, set the icon to movie.gif and enable "convert-get" if not set.
org.jigsaw.resources.DirectoryResource
org.w3c.jigsaw.frames.HTTPFrame,
edit the attributes of this protocol frame to set the putable flag to "true"
(and modify the icon to "dir.gif").
Now, the modification in this process for the AC indexer. First, the name should be AC-Main rather than CVS-Main, to avoid problems if the two kind of indexers have to coexist.
org.w3c.jigedit.resources.AutoLookupDirectory instead of
org.w3c.jigsaw.resources.DirectoryResource, Why not having a
specific frame? Simply because the cvs stuff is done in the lookup stage, and
is not protocol-dependent. To allow the autoupdate (slower) set the autoupdate
attribute to "true".
org.w3c.jigsaw.resources.FileResource, but the frame is no longer
an HTTPFrame, but an org.w3c.jigedit.frames.CvsFileFrame, why a
frame and not another resource? Because the CVS action are done doing the PUT,
so it is linked to the protocol.
This indexer has to create the "Icons" directory and create all other resources like the main indexer and set the indexer on those resources to "CVS-Main" (resp. AC-Main).

Of course two version can be done, a "normal" one, and the autocommit/autolookup version.
org.w3c.tools.resources.indexer.SampleResourceIndexer)
org.w3c.tools.resources.FramedResource and
add an org.w3c.jigsaw.frames.RelocateFrame to it. Edit the
attributes of this frame:
For the autocommit/autolookup version, nothing changes as the important stuff is handled by the main indexer.
This indexer is in charge of setting the Putlist and some filters. It is a very simple one, but some work has to be done on resources created with this indexer, as it is not a real template (altough a small PERL script can be made to do an automatic modification after the creation of the main resources).

The two version of the indexer will be the same, expect, of course, the name, the super-indexers used, like above and the class of the edit root directory (WWW).
org.w3c.tools.resources.indexer.SampleResourceIndexer). There
are no changes in the attributes as we do not want to index resources using
CVS now (we are not in the WWW directory yet).
org.w3c.jigedit.filters.PutListResource. Note that the associated
frame (PutListFrame) is automatically added. This behaviour is normal as this
resource will work more or less only with HTTP. If ever some other protocols
are allowed to upload resources, it may change and you will have then to add
this frame by hand (org.w3c.jigedit.filters.PutListFrame).
/<server-dir>/config/putlist/account.db" (at
INRIA:
"/u/tarantula/0/w3c/ylafon/Servers/JigEdit/config/putlist/account.db").
You will have to change "account" to the account name, "yves-ac"
for example.
/home/jigedit/account/"
/afs/w3.org/pub" and you will not have to change it!
org.w3c.jigsaw.resources.DirectoryResource. Add the
org.w3c.jigsaw.frames.HTTPframe to it. Edit the attributes to set
a fancy title, a fancy icon and to set the putable flag to "true". Change its
indexer to Icon(CVS-Icon or AC-Icon)
org.w3c.jigedit.filters.GrepPutFilter). Change the attributes:
Everything is ok, now you only have to add new users, set one filter and modify some attributes and everything will be up and running!
This is very simple now, Add a directory or a PassDirectory (depending if
you want all the files on the same filesystem or not), set the indexer to be
CVS-Account (or AC-Account if you want autocommit/lookup feature enabled),
then add an HTTPFrame and add to this frame an authFilter
(org.w3c.jigsaw.auth.GenericAuthFilter). The name of the user
accessing this space will be used during the publish to set the author name,
like at the end of this page ('yves'). Now go to the PutList using a browser,
to force the indexation of this resource, then go back to the configuration
tool to modify all the attributes that needs modification as mentionned
above.
You can also setup cool things to enhance JigEdit. One thing is the ToolsLister. This resource is a normal directory lister plus some tools, like deletion of a local file and its associated resource (it is important that you avoid deleting files directly!). To do so,
Open the main indexer, go to directories and add a "lister" resource of
class org.w3c.jigedit.tools.ToolsLister. This resource will
create its own frame directly. Open the lister frame, the resource in the
little frame browser, and edit the frame attributes, set the icon to
"burst.gif" and the title to "Don't delete this resource and the CVS
directory!" to avoid fatal mistakes by the users :) You can also setup the
"style-sheet-link" attribute to the URL of a style sheet for the lister
layout. One style I like:
BODY {
  color: black;
  background: white;
  font-family: serif;
}
H1 {
  color: white;
  background: teal;
  font-weight: bold;
  font-size: large;
  font-family: helvetica, sans-serif;
  margin-top: 3%
  padding: 1%;
  border: none;
  width: 100%;
}
A {
  text-decoration: none;
  color: teal;
  font-weight: bold;
}
Now go to the "*default" directory, edit the attributes of the Protocol Frame, and set the index to "lister". The resource served when "/foo/" is requested will be "/foo/lister". Save everything...
You are all set now, happy editing!